


Chapter 10: Get a Grip on Object Selection 209
a grip in this way as a visible object snap offers the same advantage as using Object Snap overrides, as described in Chapter 7: It ensures precision by making sure that objects meet exactly.
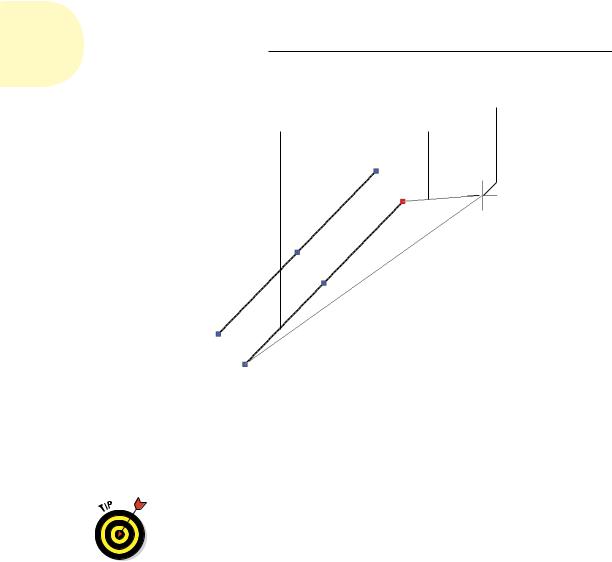
Red hot grip
Figure 10-9: Using grips to connect two objects.
You can experiment with all the grip editing options to find out how they affect a selected object. Because MOVE and STRETCH are the most useful grip editing modes, we cover them in more detail.
Move it!
Back in the days of manual drafting, moving objects was a big pain in the eraser. You had to erase the stuff you wanted to move and redraw the objects in their new location. In the process, you usually ended up erasing parts of other stuff that you didn’t want to move and left smudged lines and piles of eraser dust everywhere. CAD does away with all the fuss and muss of moving objects, and AutoCAD grip editing is a great way to make it happen. The following steps describe how to move objects:
www.it-ebooks.info

210 Part II: Let There Be Lines
1.Select one or more objects.
Use any combination of the three object selection modes — single object, window selection, and crossing selection — described in the “Grab It” section, earlier in this chapter.
2.Click one of the grips to make it hot.
At this point in your editing career, it doesn’t matter which grip you click. As you become more familiar with grip editing, you’ll discover that certain grips serve as better reference points than others for particular editing operations.
3.Right-click anywhere in the drawing area and choose Move from the crosshairs menu.
4.Move the crosshairs to a different location and click.
As you move the crosshairs around, AutoCAD displays the tentative new positions for all the objects, just as it does for the regular MOVE command, as shown previously in Figure 10-9. After you click, the objects assume their new positions.
5.Press Esc to deselect all objects and remove all grips.
Copy, or a kinder, gentler Move
If you were paying attention during the section “A gripping example,” earlier in the chapter, you may have noticed while pressing the spacebar that copy was not among the five grip editing modes. Why not? Because every grip mode includes a copy option (as the command-line prompts show in the “A gripping example” section). In other words, you can STRETCH with copy, MOVE with copy, ROTATE with copy, SCALE with copy, and MIRROR with copy.
The copy option leaves the selected objects in place and does the editing operation on a new copy of the objects.
By far the most common use for the copy option is with the MOVE grip editing mode. If you think about “MOVE with copy” for about two seconds, you’ll realize that it’s just a complicated way of saying “copy.” The following steps show how to copy objects quickly by using grip editing:
1.Select one or more objects.
2.Click any one of the grips to make it hot.
3.Right-click anywhere in the drawing area and choose Move from the menu.
4.Right-click again and choose Copy from the menu.
www.it-ebooks.info
Chapter 10: Get a Grip on Object Selection 211
5.Move the crosshairs to a different location and click.
After you click, new objects appear in the new location.
6.Move the crosshairs to additional locations and click there if you want to make additional copies.
7.Press Esc twice — once to end the copying operation and once to deselect all objects and remove all grips.
A warm-up stretch
The STRETCH grip editing mode works differently from the other modes. By default, it affects only the object with the hot grip on it, not all objects with grips on them. You can override this default behavior by using the Shift key to pick multiple grips and make them hot. Follow these steps to get
acquainted with using the STRETCH grip editing mode to stretch one or more objects:
1.Make sure that Ortho mode is toggled off on the status bar by clicking the Ortho Mode button until <Ortho off> appears on the command line.
Ortho mode forces stretch displacements to be orthogonal — that is, parallel to lines running at 0 and 90 degrees. During real editing tasks, you’ll often want to turn on Ortho mode, but while you get acquainted with stretching, leaving Ortho mode off makes things clearer.
2.Select several objects, including at least one line.
3.On one of the lines, click one of the endpoint grips to make it hot.
All the objects remain selected, but as you move the crosshairs, only the line with the hot grip changes. Figure 10-10 shows an example.
4.Click a new point for the hot endpoint grip.
The line stretches to accommodate the new endpoint location.
5.On the same line, click the midpoint grip to make it hot.
As you move the crosshairs, the entire line moves. Using the STRETCH grip editing mode with a line’s midpoint “stretches” the entire line to a new location.
6.Click a new point for the hot midpoint grip.
The line moves to the new midpoint location.
7.Hold down the Shift key. On one of the lines, click one of the endpoint grips to make it hot.
www.it-ebooks.info
212 Part II: Let There Be Lines
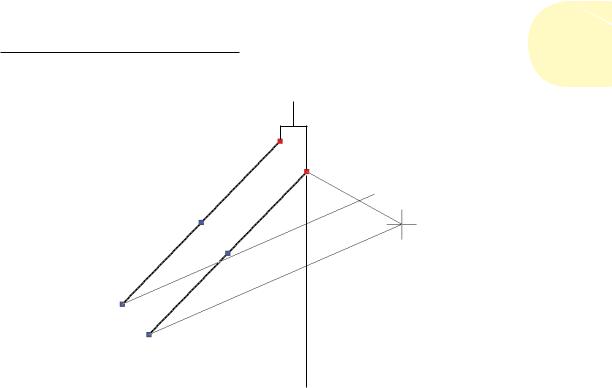
|
Drag endpoint to new location. |
Original location |
Displacement vector |
Figure 10-10: Dragging a line’s endpoint in the middle of the STRETCH grip editing operation.
8.Still holding down the Shift key, click one of the endpoint grips on a different line to make it hot.
Two grips on two different lines are now hot because you held down the Shift key and then clicked both grips.
You can create more hot grips by holding down the Shift key and clicking more grips.
9.Release the Shift key and re-pick any one of the hot grips.
Releasing the Shift key signals that you’re finished making grips hot. Re-picking one of the hot grips establishes it as the base point for the stretch operation.
10.Click a new point for the grip.
All the objects with hot grips stretch, based on the displacement of the grip that you clicked in Step 9 (see Figure 10-11).
www.it-ebooks.info
Chapter 10: Get a Grip on Object Selection 213
Multiple hot grips
Hot grip used as a base point
Figure 10-11: Stretching multiple objects with multiple hot grips.
11.Turn on Ortho mode by clicking its status bar button until <Ortho on> appears on the command line. Repeat Steps 2 through 10 to see the effect of Ortho mode on stretching.
www.it-ebooks.info

214 Part II: Let There Be Lines
www.it-ebooks.info