


126 Part II: Let There Be Lines
Following are the three keys to good CAD drawing practice:
Properties: Pay attention to and manage the properties of every drawing object that you create — especially the layer that each drawing object is on. We explain layers and other object properties in the next section.
Named objects: Pay attention to and use the named objects in every drawing — the layers, text styles, block definitions, and other nongraphical objects that serve to define the look of all the graphical objects in the drawing. We enlighten you in the “Using Named Objects” section, later in this chapter.
Precision: Pay attention to and control the precision of every point and distance that you use to draw and edit each object. We fill you in on AutoCAD’s precision drawing techniques in Chapter 7.
These can seem like daunting tasks at first, but the following sections help you cut them down to size.
Managing Your Properties
All the objects that you draw in AutoCAD are like good Monopoly players: They own properties. In AutoCAD, these properties aren’t physical things; they’re the object’s characteristics, such as layer, color, linetype, lineweight, transparency, and plot style. You use properties to communicate information about the characteristics of the objects you draw, such as the kinds of realworld objects they represent, their materials, their relative location in space, or their relative importance. In AutoCAD, you also use properties to organize objects for editing and plotting purposes.
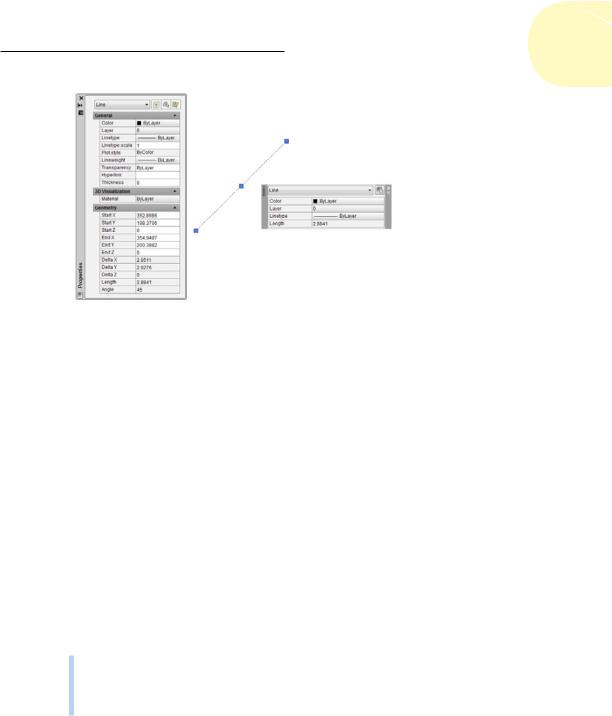
You can view — and change — all properties of an object in the Properties palette, and many of them in the Quick Properties palette. In Figure 6-1, the Properties palette at the left and the Quick Properties palette at the right show properties for the selected line object.
The Properties palette was joined in AutoCAD 2009 by its more streamlined little sibling, Quick Properties. When Quick Properties is turned on in the status bar, selecting an object opens a floating palette that displays a customizable selection of that object’s properties. (If your status bar buttons show text rather than icons, look for the QP button.)
Handy as it is, the Quick Properties palette has a knack of popping up on top of drawing objects that you need to see. In AutoCAD, you can keep Quick Properties mode turned off at the status bar, and instead use
the QUICKPROPERTIES command. Type its alias QP and then select an object to display the Quick Properties panel. You can also double-click most objects to display their quick properties.
www.it-ebooks.info
Chapter 6: Manage Your Properties 127
Figure 6-1: Comprehensive or quick? Sometimes you need lots of information, and sometimes you don’t.
To toggle the full Properties palette on and off, click the Properties button on the View tab of the Ribbon or use the Ctrl+1 key combination. Before you select an object, the Properties palette displays the current properties — properties that AutoCAD applies to new objects when you draw them. After you select an object, the Properties palette displays the properties for that object. If you select more than one object, the Properties palette displays the properties that they have in common.
Layer one on me!
Every object has a layer as one of its properties. You may be familiar with layers — independent drawing spaces that stack on top of each other to create an overall image — from using drawing programs. AutoCAD, like most CAD programs, uses layers as the primary organizing principle for all the objects that you draw. You use layers to organize objects into logical groups of things that belong together; for example, walls, furniture, and text notes usually belong on three separate layers, for a couple of reasons:
Layers give you a way to turn groups of objects on and off — both on the screen and on the plot.
Layers provide the most efficient way of controlling object color, linetype, lineweight, transparency, and plot style.
www.it-ebooks.info
128 Part II: Let There Be Lines
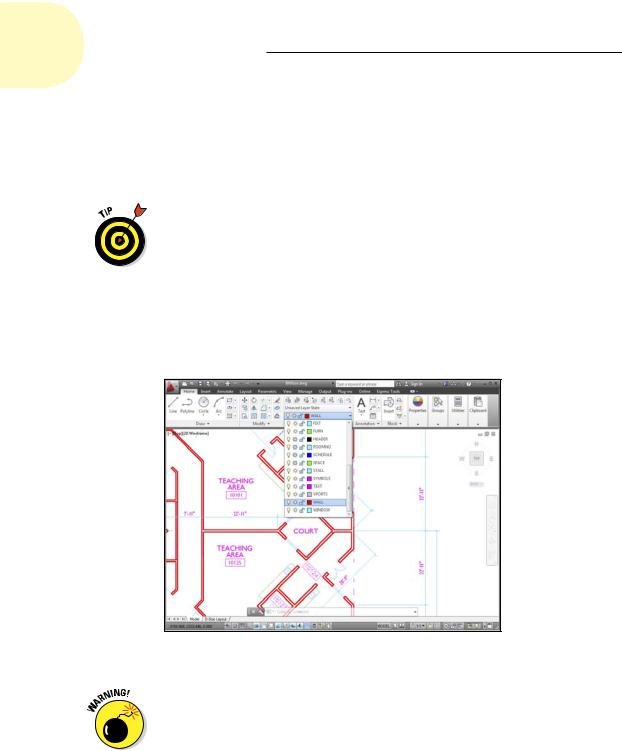
So, to work in AutoCAD efficiently, you create as many layers as the drawing needs, and then assign them names and properties, such as colors and linetypes. Then you draw objects on specific layers. When you draw an object, AutoCAD automatically puts it on the current layer — the layer that you see in the Layer drop-down list on the Home tab’s Layers panel when no objects are selected. If a layer already exists in your drawing, you can make it the current layer by choosing it in the Layer drop-down list, as shown in Figure 6-2.
It’s not absolutely necessary to create all your layers before you draw anything, but it will save you some time if you start as many layers as you think you need, and then only add more layers as needed. You can save even more time by creating all the layers you need in a new drawing and then saving it as a template file (covered in Chapter 4). Now each drawing you start from that template has all the layers you need. If you are unsure of which layers your drawing might need, no worries: Some experienced AutoCAD users draw things first, and then create appropriate layers and change the objects to them. You can easily change an object’s layer by selecting the object and then choosing the desired layer name from the Layer drop-down list.
Figure 6-2: Setting an existing layer as the current layer.
Make sure that no objects are selected before you use the Layer drop-down list to change the name of the current layer. (Press the Esc key twice to be sure.) If objects are selected, selecting another name from the Layer dropdown list changes those objects’ layers. When no objects are selected, the Layer drop-down list displays (and lets you change) only the current layer.
www.it-ebooks.info

|
|
Chapter 6: Manage Your Properties 129 |
|
|
|
||
|
|
||
|
|
||
Stacking up your layers |
|
||
How do you decide what to call your layers and |
can’t find any definitive answer, create a chart |
|
|
which objects to put on them? Some industries |
of layers for yourself. Each row in the chart |
|
|
have developed layer guidelines, and many |
should list the layer name, default color, default |
|
|
offices have created documented layer stan- |
linetype, default lineweight, default transpar- |
|
|
dards. Some projects even impose specific |
ency, and what kinds of objects belong on that |
|
|
layer requirements. (But be careful; if someone |
layer. If you use named plot styles to control |
|
|
says, “You need a brick layer for this project,” |
your plotted output, add a default plot style to |
|
|
that can mean a couple of different things.) |
the list — that’s not necessary for traditional |
|
|
Ask experienced CAD drafters in your office or |
color-based plotting. |
|
|
industry how they use layers in AutoCAD. If you |
|
|
|
|
|
|
|
|
|
|
|
Accumulating properties
Besides layers, the remaining object properties that you’re likely to want to use often are color, linetype, lineweight, transparency, and possibly plot style. Table 6-1 summarizes these five properties.
Table 6-1 |
Useful Object Properties |
Property |
What It Controls |
Color |
Displayed colors and plotted colors or line widths |
|
|
Linetype |
Displayed and plotted dash-dot line patterns |
|
|
Lineweight |
Displayed and plotted line widths |
|
|
Transparency |
Displayed and plotted opacity of objects |
|
|
Plot style |
Plotted characteristics (See Chapter 16.) |
|
|
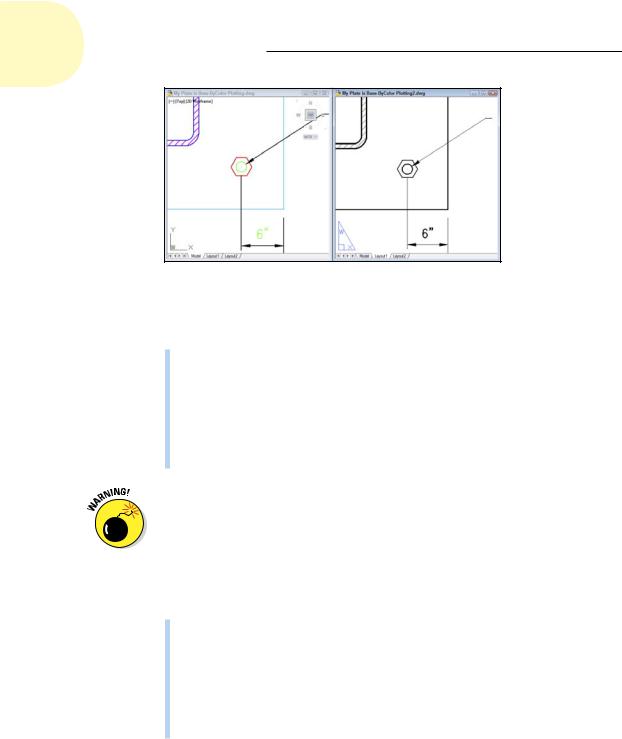
Long before AutoCAD could display lineweights on the screen and print those same lineweights on paper, object colors controlled the printed lineweight of objects. AutoCAD 2000 introduced a more logical system, where you could assign an actual plotted thickness to objects. As logical as that method seems, the older method, in which the color of objects determines their plotted lineweight, continues to dominate. You may find yourself working this way even in AutoCAD 2013, for compatibility with drawings (and co-workers) that use the old way. Figure 6-3 shows you the idea. The model space view at the left shows objects in different colors, but with the same default lineweight. The paper space view at the right (what your plotted drawing will actually look like) shows that, although the lines are all black, their thicknesses vary, determined by the model space colors. For example, blue is very thick, and black is very thin.
www.it-ebooks.info
130 Part II: Let There Be Lines
Figure 6-3: Change my line thickness but color me black.
AutoCAD gives you two different ways of controlling object properties:
By layer: Each layer has a default color, linetype, lineweight, transparency, and plot style property. Unless you tell AutoCAD otherwise, objects inherit the properties of the layers on which they’re created. When objects are selected in a drawing created by using this system, the object properties are listed as ByLayer.
By object: AutoCAD also enables you to override an object’s layer’s property setting and give the object a specific color, linetype, lineweight, transparency, or plot style that differs from the layer’s.
If you’ve worked with other graphics programs, you may be used to assigning properties, such as color, to specific objects. If so, you may be tempted to do the same in AutoCAD. Resist the temptation. Did you catch that? One more
time: Resist the temptation.
In almost all cases, it’s better to create layers, assign properties to each layer, and let the objects on each layer inherit that layer’s properties. Here are some benefits to using the ByLayer approach:
You can easily change the properties of a group of related objects that you put on one layer. You simply change the properties for the layer, not for a bunch of separate objects.
Here’s a worst-case scenario: You receive an architectural drawing from someone else. You now want to plot it without any dimensions showing, so you freeze the dimension layer. Oh, poop! (Or words to that effect.)
Only half the dimensions disappear, but so do some of the center lines, a couple of walls, the toilet, . . .
www.it-ebooks.info
Chapter 6: Manage Your Properties 131
Experienced drafters use the ByLayer approach, so if you work with drawings from other people, you’ll be much more compatible with them if you do it the same way. You’ll also avoid getting yelled at by irate CAD managers, whose job duties include haranguing any hapless newbie who assigns properties to individual objects.
If you take my advice and assign properties ByLayer, all you have to do is set layer properties in the Layer Properties Manager palette (we tell you how in this section), as shown in Figure 6-4. Before you draw any objects, make sure that the Color Control, Linetype Control, and Lineweight Control drop-down lists, and the Transparency button on the Ribbon’s Home tab’s Properties panel are all set to ByLayer, as shown in Figure 6-5. (Remember that the configuration of panels and drop-down lists may vary according to the resolution of your display.) If the drawing is set to use color-based plot styles instead of named plot styles (see Chapter 16), the Plot Style Control drop-down list will be inactive and will display ByColor.
Figure 6-4: Use layer properties to control object properties.
If the drawing is set to use named plot styles instead of color-based plot styles (see Chapter 16), the Plot Style control drop-down list should also display ByLayer.
If you want to avoid doing things the wrong way and getting yelled at by CAD managers, don’t assign properties to objects in either of these ways:
Don’t make the very common beginner’s mistake of choosing a specific color, linetype, lineweight, transparency, or plot style from the appropriate drop-down list on the Properties panel of the Ribbon’s Home tab, or from the Properties palette, and then drawing the objects.
Don’t make the also-very-common beginner’s mistake of drawing the objects, selecting them, and then choosing a property from the same drop-down lists.
www.it-ebooks.info