

196 Part II: Let There Be Lines
Allow Ctrl+Cycling Behavior
Show Single Grip on Groups
Show Bounding Box on Groups
For information on what these options do, hover the mouse pointer over an option to display a tooltip with information from the online help.
Grab It
Part of AutoCAD’s editing flexibility comes from its object-selection flexibility. For example, command-first editing offers 16 selection modes! (We describe the most useful ones in this chapter.) Don’t worry, though; you can get by most of the time with three selection modes, each of which we describe in this section:
Selecting a single object by picking it
Selecting multiple objects by enclosing them in a window selection box or polygon
Selecting multiple objects by enclosing them in a crossing selection box or polygon
One-by-one selection
The most obvious way to select objects is to pick (by clicking) them one at a time. One or more objects that are selected and ready for editing are called a selection set. You can build a selection set cumulatively with this pick-one- object-at-a-time selection mode, but this cumulative convention may be different from what you’re used to. In most Windows programs, if you select one object and then another, the first object is deselected, and the second one selected; only the object you select last remains selected. In AutoCAD, all the objects you select, one at a time, remain selected and are added to the selection set, no matter how many objects you pick. (You can change this behavior to make AutoCAD work like other Windows programs by turning on the Use Shift to Add to Selection option on the Option dialog box’s Selection tab, but we suggest that you don’t change it.) Most editing commands affect the entire group of selected objects.
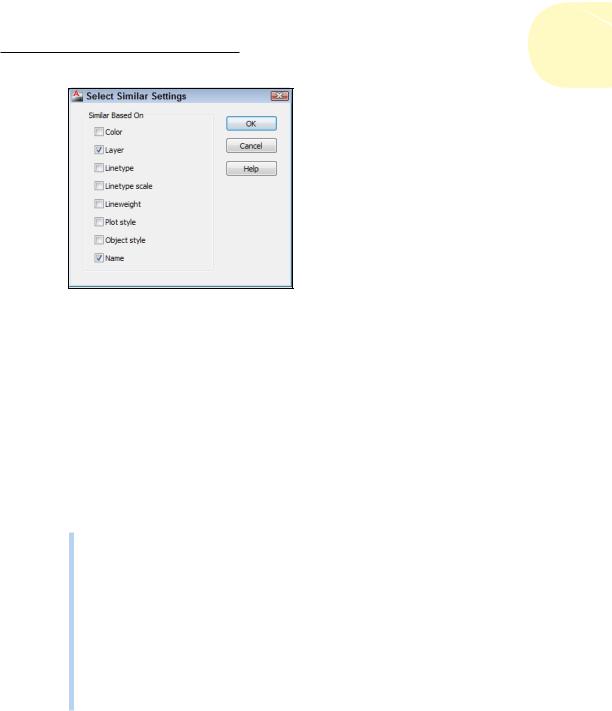
Use the SELECTSIMILAR command to automatically select similar objects based on their properties. Select an object, right-click, and choose Select Similar from the shortcut menu, and AutoCAD selects all similar objects. You can filter the properties used for selection by typing SELECTSIMILAR at the command prompt, and then entering SE to display the Select Similar Settings dialog box (see Figure 10-2).
www.it-ebooks.info
Chapter 10: Get a Grip on Object Selection 197
Figure 10-2: Choose your similarity-selection settings here.
Selection boxes left and right
Selecting objects one at a time works great when you want to edit a small number of objects, but many CAD editing tasks involve editing lots of objects. Do you really want to pick 132 lines, arcs, and circles, one at a time?
Like most Windows graphics programs, AutoCAD provides a selection window feature for grabbing a bunch of objects in a rectangular area. As you may guess by now, the AutoCAD version of this feature is a bit more powerful than the similar feature in other Windows graphics programs. AutoCAD calls its version implied windowing. Here’s how you use it.
Window object selection: If you click a blank area of the drawing — that is, not on an object — you’re implying to AutoCAD that you want to specify a selection by dragging a window around the objects. If you move the crosshairs to the right before picking the next corner of the
selection area, you’re further implying that you want to select all objects that reside completely within the selection area.
Crossing object selection: If you click a blank area of the drawing — that is, not on an object — you’re implying to AutoCAD that you want to specify a selection by dragging a window around and through the objects. If you move the crosshairs to the left before picking the next corner of the selection area, you’re implying that you want to select all objects that reside completely within or touch or cross the selection area boundary.
Fortunately, AutoCAD gives you visual cues that there’s a difference. As you move to the right, the window area appears as a rectangular or polygonal area with a blue fill and a solid border. As you move to the left, the crossing area appears as a rectangle or polygon with green fill and a dashed border.
www.it-ebooks.info
198 Part II: Let There Be Lines
If your editing method of preference is selection-first, AutoCAD gives you the option of dragging a polygonal window or crossing area, or simply dragging a series of lines through the objects you want to select. You simply click a point and drag to the left or right to get rectangular selection boxes as described above, or you can choose the WPolygon, CPolygon, or Fence options by typing the appropriate letter at the command line.
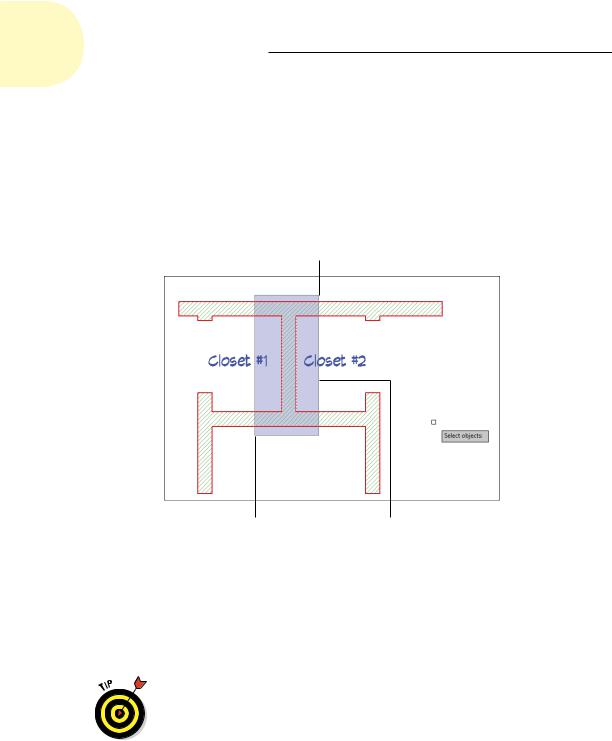
Figures 10-3 and 10-4 show a window box and a crossing box, respectively, in action.
Pick point 2
Pick point 1 |
Selection box |
Figure 10-3: A window selection box, drawn left to right, selects only the two objects that are completely within the box.
You can mix and match, selecting individual objects, specifying a window box, and specifying a crossing box. Each selection adds to the current selection set, allowing you to build an enormously complicated selection of objects and then operate on them with one or more editing commands.
You can press the Shift key in combination with any of the three standard selection modes — single object, window area, and crossing area — to remove already-selected objects from the selection set. This feature is especially useful when you’re building a selection set in a crowded drawing; you can select a big batch of objects by using Window or Crossing, and then hold
www.it-ebooks.info