


140 Part II: Let There Be Lines
criteria that you define (for example, all layers whose names contain Wall or whose color is green). To find out more, move your mouse pointer into the Layer Properties Manager palette, press F1, and click the New Property Filter hyperlink.
In both AutoCAD and AutoCAD LT, you can access a set of layer tools through the Layers panel of the Ribbon’s Home tab — see Figure 6-10. (You may have to open the panel slideout to see them all.) Layer Isolate and Layer Off are especially useful — you simply click an object to specify the layer to isolate (that is, fade all layers except the chosen one) or turn off altogether. For more information on layers, open the online help system and choose User’s Guide Create and Modify Objects Control the Properties of Objects Work with Layers Use Layers to Manage Complexity.
Figure 6-10: Tooling through the layer tools.
The LAYISO command incorporates the same layer-fading feature described in the preceding tip for locked layers — and it locks the layers as well. Set it up the way you want by typing S (for Settings) and pressing Enter; then type the option letter for the specific settings you want. Look up LAYISO in the online help Index for more information.
Instead of turning off a layer when there are only a few things in the way, you can hide or isolate individual objects with the ISOLATEOBJECTS and HIDEOBJECTS commands while keeping normal visibility for other objects on the layer. We discuss these commands in Chapter 10.
Using Named Objects
One of the things that can make AutoCAD a tough nut to crack is the somewhat cavalier naming conventions used in the program’s documentation. For years, things like lines, arcs, and other graphical items were called entities, but then more recently, they started being called objects. Fair enough, but object has also long been used to define certain nongraphical components of a drawing — things that you’d hardly consider to be objects at all — and those are the kind of “named objects” we describe in what follows.
www.it-ebooks.info
Chapter 6: Manage Your Properties 141
Hidden in the innards of every AutoCAD drawing file is a set of named objects, which are organized into symbol tables, and the properties that are common to all AutoCAD objects are defined in these tables. For example, all the line objects in a drawing are stored on one or more layers, so a layer property is common to all lines and is defined in the layer table. But the coordinates that define the start and end points of a given line are unique to that line (or they should be!) — so the coordinate properties are not common to all lines.
A layer is one example of a named object. The layer table in a given drawing contains a list of the layers in the current drawing, along with the settings for each layer (including color, linetype, on/off setting, and so on).
Named objects don’t appear as graphical objects in your drawing. They’re like the hardworking pit crew that keeps the race cars running smoothly behind the scenes. The named objects you’re likely to use the most include the following:
Layers (covered in the section “Layer one on me!,” earlier in this chapter)
Linetypes (covered in the section “Accumulating properties,” earlier in this chapter)
Text styles (See Chapter 13.)
Table styles (See Chapter 13.)
Multileader styles (See Chapter 13.)
Multiline styles (not covered in this book; see the online help)
Dimension styles (See Chapter 14.)
Block definitions and xrefs (See Chapters 17 and 18.)
Layouts (See Chapter 5.)
When you use commands such as LAYER, LINETYPE, and DIMSTYLE you’re creating and editing named objects. After you’ve created named objects in a drawing, AutoCAD DesignCenter or Content Explorer give you the tools to copy them between drawings.
Donald Trump might think otherwise, but you can have too many properties (at least in AutoCAD). You may have created layers or loaded linetypes, text, or dimension styles that you end up not using. If you think that you may have some of these superfluous named objects in your drawing, the PURGE command helps you get rid of them. Click the Application button to display the Application Menu. Choose Drawing Utilities, and then Purge to open the Purge dialog box. You can click the plus sign (+) beside each category to purge individual items, or you can click Purge All and get rid of tons of stuff at once. Visit the online help for more about purging.
www.it-ebooks.info
142 Part II: Let There Be Lines
Using AutoCAD DesignCenter
DesignCenter is a dumb name for a useful, if somewhat busy, palette. (At least they didn’t call it DesignCenter Manager!) The DesignCenter palette is handy for borrowing data from other drawings. Whereas the Properties palette (described in the section “Managing Your Properties,” earlier in this
chapter) is concerned with properties of graphical objects, the DesignCenter palette deals primarily with named objects: layers, linetypes, block definitions, text styles, and other organizational objects in drawings.
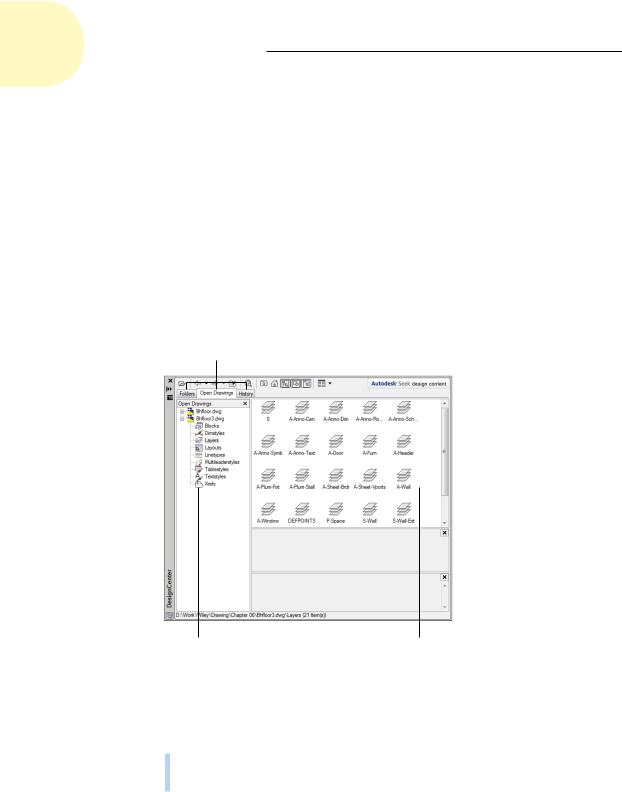
The DesignCenter palette (shown in Figure 6-11) consists of a toolbar at the top, a set of three tabs below that, a tree view pane on the left, and a content pane on the right. The tree view pane displays a Windows Explorer–like navigation panel, showing drawing files and the symbol tables contained in each drawing. The content pane usually displays the contents of the selected drawing or symbol table.
Tabs
Tree view pane Content pane
Figure 6-11: The AutoCAD DesignCenter palette.
The three tabs just below the DesignCenter toolbar control what you see in the tree view and content panes:
Folders: This tab shows the folders on your local and network drives, just like the Windows Explorer Folders pane does. Use this tab if the drawing you want to copy from isn’t currently open in AutoCAD.
www.it-ebooks.info

Chapter 6: Manage Your Properties 143
Open Drawings: This tab (current in Figure 6-11) shows the drawings that are currently open in AutoCAD. Use this tab to copy named objects between open drawings.
History: This tab shows drawings that you’ve recently browsed in DesignCenter. Use this tab to jump quickly to drawings that you’ve used recently on the Folders tab.
The Autodesk Seek Design Content button on DesignCenter’s toolbar links to parts libraries that are available on Autodesk’s website. (Seek is also accessible through the Content Explorer, which we introduce you to in Chapters 1 and 2.) Autodesk Seek is essentially an online catalog of drawings of building products, like doors and bolts. Browse the offerings to see whether any of the online libraries can be useful in your work.
The toolbar buttons further refine what you see in the tree view and content panes. A few of these buttons toggle different parts of the panes.
The following steps outline the procedure for using DesignCenter to copy named objects from one drawing to another. See the next section for a specific example.
1.If it isn’t already open, switch to the Ribbon’s View tab, find the Palettes panel, and click DesignCenter to open the DesignCenter palette.
You can also press Ctrl+2 to open this palette.
2.Select or load the drawing(s) whose content you want to view or use into the navigation pane on the left.
If the source drawing is already open, you can access its content from the Open Drawings tab. If the source drawing isn’t open but is stored on your hard drive or network, click Load on the DesignCenter toolbar and navigate to the file’s location in the Folders tab.
3.In the Open Drawings tab (if the source drawing is currently open) or the Folders tab (if the source drawing isn’t open) of the tree view pane, click the plus sign (+) beside the source file to expand the list of named object categories.
The named object categories appear in a list in the tree view pane on the left and as icons in the content pane on the right.
4.In the tree view pane, select the category of named object you want to copy.
The content pane now displays the individual named objects within the named object category. For example, in Figure 6-11 (shown previously), the Layers category is selected in the tree view pane, and icons for each named layer are shown in the content pane.
www.it-ebooks.info