


Resizing a Workfile—231
Alternately, you may cancel the restructure procedure, edit your date info series so that it contains valid values, and reattempt to apply a structure.
Missing value identifiers
Your identifier series may be numeric or alpha series containing missing values. How EViews handles these missing values depends on whether the series is used as a date ID series, or as an observation or group ID series.
Missing values are not allowed in situations where EViews expects date information. If EViews encounters missing values in a date ID series, it will issue a warning and will prompt you to delete the corresponding observations. If you proceed, EViews will remove the observations from the workfile. If removed, the observations may not be recovered, even if you subsequently change or remove the workfile structure.
If the missing values are observed in an observation or group ID series, EViews will offer you a choice of whether to keep or remove the corresponding observations, or whether to cancel the restructure. If you choose to keep the observations, the missing value, NA, for numeric series, and a blank string for alpha series, will be used as an observation or crosssection ID in the restructured workfile. If you choose to drop the observations, EViews will simply remove them from the workfile. These observations may not be recovered.
Removing a Workfile Structure
You may remove a workfile structure at any time by restructuring to an unstructured or regular frequency dated workfile. Call up the Workfile structure dialog and select
Unstructured/Undated or Dated - regular frequency from the combo box. Fill out the appropriate entries and click OK.
EViews will remove the workfile structure and will unlock any series used as date, group, or observation identifiers.
Resizing a Workfile
Resizing a workfile page is a special case of restructuring. Simply call up the Workfile structure dialog for any workfile page by selecting Proc/“Structure/Resize Current Page...” from a workfile window, or by clicking on the “Range:” description header near the top of the main workfile window. EViews will open the workfile structure dialog with your current settings displayed in the appropriate fields.
Dated - regular frequency / Unstructured
For workfile types where the structure of the data is described explicitly (dated with regular frequency, or unstructured), the Start date and End date, or Observations values will be filled out with actual values.
232—Chapter 9. Advanced Workfiles
To change the sizes of regular frequency workfiles, enter the appropriate Start date and End date information using explicit dates or offsets from “@FIRST” and “@LAST”.
To change the size of an unstructured workfile, change the number of Observations. Note that for unstructured data, you may only add or delete observations from the end of the workfile, you may not change the starting observation; if you wish to modify the starting observation you will need to work with an integer dated workfile.
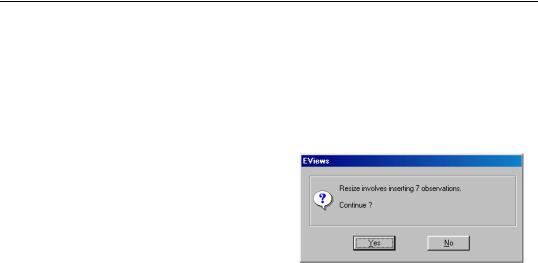
EViews will inform you of the number of observations to be added and/or deleted, and will prompt you to continue.
For example, changing the End date for your annual workfile from “2001” to “2009”, or the number of Observations in your unstructured workfile from “100” to “107”
will both add 7 observations to the end of the respective workfiles. Likewise, changing the Start date of your monthly workfile from “1990:01” to “@FIRST-24” will add 24 months to the beginning of the workfile while changing the End date to “@LAST-3” removes (deletes) the last three observations.
Dated - specified by date series
For a dated workfile that is structured using a date series, the dialog will open with prefilled Start date and End date values containing “@FIRST” and “@LAST” as stand-ins for the earliest and latest observed dates. To change the size of a dated workfile structured by a date series, simply enter the appropriate information using explicit dates or offsets from “@FIRST” and “@LAST”.
Given your start and end date values, EViews will analyze your date identifiers to determine whether you need to add or remove observations. If required, EViews will inform you of the number of observations to be added or deleted, and you will be prompted to continue. If observations are added, the date series will be modified to hold the corresponding date values. As with other forms of restructuring, deleted observations may not be recovered.
An observation will be deleted if the corresponding date ID falls outside the range implied by the start and end dates. If we enter “1970” as the Start date and “2010” as the End date in our annual workfile, any observations whose date series value is earlier than 1970 or later than 2010 will be removed from the workfile. If we enter “@FIRST+2” and “@LAST- 3” as our Start date and End date, EViews will delete the first two and last three observations from the workfile.
EViews will add observations to the workfile if the Start date is earlier than “@FIRST” or the End date is later than “@LAST”. The observations to be added are determined by

Resizing a Workfile—233
examining the regular frequency calendar to find all possible dates which fall in the desired range. If, in our annual workfile that ranges from 1980 to 2000, we specify a Start date of “1975”, EViews will add observations for all of the years from 1975 to 1979, and will modify the date series so that it contains the associated date values. Alternatively, entering “@FIRST-2” and “@LAST+2” adds two observations corresponding to 1978 and 1979, and two observations corresponding to 2001 and 2002.
Note that there is a bit of asymmetry here in the use of offsets to “@FIRST” and “@LAST”. Offsets that remove observations from the workfile simply count from the first or last observation, while offsets that add observations to the workfile use the regular frequency calendar to determine the dates to be added.
Dated Panel
For dated panel workfiles, the prefilled Start date and End date values will contain “@FIRST” and “@LAST” as stand-ins for the cross-section specific earliest and latest observed dates. To resize a dated panel workfile, you may enter an explicit date value in one or both of those fields. If you elect to use offsets, you must take care to understand the inherent complexities involved.
When you enter “@FIRST+2” and “@LAST-2”, EViews trims off 2 observations from the beginning and end of each cross-section. Used in this fashion, “@FIRST” refers to the earliest date for each cross-section, and the offsets are in observation space.
If we combine this trimming with balancing starts or ends, balancing occurs prior to the trimming of observations. Interestingly, this means that the starts or ends will not necessarily be balanced following trimming.
In order to use “@FIRST-2” or “@LAST+2”, EViews must balance starts or ends. The interpretation of the offsets that extend beyond the range of observations differs since they are evaluated in regular date space. If you enter “@FIRST-2” and choose to balance starts, the behavior is: first balance starts, then add two observations to the beginning in date space. Note that this operation is the same as adding two observations in regular date space to the cross-section with the earliest observed date and then balancing starts.
This behavior means that you cannot easily add two observations (in date space) to the start or end of each cross-section, without possibly adding more via start or end balancing. The panel data will have balanced starts or ends following the operation.
Undated with ID series / Undated Panel
Resizing an undated workfile that is structured using an ID series requires several distinct operations, since there is no simple way to describe the restructure operation. At a deep level, resizing these types of workfiles involves modifying your identifiers, and then adding or deleting observations with specific identifier values.

234—Chapter 9. Advanced Workfiles
To alter the identifier series you must first remove the workfile structure. Call up the Workfile structure dialog and select Unstructured/Undated from the combo box. Click on OK. EViews will remove the existing workfile structure and will unlock the ID series.
If you wish to remove observations, you should edit one of the ID series so that the desired observations have missing IDs. If you reapply the original Undated with ID series or Undated Panel structure, EViews will prompt you to remove observations with the missing ID values. We remind you that this step will remove all observations with missing values for the identifiers; if you originally used the missing value as a valid identifier, the corresponding observation will also be removed.
To add observations, you must first append observations to the workfile by expanding the unstructured workfile and then editing the ID series to add unique identifiers for the new values, or by using the built-in tools to append to the workfile page (“Appending to a Workfile” on page 234). Once you have added the new observations, you may reapply the workfile structure. EViews will sort your data using the identifier values, lock down the ID series, and then apply the structure to the expanded workfile.
Appending to a Workfile
One method of combining two workfile pages is to append observations from a source workfile page to the end of a target workfile page. When appending data, EViews first removes any structure from the target page, then expands its range to encompass the combined range of the original page and the appended data. The data from the source page are then copied to the expanded part of the target workfile range, either in existing series or alpha objects, or in newly created objects.
When appending, you should first make certain that the workfiles containing both the source and target page are open in EViews. In some cases (for example, concatenating a workfile page with itself), you only need to have a single open workfile since the source and target workfiles are the same.
To open the Workfile
Append dialog, click on the Proc button on the target workfile toolbar and select Append to Current Page..., or select Proc/Append to Current Page... from the main menu.
Appending to a Workfile—235
Selecting Data to
Append
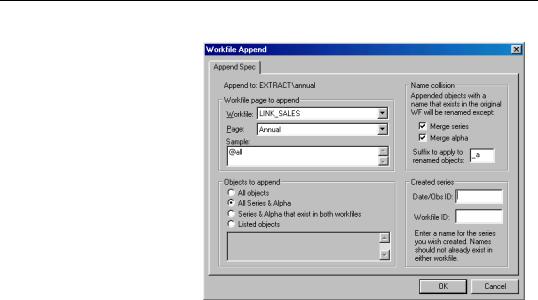
You should begin by selecting a workfile page containing data to be appended to the target page. The first combo box contains a list of all workfiles currently in memory from which you should select the source workfile; in the second combo box, you should choose a page from those in the workfile you have selected. Here, we have instructed
EViews to append data from the ANNUAL page in the workfile LINK_SALES.
Next, you should specify a sample of observations in the source page to be appended; any valid EViews sample may be provided. Here, we have specified the default sample “@ALL”, which ensures that we use all of the observations in the source page.
If you wish, you may use the Objects to append settings to specify the objects to be appended or copied. By default (All series & alpha), EViews will append all series and alphas (and links) from the source page into the destination page. If you select All objects, EViews will append all series and alphas, and will copy all other objects into the destination. Alternatively, choosing Listed objects allows you to specify the individual objects to be copied by name, using wildcards if convenient. To append only those data objects that exist in both pages, you should select Series & alpha that exist in both workfiles. If this setting is selected, a series or numeric link Y in the source page will only be appended if a series Y exists in the active page, and an alpha or alpha link X in the source will only be appended if an alpha series X exists in the destination.
Handling Name Collision
The settings in Name collision control the method EViews uses to append data when a source object name is present in the target page. To understand the effects of the various settings, consider the three possible scenarios that may occur when appending from an object into a workfile page:
• there is no object with the same name in the target page.

236—Chapter 9. Advanced Workfiles
•an object with the same name exists in the target, but the object type is not compatible.
•an object with the same name exists in the target, and the object type is compatible with the source object.
In saying that the source and destination objects are compatible, we indicate that the source data may be added to the end of the existing object. Series and numeric link data may only be added to the end of series objects, while alpha and alpha link data may only be added to the end of alpha objects. All other combinations of objects are said to be incompatible.
Suppose that we wish to append the source series X or numeric link to the target page. If there is no object with the same name in the target page, EViews will create a new series, X, containing NA values for the original target page observations, and the values of the source series X for observations in the expanded part of the range.
If there is an incompatible matching object, a new object will be created with a name formed from the original name and the text specified in the Suffix to apply to renamed objects edit field. If, for example, the target page contains an incompatible X (e.g., it contains the equation X), EViews will create a new series using the original name, and the specified suffix, for example, “X_A” (using the default suffix, “_A”).
If there is a compatible matching object, EViews will examine your dialog settings to determine the appropriate behavior. By default, EViews will append the data from a compatible source object to the end of the existing object. Thus, data from the series or numeric link X will be copied to the expanded part of the range of the target series X, and data from the alpha or alpha link Y will be copied to the end of the alpha series Y. You may override this default so that EViews creates a new object even when the matching objects are compatible, by unselecting the Merge series or Merge alpha checkboxes.
Creating Identifier Series
The optional Created series settings in the dialog allow you to save series containing information about each observation in the combined workfile.
To save a series containing the date or observation ID associated with each observation in the combined workfile, you should enter a unique name in the edit field labeled Date/Obs ID. The specified series will be created in the target page, and will contain the observation or cell identifiers given by the structures associated with the source and the original target pages. Saving the IDs is particularly useful since appending to a workfile removes the existing page structure.