

Sample Objects—103
quency calendar, until we reach the highest date in the workfile, so that we “drop” the two observations “2004” and “2003”. The remaining two offsets, which use the observed dates, drop the observations for “2002” and “2000”. The resulting sample includes the observations “1994”, “1995”, and “1997”.
Sample Objects
As you have seen, it is possible to develop quite elaborate selection rules for the workfile sample. However, it can become quite cumbersome and time-consuming to re-enter these rules if you change samples frequently. Fortunately, EViews provides you with a method of saving sample information in an object which can then be referred to by name. If you work with many well-defined subsets of your data, you will soon find sample objects to be indispensable.
Creating a Sample Object
To create a sample object, select Object/New Object… from the main menu or the workfile toolbar. When the New Object dialog appears, select Sample and, optionally provide a name. If you do not provide a name, EViews will automatically assign one for you (sample objects may not be untitled). Click on OK and EViews will open the sample object specification dialog:
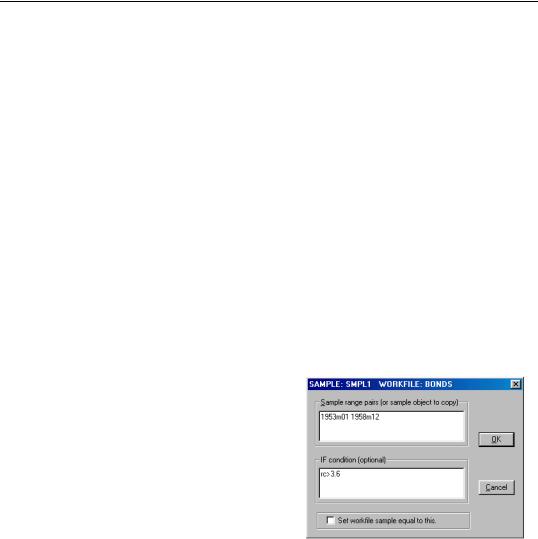
Here is a partially filled-in sample object dialog for SMPL1. Notice that while this dialog looks very similar to the one we described above for setting the sample, there are minor cosmetic differences: the name of the sample object appears in the title bar, and there is a check box for setting the workfile sample equal to this sample object.
These cosmetic differences reflect the two distinct purposes of the dialog: (1) to define
the sample object, and (2) to set the workfile sample. Since EViews separates the act of defining the sample object from the act of setting the workfile sample, you can define the object without changing the workfile sample, and vice versa.
To define the sample object, you should fill out this dialog as described before and click on OK. The sample object now appears in the workfile directory with a double-arrow icon.
To declare a sample object using a command, simply issue the sample declaration, followed by the name to be given to the sample object, and then the sample string:

104—Chapter 5. Basic Data Handling
sample mysample 1955m1 1958m12 if rc>3.6
EViews will create the sample object MYSAMPLE which will use observations between 1955:01 and 1958:12, where the value of the RC series is greater than 3.6.
Using a Sample Object
You may use a previously defined sample object directly to set the workfile sample. Simply open a sample object by double clicking on the name or icon. This will reopen the sample dialog. If you wish to change the sample object, you may edit the sample specification; otherwise, simply click the Set workfile sample check box and click on OK.
Or, you may set the workfile sample using the sample object, by entering the smpl command, followed by the sample object name. For example, the command:
smpl mysample
will set the workfile sample according to the rules contained in the sample object MYSAMPLE.
For many purposes, you may also use a named sample object as though it were an ordinary EViews series containing the values 1 and 0, for observations that are and are not included, respectively. Thus, if SMP2 is a named sample object, you may use it as though it were a series in any EViews expressions (see “Series Expressions” on page 131). For example:
y1*(smp2=0) + 3*y2*(smp2=1)
is a valid EViews expression, evaluating to the value of 3*Y2 if an observation is in SMP2, and Y1, otherwise.
You may also, for example, create a new series that is equal to a sample object, and then examine the values of the series to see which observations do and do not satisfy the sample criterion.
Additionally, one important consequence of this treatment of sample objects is that you may use sample objects in the construction of other sample objects. For example, if you create a sample object FEMALE containing observations for individuals who are females,
sample female @all if gender="female"
and a second sample object HIGHINC if INCOME is greater than 25000:
sample highinc @all if income>25000
You may set the sample to observations where individuals are low income females using:

Importing Data—105
smpl @all if female and not highinc
where we use the NOT keyword to take the complement of the observations in HIGHINC. To create a sample object HIGHFEMALE using this sample, use the command:
sample highfemale @all if female and not highinc
Alternatively, we could have used the equivalent expression
sample highfemale @all if female and highinc=0
More generally, we may use any expression involving sample objects and the keywords “AND”, “OR”, and “NOT”, as in
smpl 1950 1980 if female or not highinc
which sets the sample to those observations from 1950 to 1980 that are also in the sample FEMALE, but not in the sample HIGHINC.
Importing Data
The data for your project may be available in a variety of forms. The data may be in a machine readable spreadsheet or text file that you created yourself or downloaded from the Internet, or perhaps they are in book or photocopy form.
There are a number of ways to read such data into EViews. Earlier, we described workfile creation tools that allow you to open data from foreign sources into a new workfile (“Creating a Workfile by Reading from a Foreign Data Source” on page 53). This is most likely the easiest way to get data from foreign files and database sources such as ODBC into EViews, but you should note that these tools are expressly designed for creating new workfiles.
Alternatively, you may wish to import data into an existing workfile, perhaps into existing series in the workfile—you may, for example, wish to read a portion of an Excel file into a subset of observations in a series or group of series. We term the reading of data into existing workfiles and/or series importing series data to distinguish it from the creation of entirely new workfiles and series.
There are several methods for importing series data into EViews. In the remainder of this discussion, we outline the basics of data import from spreadsheet, text file, or printed formats, into series and group objects. Note that we omit, for the moment, discussion of importing data into EViews matrix, vector and pool objects, and discussion of EViews and foreign databases. The matrix and vector import tools are mentioned briefly in “Matrix Object Import” on page 112; pool import is described in “Importing Pooled Data” on page 832; EViews databases are the subject of Chapter 10, “EViews Databases”, beginning on page 261.
106—Chapter 5. Basic Data Handling
Entering Data
For small datasets in printed form, you may wish to enter the data by typing at the keyboard.
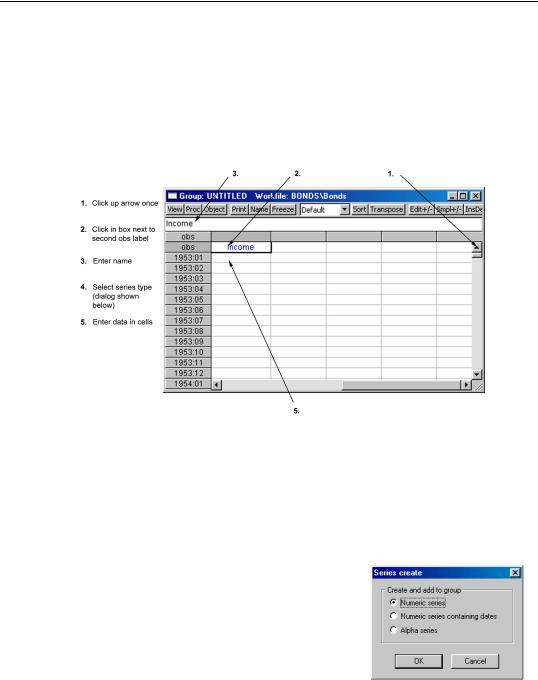
•Your first step is to open a temporary spreadsheet window in which you will enter the data. Choose Quick/Empty Group (Edit Series) from the main menu to open an untitled group window:
•The next step is to create and name the series. First click once on the up arrow in the scroll bar to display the second obs label on the left-hand column. The row of cells next to the second obs label is where you will enter and edit series names.
Click once in the cell next to the second obs label, and enter your first series name. Here we have typed “income” in the edit window (the name in the cell changes as we type in the edit window). Press RETURN. If you enter the name of an existing series, the series data will be brought into the group.
•EViews will prompt you to specify a series type for the column. You may select a numeric series, numeric series containing date values, or an alpha series. When you click on OK, EViews will create a numeric or alpha series and will apply formatting information that will aid you in viewing your data.
•You should repeat this procedure in subsequent columns for each additional series. If you decide you
want to rename one of your series, simply select the cell containing the series name,
Importing Data—107
edit the name in the edit window, and then press RETURN. EViews will prompt you to confirm the series rename.
•To enter the data, click on the appropriate cell and type the number or text. Pressing RETURN after entering the cell value will move you to the next cell. If you prefer, you can use the cursor keys to navigate the spreadsheet.
•When you are finished entering data, close the group window. If you wish, you can first name the untitled group by clicking on the Name button. Otherwise, if you do not wish to keep the group, answer Yes when EViews asks you to confirm the deletion.
Copying-and-Pasting
The Windows clipboard is a handy way to move data within EViews and between EViews and other software applications. It is a natural tool for importing data from Excel and other Windows applications that support Windows copy-and-paste.
Copying from Windows applications
The following discussion involves an example using an Excel spreadsheet, but the basic principles apply for other Windows applications.
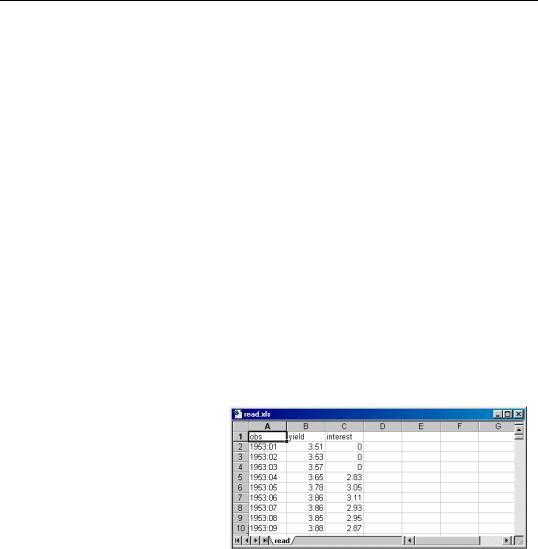
Suppose you have bond yield and interest rate data in an Excel spreadsheet that you would like to bring into EViews.
Open the spreadsheet in Excel. Your first step is to highlight the cells to be imported into EViews. Since the column headings YIELD and INTEREST will be used as EViews variable names, you should highlight them as well. Since EViews understands dated data, and we are going to create a
monthly workfile, you do not need to copy the date column. Instead, click on the column label B and drag to the column label C. The two columns of the spreadsheet will be highlighted.
108—Chapter 5. Basic Data Handling
Select Edit/Copy to copy the highlighted data to the clipboard.
Pasting into New Series
Start EViews and create a new, or load an existing, monthly workfile containing the dates in the Excel spreadsheet (in our example, 1953:1 through
1994:11). Make certain that the sample is set to include the same observations that you have copied onto the clipboard.
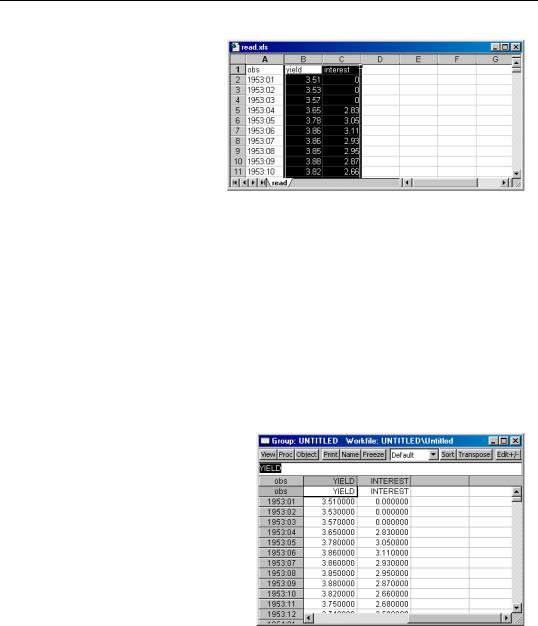
Select Quick/Empty Group (Edit Series). Note that the spreadsheet opens in edit mode so there is no need to click the Edit +/– button.
Here, we have created a monthly workfile with a range from 1953:1 to 1999:12. The first row of the EViews spreadsheet is labeled 1953:01. Since we are pasting in the series names as well, you should click on the up arrow in the scroll bar to make room for the series names.
Place the cursor in the upper-left cell, just to the right of the second obs label. Then select Edit/Paste from the main menu (not Edit +/– in the toolbar). The group spreadsheet will now contain the data from the clipboard.
EViews automatically analyzes the data on the clipboard to determine the most likely series type. If, for example, your series contains text that can always be interpreted as a number, EViews will create a numeric series. Here, the numeric series YIELD and INTEREST have been created in the workfile.
If the numbers in the series may all be interpreted as date values, or if the data are all string representa-
tions of dates, EViews will create a numeric series formatted to display dates.
If you paste a name corresponding to an object that already exists in the workfile, EViews will find the next available name by appending an integer to the series name. For example, if SER already exists in the workfile, pasting the name “SER” will create a series SER01.
Importing Data—109
You may now close the group window and delete the untitled group without losing the two series.
Pasting into Existing Series
You can import data from the clipboard into an existing EViews series or group spreadsheet by using Edit/Paste in the same fashion. There are only a few additional issues to consider:
•To paste several series, you will first open a group window containing the existing series. The easiest way to do this is to click on Show, and then type the series names in the order they appear on the clipboard. Alternatively, you can create an untitled group by selecting the first series, holding down the Ctrl-key and click select each subsequent series (in order), and then double clicking to open.
•Make certain that the group window is showing the sample range that corresponds to the data on the clipboard.
•Next, make certain that the group window is in edit mode. If not in edit mode, press the Edit +/– button to toggle to edit mode. Place the cursor in the target cell, and select Edit/Paste from the main menu.
•Finally, click on Edit +/– to return to protected mode.
•If you are pasting into a single series you will need to make certain that the series window is in edit mode, and that the series is viewed in a single column. If the series is in multiple columns, push on the Wide +/– button. Then Edit/Paste the data as usual, and click on Edit +/– to protect the data.
Importing Data from a Spreadsheet or Text File
You can also read data directly from files created by other programs. Data may be in standard ASCII form or in either Lotus (.WKS, .WK1 or .WK3) or Excel (.XLS) spreadsheet formats.
First, make certain that you have an open workfile to receive the contents of the data import and that the workfile window is active.
Next, click on Proc/Import/Read Text-Lotus-Excel... You will see a standard File Open dialog box asking you to specify the type and name of the file. Select a file type, navigate to the directory containing the file, and double click on the name. Alternatively, type in the name of the file that you wish to read (with full path information, if appropriate); if possible, EViews will automatically set the file type, otherwise it will treat the file as an ASCII file. Click on Open.
110—Chapter 5. Basic Data Handling
EViews will open a dialog prompting you for additional information about the import procedure. The dialog will differ greatly depending on whether the source file is a spreadsheet or an ASCII file.
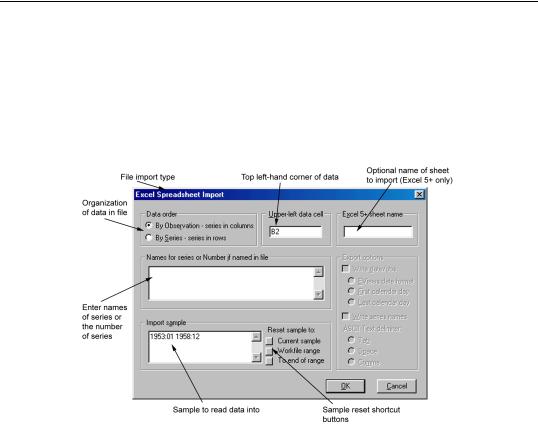
Spreadsheet Import
The title bar of the dialog will identify the type of file that you have asked EViews to read. Here is the dialog for importing an Excel 5 (or later versions of Excel) spreadsheet:
You will see slightly different versions of this dialog depending on whether you are reading a Lotus or an Excel 4 (and earlier) file. Now fill in the dialog:
•First, you need to tell EViews whether the data are ordered by observation or by series. By observation means that all of the data for the first observation are followed by all of the data for the second observation, etc. By series means that all of the data for the first variable are followed by all data for the second variable, etc. Another interpretation for “by observation” is that variables are arranged in columns while “by series” implies that all of the observations for a variable are in a single row.

Importing Data—111
Our Excel example above (“Copying from Windows applications” on page 107) is organized by observation since each series is in a separate column. If the Excel data for YIELD and INTEREST were each contained in a single row as depicted
here, then the data should be read by series.
•Next, tell EViews the location of the beginning cell (upper left-hand corner) of your actual data, not including any label or date information. In both examples above, the upper left-hand cell is B2.
•In the edit box in the middle of the dialog, enter the names to be assigned to the series you will be importing. EViews reads spreadsheet data in contiguous blocks, so you should provide a name for each column or row (depending on the orientation of the data), even if you only wish to read selected columns or rows. To read a column or row into an alpha series, you should enter the tag “$” following the series name (e.g., “NAME $ INCOME CONSUMP”).
•Alternatively, if the names that you wish to use for your series are contained in the file, you can simply provide the number of series to be read. The names must be adjacent to your data. If the data are organized by row and the starting cell is B2, then the names must be in column A, beginning at cell A2. If the data are organized by column beginning in B2, then the names must be in row 1, starting in cell B1. If, in the course of reading the data, EViews encounters an invalid cell name, it will automatically assign the next unused name with the prefix SER, followed by a number (e.g., SER01, SER02, etc.).
•Lastly, you should tell EViews the sample of data that you wish to import. EViews begins with the first observation in the file and assigns it to the first date in the sample for each variable. Each successive observation in the file is associated with successive observations in the sample. Thus, in an annual workfile, if you enter the sample:
1971 1975 1990 1991
in the import dialog, the first five observations will be assigned to the dates 1971– 1975, and the sixth and seventh observations will be assigned to the dates 1990– 1991. The data in the intermediate period will be unaffected by the importing procedure.

112—Chapter 5. Basic Data Handling
You should be warned that if you read into a sample which has more observations than are present in your input file, observations for which there are no corresponding inputs will be assigned missing values. For example, if you read into the sample defined as “1971 1990”, and there are only 10 observations in the input file, the observations from 1981 to 1990 will be assigned missing values.
When the dialog is first displayed, EViews enters the current workfile sample in the edit box by default. You should edit this string to reflect the desired sample. To make it easier to set the sample, EViews provides you with three push-buttons which change the string in the edit box to commonly used values:
1.Current sample sets the dialog string to the current workfile sample.
2.Workfile range sets the dialog string to the entire range of the workfile.
3.To end of range sets the dialog string to all observations from the beginning of the current sample to the end of the workfile range.
•If you are reading data from an Excel 5 workbook file, there will be an additional edit box where you can enter the name of the sheet containing your data. If you do not enter a name, EViews will read from the topmost sheet in the Excel workbook.
•When the dialog is completely filled out, simply click OK and EViews will read your file, creating series and assigning values as requested.
ASCII Import
If you choose to read from an ASCII file, EViews will open an ASCII Text Import dialog. Fill out the dialog to read from the specified file.
The dialog box for ASCII file import is considerably more complicated than the corresponding spreadsheet dialog. While unfortunate, this complexity is necessary since there is no standard format for ASCII files. EViews provides you with a range of options to handle various types of ASCII files.
ASCII file importing is explained in considerable detail in “Importing ASCII Text Files” beginning on page 120.
Matrix Object Import
The preceding discussion focused on importing data into series or group objects. Similar tools are available for importing data directly into a matrix object from spreadsheet or from ASCII text files.
Importing Data—113
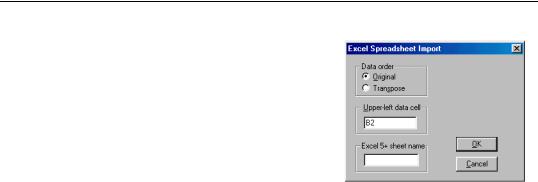
To import data from a file into a matrix object, you must first open the correctly sized matrix object, and select Proc/Import Data (ASCII, .XLS, .WK?)....
After you select your file, EViews will open an import dialog.
Here, we depict the dialog for importing from an Excel spreadsheet. The corresponding ASCII dialog has many more options, since ASCII file reading is more complicated. Note that both the import and
export dialogs differ little from the series import dialogs described above. The differences reflect the different nature of series and matrix input and output. For example, dialog options for series names and the sample are omitted since they do not apply to matrices.
In reading from a file, EViews first fills the matrix with NAs, puts the first data element in the (1,1) element of the matrix, and then continues reading the data by row or column according to the specified settings for Data order. If this option is set as Original, EViews will read by row, filling the first row from left to right, and then continuing on to the next row. If the ordering is set as Transpose, EViews will read by column, reading the first column from top to bottom and then continuing on to the next column. In either case, the data read from the file are placed into the matrix by row.
ASCII files provide you with the option of reading your file as a rectangle. If your ASCII file is laid out as a rectangle, the contents of the rectangle will be placed in the matrix beginning at the (1,1) element of the matrix. For example, if you have a 3 × 3 matrix X in EViews, and read from the ASCII file containing:
1 2 3 4
5 6 7 8
9 10 11 12
using the File laid out as rectangle option, the matrix X will contain the corresponding rectangular portion of the ASCII file:
1 2 3
5 6 7
9 10 11
If you do not select the rectangular read option, EViews fills the matrix element-by-ele- ment, reading from the file line-by-line Then X will contain:
1 2 3
4 5 6
7 8 9