

- •brief contents
- •about this book
- •The Windows Forms namespace
- •Part 1: Hello Windows Forms
- •Part 2: Basic Windows Forms
- •Part 3: Advanced Windows Forms
- •Who should read this book?
- •Conventions
- •Action
- •Result
- •Source code downloads
- •Author online
- •acknowledgments
- •about .NET
- •Casting the .NET
- •Windows Forms overview
- •about the cover illustration
- •Hello Windows Forms
- •1.1 Programming in C#
- •1.1.1 Namespaces and classes
- •1.1.2 Constructors and methods
- •1.1.3 C# types
- •1.1.4 The entry point
- •1.1.5 The Application class
- •1.1.6 Program execution
- •1.2 Adding controls
- •1.2.1 Shortcuts and fully qualified names
- •1.2.2 Fields and properties
- •1.2.3 The Controls property
- •1.3 Loading files
- •1.3.1 Events
- •1.3.2 The OpenFileDialog class
- •1.3.3 Bitmap images
- •1.4 Resizing forms
- •1.4.1 Desktop layout properties
- •1.4.2 The Anchor property
- •1.4.3 The Dock property
- •1.5 Recap
- •2.1 Programming with Visual Studio .NET
- •2.1.1 Creating a project
- •Action
- •Result
- •2.1.2 Executing a program
- •Action
- •Result
- •2.1.3 Viewing the source code
- •View the code generated by Visual Studio .NET
- •Action
- •Result
- •2.2 Adding controls
- •2.2.1 The AssemblyInfo file
- •Action
- •Results
- •2.2.2 Renaming a form
- •Action
- •Result
- •2.2.3 The Toolbox window
- •Action
- •Result
- •2.3 Loading files
- •2.3.1 Event handlers in Visual Studio .NET
- •Action
- •Result
- •2.3.2 Exception handling
- •Action
- •Result
- •Action
- •Results and Comments
- •2.4 Resizing forms
- •2.4.1 Assign the Anchor property
- •Action
- •Result
- •2.4.2 Assign the MinimumSize property
- •Action
- •Result
- •2.5 Recap
- •Basic Windows Forms
- •Menus
- •Action
- •Result
- •Action
- •Result
- •Action
- •Result
- •Action
- •Result
- •3.3 Click events
- •Action
- •Result
- •Action
- •Result
- •Action
- •Result
- •Action
- •Result
- •Action
- •Result
- •Action
- •Result
- •3.5 Context menus
- •Action
- •Result
- •Action
- •Result
- •3.6 Recap
- •Status bars
- •4.1 The Control class
- •4.2 The StatusBar class
- •Action
- •Result
- •Action
- •Result
- •4.3.1 Adding panels to a status bar
- •Action
- •Result
- •Action
- •Result
- •Action
- •Result
- •Action
- •Result
- •4.5 Recap
- •Reusable libraries
- •5.1 C# classes and interfaces
- •5.2 Class libraries
- •Action
- •Result
- •Action
- •Result
- •Action
- •Result
- •Action
- •Result
- •Action
- •Result
- •Action
- •Result
- •Action
- •Result
- •Action
- •Result
- •Action
- •Result
- •5.3 Interfaces revisited
- •Action
- •Result
- •Action
- •Result
- •Action
- •Result
- •5.4 Robustness issues
- •Action
- •Result
- •Action
- •Result
- •Action
- •Result
- •Action
- •Result
- •Action
- •Result
- •Action
- •Result
- •Common file dialogs
- •Action
- •Results
- •Action
- •Result
- •Action
- •Result
- •Action
- •Result
- •Action
- •Result
- •6.3 Paint events
- •Action
- •Result
- •Action
- •Result
- •6.4 Context menus revisited
- •Action
- •Result
- •Action
- •Result
- •6.5 Files and paths
- •Action
- •Result
- •Action
- •Result
- •Action
- •Result
- •6.6 Save file dialogs
- •Action
- •Result
- •Action
- •Result
- •Action
- •Result
- •Action
- •Result
- •Action
- •Result
- •6.7 Open file dialogs
- •Action
- •Result
- •Action
- •Result
- •6.8 Recap
- •Drawing and scrolling
- •7.1 Form class hierarchy
- •Action
- •Result
- •Action
- •Result
- •Action
- •Result
- •Action
- •Result
- •Action
- •Result
- •Action
- •Result
- •Action
- •Result
- •Action
- •Result
- •Action
- •Result
- •Action
- •Result
- •Action
- •Result
- •Action
- •Result
- •7.4 Panels
- •Action
- •Result
- •Action
- •Result
- •Action
- •Result
- •Action
- •Result
- •Action
- •Result
- •Dialog boxes
- •8.1 Message boxes
- •Action
- •Result
- •Action
- •Result
- •8.1.4 Creating A YesNoCancel dialog
- •Action
- •Result
- •Action
- •Result
- •8.2 The Form.Close method
- •8.2.1 The relationship between Close and Dispose
- •Action
- •Result
- •8.3 Modal dialog boxes
- •Action
- •Result
- •Action
- •Result
- •8.3.2 Preserving caption values
- •Action
- •Result
- •Action
- •Result
- •Action
- •Result
- •Action
- •Result
- •Action
- •Result
- •Action
- •Result
- •Action
- •Result
- •Action
- •Result
- •Action
- •Result
- •Action
- •Result
- •Action
- •Result
- •Action
- •Result
- •Action
- •Result
- •Action
- •Result
- •Action
- •Result
- •Action
- •Result
- •Action
- •Result
- •Basic controls
- •Action
- •Result
- •Action
- •Result
- •Action
- •Result
- •9.1.2 Creating a derived form
- •Action
- •Result
- •9.2 Labels and text boxes
- •Action
- •Result
- •Action
- •Result
- •Action
- •Result
- •Action
- •Result
- •Action
- •Result
- •Action
- •Result
- •Action
- •Result
- •Action
- •Result
- •Action
- •Result
- •Action
- •Result
- •Action
- •Result
- •Action
- •Result
- •Action
- •Result
- •Action
- •Result
- •Action
- •Result
- •Action
- •Result
- •Action
- •Result
- •Action
- •Result
- •9.3.6 Adding AlbumEditDlg to our main form
- •Action
- •Result
- •Action
- •Result
- •9.4 Recap
- •List controls
- •10.1 List boxes
- •Action
- •Result
- •Action
- •Result
- •Action
- •Result
- •Action
- •Result
- •10.2 Multiselection list boxes
- •10.2.1 Enabling multiple selection
- •Action
- •Result
- •Action
- •Result
- •Action
- •Result
- •Action
- •Result
- •10.3 Combo boxes
- •Action
- •Result
- •Action
- •Result
- •10.4 Combo box edits
- •Action
- •Result
- •Action
- •Result
- •Action
- •Result
- •10.5 Owner-drawn lists
- •Action
- •Result
- •Action
- •Result
- •Action
- •Result
- •Action
- •Result
- •More controls
- •Action
- •Result
- •Action
- •Result
- •11.2 Tab pages
- •Action
- •Result
- •Action
- •Result
- •11.3.1 Dates and times
- •Action
- •Result
- •Action
- •Result
- •Action
- •Result
- •Action
- •Result
- •Action
- •Result
- •Action
- •Result
- •11.5 Recap
- •A .NET assortment
- •12.1 Keyboard events
- •Action
- •Result
- •Action
- •Result
- •12.2 Mouse events
- •Action
- •Result
- •Action
- •Result
- •Action
- •Result
- •12.3 Image buttons
- •Action
- •Result
- •Action
- •Result
- •Action
- •Result
- •Action
- •Result
- •Action
- •Result
- •Action
- •Result
- •Action
- •Result
- •Action
- •Result
- •Action
- •Result
- •12.4 Icons
- •Action
- •Result
- •Action
- •Result
- •Action
- •Result
- •12.5 Recap
- •Toolbars and tips
- •13.1 Toolbars
- •Action
- •Result
- •Action
- •Result
- •Action
- •Result
- •Action
- •Result
- •Action
- •Result
- •Action
- •Result
- •Action
- •Result
- •Action
- •Result
- •Action
- •Result
- •13.4.2 Creating tool tips
- •Action
- •Result
- •Action
- •Result
- •Advanced Windows Forms
- •List views
- •14.2 The ListView class
- •Action
- •Result
- •Action
- •Result
- •Action
- •Result
- •Action
- •Result
- •14.2.3 Populating a ListView
- •Action
- •Result
- •Action
- •14.3 ListView columns
- •Action
- •Result
- •Action
- •Result
- •Action
- •Result
- •Action
- •Result
- •Action
- •Result
- •Action
- •Result
- •Action
- •Result
- •Action
- •Result
- •Action
- •Result
- •Action
- •Result
- •Action
- •Result
- •Action
- •Result
- •Action
- •Result
- •Action
- •Result
- •Action
- •Result
- •Action
- •Result
- •Action
- •Result
- •Action
- •Result
- •Action
- •Result
- •14.6 Recap
- •Tree views
- •Action
- •Result
- •Action
- •Result
- •Action
- •Result
- •15.3 Dynamic tree nodes
- •Action
- •Result
- •Action
- •Result
- •Action
- •Result
- •Action
- •Result
- •Action
- •Result
- •15.4 Node selection
- •Action
- •Result
- •Action
- •Result
- •Action
- •Result
- •Action
- •Result
- •Action
- •Result
- •15.5 Fun with tree views
- •Action
- •Result
- •Action
- •Result
- •Action
- •Result
- •Multiple document interfaces
- •Action
- •Result
- •Action
- •Result
- •Action
- •Result
- •16.3 Merged menus
- •Action
- •Result
- •Action
- •Result
- •Action
- •Result
- •Action
- •Result
- •16.4 MDI children
- •Action
- •Result
- •Action
- •Result
- •Action
- •Result
- •Action
- •Result
- •Action
- •Result
- •Action
- •Result
- •Action
- •Result
- •Action
- •Result
- •Action
- •Result
- •Action
- •Result
- •16.5 MDI child window management
- •Action
- •Result
- •Action
- •Result
- •16.6 Recap
- •Data binding
- •17.1 Data grids
- •Action
- •Result
- •Action
- •Result
- •17.2 Data grid customization
- •Action
- •Result
- •Action
- •Result
- •Action
- •Result
- •Action
- •Result
- •Action
- •Result
- •Action
- •Result
- •Action
- •Result
- •Action
- •Result
- •Action
- •Result
- •Action
- •Result
- •Action
- •Result
- •Odds and ends .NET
- •Action
- •Result
- •Action
- •Result
- •Action
- •Result
- •Action
- •Result
- •18.2 Timers
- •Action
- •Result
- •Action
- •Result
- •18.3 Drag and drop
- •Action
- •Result
- •Action
- •Result
- •18.4 ActiveX controls
- •Action
- •Result
- •Action
- •Result
- •Action
- •Result
- •Action
- •Result
- •Action
- •Result
- •18.5 Recap
- •C# primer
- •A.1 C# programs
- •A.1.1 Assemblies
- •A.1.2 Namespaces
- •A.2 Types
- •A.2.1 Classes
- •A.2.2 Structures
- •A.2.3 Interfaces
- •A.2.4 Enumerations
- •A.2.5 Delegates
- •A.3 Language elements
- •A.3.1 Built-in types
- •A.3.2 Operators
- •A.3.3 Keywords
- •A.4 Special features
- •A.4.1 Exceptions
- •A.4.2 Arrays
- •A.4.3 Main
- •A.4.4 Boxing
- •A.4.5 Documentation
- •.NET namespaces
- •B.1 System.Collections
- •B.2 System.ComponentModel
- •B.3 System.Data
- •B.4 System.Drawing
- •B.5 System.Globalization
- •B.6 System.IO
- •B.7 System.Net
- •B.8 System.Reflection
- •B.9 System.Resources
- •B.10 System.Security
- •B.11 System.Threading
- •B.12 System.Web
- •B.13 System.Windows.Forms
- •B.14 System.XML
- •Visual index
- •C.1 Objects
- •C.2 Marshal by reference objects
- •C.3 Components
- •C.4 Common dialogs
- •C.7 Event data
- •C.8 Enumerations
- •For more information
- •bibliography
- •Symbols
- •Index
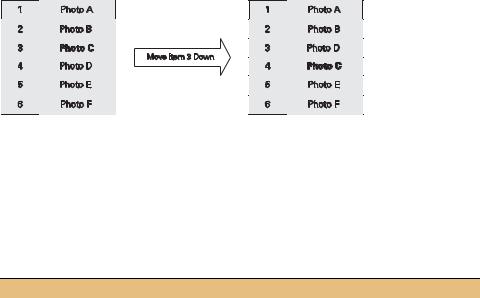
move item 3 down, it becomes item 4. If you then move item 4 down, you would effectively move the original item 3 into position 5.
Figure 10.3 When the third item in the list is moved down, the original fourth item moves into position 3.
The trick here, as you may realize, is to move item 4 first, and then move item 3. In general terms, to move multiple items down, we must move the items starting from the bottom. Conversely, to move multiple items up, we must start at the top.
We will begin with the new methods required in the PhotoAlbum class.
Set the version number of the MyPhotoAlbum library to 10.2.
IMPLEMENT MOVE METHODS IN PHOTOALBUM CLASS
|
Action |
Result |
|
|
|
1 |
In the PhotoAlbum.cs window, add a |
public void MoveBefore(int i) |
|
MoveBefore method to move a |
{ |
|
photograph at a specified index to the |
if (i > 0 && i < this.Count) |
|
{ |
|
|
previous position. |
|
|
Photograph photo = this[i]; |
|
|
How-to |
this.RemoveAt(i); |
|
this.Insert(i-1, photo); |
|
|
a. Ensure the given index is valid. |
|
|
} |
|
|
b. Remove the Photograph at this |
} |
|
|
|
|
index from the list. |
|
|
c. Insert the removed photograph at |
|
|
the new position. |
|
|
|
|
2 |
Add a MoveAfter method to move a |
public void MoveAfter(int i) |
|
photograph at a specified index to the |
{ |
|
subsequent position. |
if (i >= 0 && i < this.Count-1) |
|
{ |
|
|
|
|
|
|
Photograph photo = this[i]; |
|
|
this.RemoveAt(i); |
|
|
this.Insert(i+1, photo); |
|
|
} |
|
|
} |
|
|
|
With these methods in place, we are ready to implement Click event handlers for our Move Up and Move Down buttons. These handlers are shown in the following steps:
MULTISELECTION LIST BOXES |
329 |

HANDLE THE MOVE BUTTONS
|
Action |
Result |
|
|
|
3 |
Implement a Click event |
private void btnMoveUp_Click |
|
handler for the Move Up button. |
(object sender, System.EventArgs e) |
|
Note: We could have used a |
{ |
|
ListBox.SelectedIndexCollection indices |
|
|
foreach loop over the indices |
= lstPhotos.SelectedIndices; |
|
array here. This was written as a |
int[] newSelects = new int[indices.Count]; |
|
|
|
|
for loop to be consistent with |
// Move the selected items up |
|
the implementation of the Move |
for (int i = 0; i < indices.Count; i++) |
|
Down handler. |
{ |
|
|
int index = indices[i]; |
|
|
_album.MoveBefore(index); |
|
|
newSelects[i] = index - 1; |
|
|
} |
|
|
_bAlbumChanged = true; |
|
|
UpdateList(); |
|
|
// Reset the selections. |
|
|
lstPhotos.ClearSelected(); |
|
|
foreach (int x in newSelects) |
|
|
{ |
|
|
lstPhotos.SetSelected(x, true); |
|
|
} |
|
|
} |
|
|
|
4 |
Implement the Click handler for |
private void btnMoveDown_Click |
|
the Move Down button. |
(object sender, System.EventArgs e) |
|
|
{ |
|
|
ListBox.SelectedIndexCollection indices |
|
|
= lstPhotos.SelectedIndices; |
|
|
int[] newSelects = new int[indices.Count]; |
|
|
// Move the selected items down |
|
|
for (int i = indices.Count - 1; |
|
|
i >= 0; |
|
|
i--) |
|
|
{ |
|
|
int index = indices[i]; |
|
|
_album.MoveAfter(index); |
|
|
newSelects[i] = index + 1; |
|
|
} |
|
|
_bAlbumChanged = true; |
|
|
UpdateList(); |
|
|
// Reset the selections. |
|
|
lstPhotos.ClearSelected(); |
|
|
foreach (int x in newSelects) |
|
|
{ |
|
|
lstPhotos.SetSelected(x, true); |
|
|
} |
|
|
} |
|
|
|
Both of these methods employ a number of members of the ListBox class. Let’s examine the Move Down button handler in detail as a way to discuss these changes.
330 |
CHAPTER 10 LIST CONTROLS |

private void btnMoveDown_Click(object sender, System.EventArgs e)
{
ListBox.SelectedIndexCollection indices = lstPhotos.SelectedIndices; |
|
|
||||||
|
|
|||||||
int[] newSelects = new int[indices.Count]; |
Retrieve the |
|
|
|||||
b |
||||||||
|
|
|
|
|
||||
// Move the selected items down |
selected items |
|
|
|||||
c Move selected |
|
|
||||||
for (int i = indices.Count - 1; i >= 0; i--) |
|
|
||||||
{ |
|
|
|
|
items down |
|
|
|
int index = indices[i]; |
|
|
|
|
|
|
|
|
_album.MoveAfter(index); |
|
|
|
|
|
|
||
newSelects[i] = index + 1; |
|
|
|
|
|
|
||
} |
|
|
|
|
|
|
|
|
_bAlbumChanged = true; |
|
Update the |
|
|
|
|||
UpdateList(); |
d list box |
|
|
|
||||
// Reset the selections. |
|
|
|
e Reselect the items |
|
|
||
lstPhotos.ClearSelected(); |
|
|
|
|
||||
foreach (int x in newSelects) |
|
|
|
|
|
|||
{ |
|
|
|
|
|
|
|
|
lstPhotos.SetSelected(x, true); |
|
|
|
|
|
|||
|
|
|
|
|||||
} |
|
|
|
|
|
|
|
|
}
The following points are highlighted in the code:
bA local indices variable is created to hold the index values of the selected items. The
SelectedIndices property returns a ListBox.SelectedIndexCollection instance containing an array of the selected index values. The related SelectedItems property returns the actual objects selected. Note that an array of integers is
also created to hold the new index positions of the objects after they have been moved.
cStarting from the bottom of the list, each selected item is moved down in the album. Note that the MoveDown button is disabled if the last item is selected, so we know for certain that index + 1 will not produce an index which is out of range.
dOnce all the changes have been made to our album, we update the list box with the new entries. Note that the UpdateList method has a side effect of clearing the current selections from the list.
eOnce the list has been updated, the items need to be reselected. The newSelects array was created for this purpose. The ClearSelected method is used to remove any default selections added by the UpdateList method, and the SetSelected method is used to select each entry in the array.
You can run the application here if you like to see how these buttons work. The next section discusses the Remove button implementation.
10.2.3HANDLING THE REMOVE BUTTON
The Remove button is a bit like the Move Down button. We have to be careful that the removal of one item does not cause us to remove incorrect entries on subsequent
MULTISELECTION LIST BOXES |
331 |
items. We will again loop through the list of selected items starting from the end to avoid this problem.
Also note that by removing the selected photographs, we are making an irreversible change to the photo album. As a result, this is a good place to employ the sageBox class to ensure that the user really wants to remove the photos.
|
|
HANDLE THE REMOVE BUTTON |
|
|
|
|
|
|
Action |
|
Result |
|
|
|
|
1 |
Add a Click handler to the |
|
private void btnRemove_Click |
|
Remove button. |
|
(object sender, System.EventArgs e) |
|
|
|
{ |
|
|
|
|
2 |
Implement this handler to |
|
string msg; |
|
confirm with the user that |
|
int n = lstPhotos.SelectedItems.Count; |
|
they really want to remove |
|
if (n == 1) |
|
|
msg = "Do your really want to " |
|
|
the selected photos. |
|
|
|
|
+ "remove the selected photo?"; |
|
|
How-to |
|
else |
|
|
msg = String.Format("Do you really want to " |
|
|
Use the MessageBox class |
|
|
|
|
+ "remove the {0} selected photos?", n); |
|
|
with the Question icon. |
|
DialogResult result = MessageBox.Show( |
|
|
|
|
|
|
|
msg, "Remove Photos?", |
|
|
|
MessageBoxButtons.YesNo, |
|
|
|
MessageBoxIcon.Question); |
|
|
|
|
3 |
If the user says Yes, then |
|
if (result == DialogResult.Yes) |
|
remove the selected items. |
|
{ |
|
How-to |
|
ListBox.SelectedIndexCollection indices |
|
|
= lstPhotos.SelectedIndices; |
|
|
Use the SelectedIndices |
|
for (int i = indices.Count - 1; i >= 0; i--) |
|
property. |
|
{ |
|
|
_album.RemoveAt(indices[i]); |
|
|
|
|
|
|
|
|
} |
|
|
|
_bAlbumChanged = true; |
|
|
|
UpdateList(); |
|
|
|
} |
|
|
|
} |
|
|
|
|
This code uses the SelectedItems property to retrieve the collection of selected objects. This property is used to determine how many items are selected so that our message to the user can include this information.
int n = lstPhotos.SelectedItems.Count;
To perform the deletion, we use the SelectedIndices property to retrieve the index numbers of each selected object. Since our list is based on the PhotoAlbum class, we know that the index in the list box corresponds to the index in the album. Removing a selection is a simple matter of removing the object at the given index from the album.
ListBox.SelectedIndexCollection indices = lstPhotos.SelectedIndices; for (int i = indices.Count - 1; i >= 0; i--)
{
_album.RemoveAt(indices[i]);
}
332 |
CHAPTER 10 LIST CONTROLS |