

- •brief contents
- •about this book
- •The Windows Forms namespace
- •Part 1: Hello Windows Forms
- •Part 2: Basic Windows Forms
- •Part 3: Advanced Windows Forms
- •Who should read this book?
- •Conventions
- •Action
- •Result
- •Source code downloads
- •Author online
- •acknowledgments
- •about .NET
- •Casting the .NET
- •Windows Forms overview
- •about the cover illustration
- •Hello Windows Forms
- •1.1 Programming in C#
- •1.1.1 Namespaces and classes
- •1.1.2 Constructors and methods
- •1.1.3 C# types
- •1.1.4 The entry point
- •1.1.5 The Application class
- •1.1.6 Program execution
- •1.2 Adding controls
- •1.2.1 Shortcuts and fully qualified names
- •1.2.2 Fields and properties
- •1.2.3 The Controls property
- •1.3 Loading files
- •1.3.1 Events
- •1.3.2 The OpenFileDialog class
- •1.3.3 Bitmap images
- •1.4 Resizing forms
- •1.4.1 Desktop layout properties
- •1.4.2 The Anchor property
- •1.4.3 The Dock property
- •1.5 Recap
- •2.1 Programming with Visual Studio .NET
- •2.1.1 Creating a project
- •Action
- •Result
- •2.1.2 Executing a program
- •Action
- •Result
- •2.1.3 Viewing the source code
- •View the code generated by Visual Studio .NET
- •Action
- •Result
- •2.2 Adding controls
- •2.2.1 The AssemblyInfo file
- •Action
- •Results
- •2.2.2 Renaming a form
- •Action
- •Result
- •2.2.3 The Toolbox window
- •Action
- •Result
- •2.3 Loading files
- •2.3.1 Event handlers in Visual Studio .NET
- •Action
- •Result
- •2.3.2 Exception handling
- •Action
- •Result
- •Action
- •Results and Comments
- •2.4 Resizing forms
- •2.4.1 Assign the Anchor property
- •Action
- •Result
- •2.4.2 Assign the MinimumSize property
- •Action
- •Result
- •2.5 Recap
- •Basic Windows Forms
- •Menus
- •Action
- •Result
- •Action
- •Result
- •Action
- •Result
- •Action
- •Result
- •3.3 Click events
- •Action
- •Result
- •Action
- •Result
- •Action
- •Result
- •Action
- •Result
- •Action
- •Result
- •Action
- •Result
- •3.5 Context menus
- •Action
- •Result
- •Action
- •Result
- •3.6 Recap
- •Status bars
- •4.1 The Control class
- •4.2 The StatusBar class
- •Action
- •Result
- •Action
- •Result
- •4.3.1 Adding panels to a status bar
- •Action
- •Result
- •Action
- •Result
- •Action
- •Result
- •Action
- •Result
- •4.5 Recap
- •Reusable libraries
- •5.1 C# classes and interfaces
- •5.2 Class libraries
- •Action
- •Result
- •Action
- •Result
- •Action
- •Result
- •Action
- •Result
- •Action
- •Result
- •Action
- •Result
- •Action
- •Result
- •Action
- •Result
- •Action
- •Result
- •5.3 Interfaces revisited
- •Action
- •Result
- •Action
- •Result
- •Action
- •Result
- •5.4 Robustness issues
- •Action
- •Result
- •Action
- •Result
- •Action
- •Result
- •Action
- •Result
- •Action
- •Result
- •Action
- •Result
- •Common file dialogs
- •Action
- •Results
- •Action
- •Result
- •Action
- •Result
- •Action
- •Result
- •Action
- •Result
- •6.3 Paint events
- •Action
- •Result
- •Action
- •Result
- •6.4 Context menus revisited
- •Action
- •Result
- •Action
- •Result
- •6.5 Files and paths
- •Action
- •Result
- •Action
- •Result
- •Action
- •Result
- •6.6 Save file dialogs
- •Action
- •Result
- •Action
- •Result
- •Action
- •Result
- •Action
- •Result
- •Action
- •Result
- •6.7 Open file dialogs
- •Action
- •Result
- •Action
- •Result
- •6.8 Recap
- •Drawing and scrolling
- •7.1 Form class hierarchy
- •Action
- •Result
- •Action
- •Result
- •Action
- •Result
- •Action
- •Result
- •Action
- •Result
- •Action
- •Result
- •Action
- •Result
- •Action
- •Result
- •Action
- •Result
- •Action
- •Result
- •Action
- •Result
- •Action
- •Result
- •7.4 Panels
- •Action
- •Result
- •Action
- •Result
- •Action
- •Result
- •Action
- •Result
- •Action
- •Result
- •Dialog boxes
- •8.1 Message boxes
- •Action
- •Result
- •Action
- •Result
- •8.1.4 Creating A YesNoCancel dialog
- •Action
- •Result
- •Action
- •Result
- •8.2 The Form.Close method
- •8.2.1 The relationship between Close and Dispose
- •Action
- •Result
- •8.3 Modal dialog boxes
- •Action
- •Result
- •Action
- •Result
- •8.3.2 Preserving caption values
- •Action
- •Result
- •Action
- •Result
- •Action
- •Result
- •Action
- •Result
- •Action
- •Result
- •Action
- •Result
- •Action
- •Result
- •Action
- •Result
- •Action
- •Result
- •Action
- •Result
- •Action
- •Result
- •Action
- •Result
- •Action
- •Result
- •Action
- •Result
- •Action
- •Result
- •Action
- •Result
- •Action
- •Result
- •Basic controls
- •Action
- •Result
- •Action
- •Result
- •Action
- •Result
- •9.1.2 Creating a derived form
- •Action
- •Result
- •9.2 Labels and text boxes
- •Action
- •Result
- •Action
- •Result
- •Action
- •Result
- •Action
- •Result
- •Action
- •Result
- •Action
- •Result
- •Action
- •Result
- •Action
- •Result
- •Action
- •Result
- •Action
- •Result
- •Action
- •Result
- •Action
- •Result
- •Action
- •Result
- •Action
- •Result
- •Action
- •Result
- •Action
- •Result
- •Action
- •Result
- •Action
- •Result
- •9.3.6 Adding AlbumEditDlg to our main form
- •Action
- •Result
- •Action
- •Result
- •9.4 Recap
- •List controls
- •10.1 List boxes
- •Action
- •Result
- •Action
- •Result
- •Action
- •Result
- •Action
- •Result
- •10.2 Multiselection list boxes
- •10.2.1 Enabling multiple selection
- •Action
- •Result
- •Action
- •Result
- •Action
- •Result
- •Action
- •Result
- •10.3 Combo boxes
- •Action
- •Result
- •Action
- •Result
- •10.4 Combo box edits
- •Action
- •Result
- •Action
- •Result
- •Action
- •Result
- •10.5 Owner-drawn lists
- •Action
- •Result
- •Action
- •Result
- •Action
- •Result
- •Action
- •Result
- •More controls
- •Action
- •Result
- •Action
- •Result
- •11.2 Tab pages
- •Action
- •Result
- •Action
- •Result
- •11.3.1 Dates and times
- •Action
- •Result
- •Action
- •Result
- •Action
- •Result
- •Action
- •Result
- •Action
- •Result
- •Action
- •Result
- •11.5 Recap
- •A .NET assortment
- •12.1 Keyboard events
- •Action
- •Result
- •Action
- •Result
- •12.2 Mouse events
- •Action
- •Result
- •Action
- •Result
- •Action
- •Result
- •12.3 Image buttons
- •Action
- •Result
- •Action
- •Result
- •Action
- •Result
- •Action
- •Result
- •Action
- •Result
- •Action
- •Result
- •Action
- •Result
- •Action
- •Result
- •Action
- •Result
- •12.4 Icons
- •Action
- •Result
- •Action
- •Result
- •Action
- •Result
- •12.5 Recap
- •Toolbars and tips
- •13.1 Toolbars
- •Action
- •Result
- •Action
- •Result
- •Action
- •Result
- •Action
- •Result
- •Action
- •Result
- •Action
- •Result
- •Action
- •Result
- •Action
- •Result
- •Action
- •Result
- •13.4.2 Creating tool tips
- •Action
- •Result
- •Action
- •Result
- •Advanced Windows Forms
- •List views
- •14.2 The ListView class
- •Action
- •Result
- •Action
- •Result
- •Action
- •Result
- •Action
- •Result
- •14.2.3 Populating a ListView
- •Action
- •Result
- •Action
- •14.3 ListView columns
- •Action
- •Result
- •Action
- •Result
- •Action
- •Result
- •Action
- •Result
- •Action
- •Result
- •Action
- •Result
- •Action
- •Result
- •Action
- •Result
- •Action
- •Result
- •Action
- •Result
- •Action
- •Result
- •Action
- •Result
- •Action
- •Result
- •Action
- •Result
- •Action
- •Result
- •Action
- •Result
- •Action
- •Result
- •Action
- •Result
- •Action
- •Result
- •14.6 Recap
- •Tree views
- •Action
- •Result
- •Action
- •Result
- •Action
- •Result
- •15.3 Dynamic tree nodes
- •Action
- •Result
- •Action
- •Result
- •Action
- •Result
- •Action
- •Result
- •Action
- •Result
- •15.4 Node selection
- •Action
- •Result
- •Action
- •Result
- •Action
- •Result
- •Action
- •Result
- •Action
- •Result
- •15.5 Fun with tree views
- •Action
- •Result
- •Action
- •Result
- •Action
- •Result
- •Multiple document interfaces
- •Action
- •Result
- •Action
- •Result
- •Action
- •Result
- •16.3 Merged menus
- •Action
- •Result
- •Action
- •Result
- •Action
- •Result
- •Action
- •Result
- •16.4 MDI children
- •Action
- •Result
- •Action
- •Result
- •Action
- •Result
- •Action
- •Result
- •Action
- •Result
- •Action
- •Result
- •Action
- •Result
- •Action
- •Result
- •Action
- •Result
- •Action
- •Result
- •16.5 MDI child window management
- •Action
- •Result
- •Action
- •Result
- •16.6 Recap
- •Data binding
- •17.1 Data grids
- •Action
- •Result
- •Action
- •Result
- •17.2 Data grid customization
- •Action
- •Result
- •Action
- •Result
- •Action
- •Result
- •Action
- •Result
- •Action
- •Result
- •Action
- •Result
- •Action
- •Result
- •Action
- •Result
- •Action
- •Result
- •Action
- •Result
- •Action
- •Result
- •Odds and ends .NET
- •Action
- •Result
- •Action
- •Result
- •Action
- •Result
- •Action
- •Result
- •18.2 Timers
- •Action
- •Result
- •Action
- •Result
- •18.3 Drag and drop
- •Action
- •Result
- •Action
- •Result
- •18.4 ActiveX controls
- •Action
- •Result
- •Action
- •Result
- •Action
- •Result
- •Action
- •Result
- •Action
- •Result
- •18.5 Recap
- •C# primer
- •A.1 C# programs
- •A.1.1 Assemblies
- •A.1.2 Namespaces
- •A.2 Types
- •A.2.1 Classes
- •A.2.2 Structures
- •A.2.3 Interfaces
- •A.2.4 Enumerations
- •A.2.5 Delegates
- •A.3 Language elements
- •A.3.1 Built-in types
- •A.3.2 Operators
- •A.3.3 Keywords
- •A.4 Special features
- •A.4.1 Exceptions
- •A.4.2 Arrays
- •A.4.3 Main
- •A.4.4 Boxing
- •A.4.5 Documentation
- •.NET namespaces
- •B.1 System.Collections
- •B.2 System.ComponentModel
- •B.3 System.Data
- •B.4 System.Drawing
- •B.5 System.Globalization
- •B.6 System.IO
- •B.7 System.Net
- •B.8 System.Reflection
- •B.9 System.Resources
- •B.10 System.Security
- •B.11 System.Threading
- •B.12 System.Web
- •B.13 System.Windows.Forms
- •B.14 System.XML
- •Visual index
- •C.1 Objects
- •C.2 Marshal by reference objects
- •C.3 Components
- •C.4 Common dialogs
- •C.7 Event data
- •C.8 Enumerations
- •For more information
- •bibliography
- •Symbols
- •Index

C H A P T E R |
9 |
|
|
Basic controls
9.1Form inheritance 264
9.2Labels and text boxes 271
9.3Button classes 290
9.4Recap 313
The .NET Framework provides a number of controls for use in Windows Forms applications. This chapter will introduce the most basic of these, namely the Label,
TextBox, Button, RadioButton, and CheckBox controls. These controls date back to the original version of Windows,1 and before that to other graphical environments in other operating systems, so they must be somewhat useful. In practice, labels, text boxes, and the various button types are critical in almost any Windows application, so it is worth spending a little time to see how they are added to and utilized by applications.
As usual, we will discuss the classes for these controls in the context of our MyPhotos application. This will require that we do some work on our PhotoAlbum and Photograph classes. Our controls are not very useful unless they can be integrated into an application, so these changes should illustrate how similar constructs can be used in your own applications. In addition, such changes present opportunities to discuss additional concepts such as the .NET DateTime structure and the C# delegate keyword.
1List boxes and combo boxes were part of this version as well, but we will leave these controls to the next chapter.
263

Specific Windows Forms concepts we will cover in this chapter include:
•Form inheritance: what is it and how do you do it?
•Basic Windows Forms controls: the Label, TextBox, Button, RadioButton, and CheckBox classes.
•Container controls such as Panel and GroupBox objects.
In addition, we will also look at the following related concepts:
•The C# delegate keyword.
•The System.DateTime structure.
•Keyboard and focus events for controls.
•Using the Control.Tag property.
To enable our discussion of all this and more, we will create two modal dialog boxes for our form, shown in the first section as figure 9.1. These will represent various settings the user can modify on an individual photograph or entire album. While we will discuss each control generally, these two dialogs will serve to demonstrate the creation and usage of each control as we move through the chapter.
We begin our discussion with form inheritance.
9.1FORM INHERITANCE
The concept of object inheritance is often explained with the canonical Employee class derived from a Person class. The derived class, in this case Employee, inherits the properties and functionality found in the parent class, e.g., Person. For example, the Person class might provide properties and methods for tracking the address of a person. The Employee class inherits these members and supports this functionality without the addition of any new code.2
The .NET Framework allows a similar behavior for Forms. You can create a form, and then reuse that form in the creation of additional forms. The parent form defines various members and controls that child forms will inherit. Controls on the form define their access level, such as private, protected, or public, just like members of any other class. A child form can modify these controls to the extent of their assigned access level.
For our application, we would like to add the two dialogs shown in figure 9.1. The first is for editing the properties of a specific photograph, and the second for editing the properties of an album. While the contents of these two windows are entirely different, they are both modal dialog boxes and share a common set of buttons at the base of the form and a panel at the top.
2 The overview of C# in appendix B provides additional information on inheritance.
264 |
CHAPTER 9 BASIC CONTROLS |
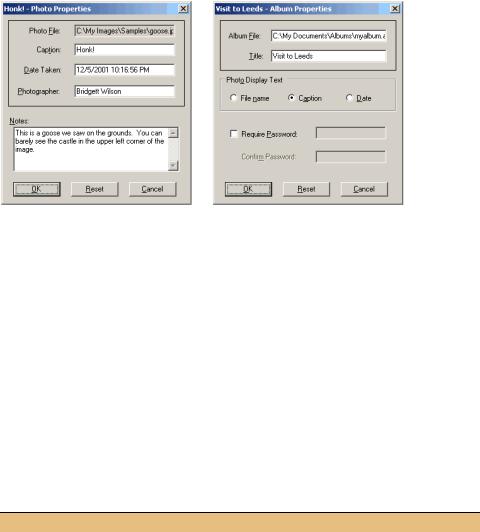
Figure 9.1 These dialogs are created using only the controls discussed in this chapter.
We could just be very careful here, and ensure that the two dialogs appear and behave in a similar manner. But who wants to be careful? Instead, this is a great chance to use a common Form for both windows to see how form inheritance works.
In this section we will create the base window and a derived window for use in subsequent sections. Since our new windows will be specific to the PhotoAlbum and Photograph classes, we will create these objects in the MyPhotoAlbum library.
9.1.1CREATING A BASE FORM
A base form is created just like any other form object. Since our base form does not use any settings we haven’t seen in earlier chapters, let’s whip through the creation of this new window. Before we do, you may recall that we modified the namespace for the Photograph and PhotoAlbum classes in chapter 5 to include the Manning prefix. Rather than continue to do this by hand, we can modify the project properties so that this namespace is used by default.
Set the version number of the MyPhotoAlbum to 9.1.
MODIFY THE NAMESPACE FOR FILES IN THE MYPHOTOALBUM PROJECT
|
Action |
Result |
|
|
|
1 |
Set the default namespace for the |
This ensures that all future classes |
|
MyPhotoAlbum project to |
created for this project will use the |
|
Manning.MyPhotoAlbum. |
Manning.MyPhotoAlbum namespace. |
|
How-to |
|
|
a. Right-click the MyPhotoAlbum project in the |
|
|
Solution Explorer window. |
|
|
b. Select Properties. |
|
|
c. In the MyPhotoAlbum Property Pages window, |
|
|
make sure the General settings are shown. |
|
|
d. Modify the Default Namespace setting to be |
|
|
“Manning.MyPhotoAlbum.” |
|
|
|
|
FORM INHERITANCE |
265 |
This ensures that any new objects added to the project will be created with this namespace. With this change in place, we can create our base form.
Here we will just create the form and its controls. Later in this section we will create some infrastructure that will be useful in our derived forms later in the chapter.
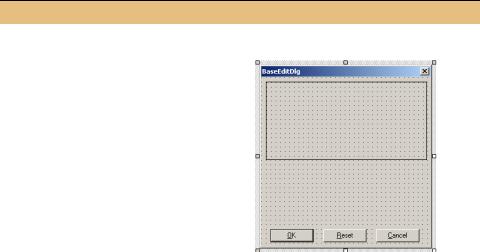
CREATE THE BASEEDITDLG FORM
|
|
|
|
Action |
|
|
|
Result |
|||
|
|
|
|
|
|
|
|
|
|
||
2 |
Add a new Form to the MyPhotoAlbum |
The new class appears in the Solution Explorer |
|||||||||
|
project called “BaseEditDlg.” |
|
|
|
window and the BaseEditDlg.cs [Design] |
||||||
|
|
|
|
|
|
|
|
|
|
|
window is displayed. |
|
|
|
|
|
|
|
|
|
|
||
3 |
Add the three buttons to the form. Assign |
|
|||||||||
|
their settings and position as shown. |
|
|||||||||
|
|
|
|
Settings |
|
|
|
|
|||
|
|
|
|
|
|
|
|
|
|
|
|
|
|
Button |
Property |
|
Value |
|
|||||
|
|
|
OK |
(Name) |
|
btnOk |
|
||||
|
|
|
|
DialogResult |
|
OK |
|
||||
|
|
|
|
|
Text |
|
&OK |
|
|||
|
|
Reset |
(Name) |
|
btnReset |
|
|||||
|
|
|
|
|
Text |
|
&Reset |
|
|||
|
|
Cancel |
(Name) |
|
btnCancel |
|
|||||
|
|
|
|
DialogResult |
|
Cancel |
|
||||
|
|
|
|
|
Text |
|
&Cancel |
|
|||
|
|
|
|
|
|
|
|
|
|
|
|
4 |
Add a Panel to the top of the form. |
|
|||||||||
|
|
|
|
Settings |
|
|
|
|
|||
|
|
|
|
|
|
|
|
||||
|
|
|
Property |
|
Value |
|
|||||
|
|
|
BorderStyle |
|
FixedSingle |
|
|||||
|
|
|
Modifiers |
|
Protected |
|
|||||
|
Note: The Modifiers property used here |
|
|||||||||
|
establishes the accessibility level of the |
|
|||||||||
|
control. The three buttons use the default |
|
|||||||||
|
setting of Private. The Protected setting |
|
|||||||||
|
creates a protected control so that it can |
|
|||||||||
|
be modified in subclasses. |
|
|
|
|
||||||
|
|
|
|
|
|
|
|
|
|
|
|
266 |
CHAPTER 9 BASIC CONTROLS |
CREATE THE BASEEDITDLG FORM (continued)
|
|
Action |
|
|
Result |
|
|
|
|
|
|
|
|
5 |
Set the properties for the BaseEditDlg |
|
||||
|
form to make it a dialog box. |
|
||||
|
|
Settings |
|
|
|
|
|
|
|
|
|
|
|
|
|
Property |
|
Value |
|
|
|
|
AcceptButton |
|
btnOk |
|
|
|
|
CancelButton |
|
btnCancel |
|
|
|
|
FormBorderStyle |
|
FixedDialog |
|
|
|
|
MaximizeBox |
|
False |
|
|
|
|
MinimizeBox |
|
False |
|
|
|
|
ShowInTaskBar |
|
False |
|
|
|
|
Size |
|
300, 320 |
|
|
|
|
|
|
|
|
|
The code generated here is similar to code we have seen for other forms in our application. The one exception is the panel1 control. The three buttons are defined as private controls as have all the controls we created in earlier chapters. The panel1 object is a protected control. As we shall see, this will allow our child forms to modify the settings of this panel, and in particular change its size to accommodate the desired collection of controls.
namespace Manning.MyPhotoAlbum
{
///<summary>
///Base form window.
///</summary>
public class BaseEditDlg : System.Windows.Forms.Form
{
private System.Windows.Forms.Button btnOk; private System.Windows.Forms.Button btnReset; private System.Windows.Forms.Button btnCancel; protected System.Windows.Forms.Panel panel1;
The cause of this change is the Modifiers property setting. This is not an actual property in the C# sense, and does not appear in the documentation for the Button class. This setting appears in the Properties window within Visual Studio to allow the access level for a control to be set. There are five possible values of this setting, as shown in the following table:
FORM INHERITANCE |
267 |