

- •brief contents
- •about this book
- •The Windows Forms namespace
- •Part 1: Hello Windows Forms
- •Part 2: Basic Windows Forms
- •Part 3: Advanced Windows Forms
- •Who should read this book?
- •Conventions
- •Action
- •Result
- •Source code downloads
- •Author online
- •acknowledgments
- •about .NET
- •Casting the .NET
- •Windows Forms overview
- •about the cover illustration
- •Hello Windows Forms
- •1.1 Programming in C#
- •1.1.1 Namespaces and classes
- •1.1.2 Constructors and methods
- •1.1.3 C# types
- •1.1.4 The entry point
- •1.1.5 The Application class
- •1.1.6 Program execution
- •1.2 Adding controls
- •1.2.1 Shortcuts and fully qualified names
- •1.2.2 Fields and properties
- •1.2.3 The Controls property
- •1.3 Loading files
- •1.3.1 Events
- •1.3.2 The OpenFileDialog class
- •1.3.3 Bitmap images
- •1.4 Resizing forms
- •1.4.1 Desktop layout properties
- •1.4.2 The Anchor property
- •1.4.3 The Dock property
- •1.5 Recap
- •2.1 Programming with Visual Studio .NET
- •2.1.1 Creating a project
- •Action
- •Result
- •2.1.2 Executing a program
- •Action
- •Result
- •2.1.3 Viewing the source code
- •View the code generated by Visual Studio .NET
- •Action
- •Result
- •2.2 Adding controls
- •2.2.1 The AssemblyInfo file
- •Action
- •Results
- •2.2.2 Renaming a form
- •Action
- •Result
- •2.2.3 The Toolbox window
- •Action
- •Result
- •2.3 Loading files
- •2.3.1 Event handlers in Visual Studio .NET
- •Action
- •Result
- •2.3.2 Exception handling
- •Action
- •Result
- •Action
- •Results and Comments
- •2.4 Resizing forms
- •2.4.1 Assign the Anchor property
- •Action
- •Result
- •2.4.2 Assign the MinimumSize property
- •Action
- •Result
- •2.5 Recap
- •Basic Windows Forms
- •Menus
- •Action
- •Result
- •Action
- •Result
- •Action
- •Result
- •Action
- •Result
- •3.3 Click events
- •Action
- •Result
- •Action
- •Result
- •Action
- •Result
- •Action
- •Result
- •Action
- •Result
- •Action
- •Result
- •3.5 Context menus
- •Action
- •Result
- •Action
- •Result
- •3.6 Recap
- •Status bars
- •4.1 The Control class
- •4.2 The StatusBar class
- •Action
- •Result
- •Action
- •Result
- •4.3.1 Adding panels to a status bar
- •Action
- •Result
- •Action
- •Result
- •Action
- •Result
- •Action
- •Result
- •4.5 Recap
- •Reusable libraries
- •5.1 C# classes and interfaces
- •5.2 Class libraries
- •Action
- •Result
- •Action
- •Result
- •Action
- •Result
- •Action
- •Result
- •Action
- •Result
- •Action
- •Result
- •Action
- •Result
- •Action
- •Result
- •Action
- •Result
- •5.3 Interfaces revisited
- •Action
- •Result
- •Action
- •Result
- •Action
- •Result
- •5.4 Robustness issues
- •Action
- •Result
- •Action
- •Result
- •Action
- •Result
- •Action
- •Result
- •Action
- •Result
- •Action
- •Result
- •Common file dialogs
- •Action
- •Results
- •Action
- •Result
- •Action
- •Result
- •Action
- •Result
- •Action
- •Result
- •6.3 Paint events
- •Action
- •Result
- •Action
- •Result
- •6.4 Context menus revisited
- •Action
- •Result
- •Action
- •Result
- •6.5 Files and paths
- •Action
- •Result
- •Action
- •Result
- •Action
- •Result
- •6.6 Save file dialogs
- •Action
- •Result
- •Action
- •Result
- •Action
- •Result
- •Action
- •Result
- •Action
- •Result
- •6.7 Open file dialogs
- •Action
- •Result
- •Action
- •Result
- •6.8 Recap
- •Drawing and scrolling
- •7.1 Form class hierarchy
- •Action
- •Result
- •Action
- •Result
- •Action
- •Result
- •Action
- •Result
- •Action
- •Result
- •Action
- •Result
- •Action
- •Result
- •Action
- •Result
- •Action
- •Result
- •Action
- •Result
- •Action
- •Result
- •Action
- •Result
- •7.4 Panels
- •Action
- •Result
- •Action
- •Result
- •Action
- •Result
- •Action
- •Result
- •Action
- •Result
- •Dialog boxes
- •8.1 Message boxes
- •Action
- •Result
- •Action
- •Result
- •8.1.4 Creating A YesNoCancel dialog
- •Action
- •Result
- •Action
- •Result
- •8.2 The Form.Close method
- •8.2.1 The relationship between Close and Dispose
- •Action
- •Result
- •8.3 Modal dialog boxes
- •Action
- •Result
- •Action
- •Result
- •8.3.2 Preserving caption values
- •Action
- •Result
- •Action
- •Result
- •Action
- •Result
- •Action
- •Result
- •Action
- •Result
- •Action
- •Result
- •Action
- •Result
- •Action
- •Result
- •Action
- •Result
- •Action
- •Result
- •Action
- •Result
- •Action
- •Result
- •Action
- •Result
- •Action
- •Result
- •Action
- •Result
- •Action
- •Result
- •Action
- •Result
- •Basic controls
- •Action
- •Result
- •Action
- •Result
- •Action
- •Result
- •9.1.2 Creating a derived form
- •Action
- •Result
- •9.2 Labels and text boxes
- •Action
- •Result
- •Action
- •Result
- •Action
- •Result
- •Action
- •Result
- •Action
- •Result
- •Action
- •Result
- •Action
- •Result
- •Action
- •Result
- •Action
- •Result
- •Action
- •Result
- •Action
- •Result
- •Action
- •Result
- •Action
- •Result
- •Action
- •Result
- •Action
- •Result
- •Action
- •Result
- •Action
- •Result
- •Action
- •Result
- •9.3.6 Adding AlbumEditDlg to our main form
- •Action
- •Result
- •Action
- •Result
- •9.4 Recap
- •List controls
- •10.1 List boxes
- •Action
- •Result
- •Action
- •Result
- •Action
- •Result
- •Action
- •Result
- •10.2 Multiselection list boxes
- •10.2.1 Enabling multiple selection
- •Action
- •Result
- •Action
- •Result
- •Action
- •Result
- •Action
- •Result
- •10.3 Combo boxes
- •Action
- •Result
- •Action
- •Result
- •10.4 Combo box edits
- •Action
- •Result
- •Action
- •Result
- •Action
- •Result
- •10.5 Owner-drawn lists
- •Action
- •Result
- •Action
- •Result
- •Action
- •Result
- •Action
- •Result
- •More controls
- •Action
- •Result
- •Action
- •Result
- •11.2 Tab pages
- •Action
- •Result
- •Action
- •Result
- •11.3.1 Dates and times
- •Action
- •Result
- •Action
- •Result
- •Action
- •Result
- •Action
- •Result
- •Action
- •Result
- •Action
- •Result
- •11.5 Recap
- •A .NET assortment
- •12.1 Keyboard events
- •Action
- •Result
- •Action
- •Result
- •12.2 Mouse events
- •Action
- •Result
- •Action
- •Result
- •Action
- •Result
- •12.3 Image buttons
- •Action
- •Result
- •Action
- •Result
- •Action
- •Result
- •Action
- •Result
- •Action
- •Result
- •Action
- •Result
- •Action
- •Result
- •Action
- •Result
- •Action
- •Result
- •12.4 Icons
- •Action
- •Result
- •Action
- •Result
- •Action
- •Result
- •12.5 Recap
- •Toolbars and tips
- •13.1 Toolbars
- •Action
- •Result
- •Action
- •Result
- •Action
- •Result
- •Action
- •Result
- •Action
- •Result
- •Action
- •Result
- •Action
- •Result
- •Action
- •Result
- •Action
- •Result
- •13.4.2 Creating tool tips
- •Action
- •Result
- •Action
- •Result
- •Advanced Windows Forms
- •List views
- •14.2 The ListView class
- •Action
- •Result
- •Action
- •Result
- •Action
- •Result
- •Action
- •Result
- •14.2.3 Populating a ListView
- •Action
- •Result
- •Action
- •14.3 ListView columns
- •Action
- •Result
- •Action
- •Result
- •Action
- •Result
- •Action
- •Result
- •Action
- •Result
- •Action
- •Result
- •Action
- •Result
- •Action
- •Result
- •Action
- •Result
- •Action
- •Result
- •Action
- •Result
- •Action
- •Result
- •Action
- •Result
- •Action
- •Result
- •Action
- •Result
- •Action
- •Result
- •Action
- •Result
- •Action
- •Result
- •Action
- •Result
- •14.6 Recap
- •Tree views
- •Action
- •Result
- •Action
- •Result
- •Action
- •Result
- •15.3 Dynamic tree nodes
- •Action
- •Result
- •Action
- •Result
- •Action
- •Result
- •Action
- •Result
- •Action
- •Result
- •15.4 Node selection
- •Action
- •Result
- •Action
- •Result
- •Action
- •Result
- •Action
- •Result
- •Action
- •Result
- •15.5 Fun with tree views
- •Action
- •Result
- •Action
- •Result
- •Action
- •Result
- •Multiple document interfaces
- •Action
- •Result
- •Action
- •Result
- •Action
- •Result
- •16.3 Merged menus
- •Action
- •Result
- •Action
- •Result
- •Action
- •Result
- •Action
- •Result
- •16.4 MDI children
- •Action
- •Result
- •Action
- •Result
- •Action
- •Result
- •Action
- •Result
- •Action
- •Result
- •Action
- •Result
- •Action
- •Result
- •Action
- •Result
- •Action
- •Result
- •Action
- •Result
- •16.5 MDI child window management
- •Action
- •Result
- •Action
- •Result
- •16.6 Recap
- •Data binding
- •17.1 Data grids
- •Action
- •Result
- •Action
- •Result
- •17.2 Data grid customization
- •Action
- •Result
- •Action
- •Result
- •Action
- •Result
- •Action
- •Result
- •Action
- •Result
- •Action
- •Result
- •Action
- •Result
- •Action
- •Result
- •Action
- •Result
- •Action
- •Result
- •Action
- •Result
- •Odds and ends .NET
- •Action
- •Result
- •Action
- •Result
- •Action
- •Result
- •Action
- •Result
- •18.2 Timers
- •Action
- •Result
- •Action
- •Result
- •18.3 Drag and drop
- •Action
- •Result
- •Action
- •Result
- •18.4 ActiveX controls
- •Action
- •Result
- •Action
- •Result
- •Action
- •Result
- •Action
- •Result
- •Action
- •Result
- •18.5 Recap
- •C# primer
- •A.1 C# programs
- •A.1.1 Assemblies
- •A.1.2 Namespaces
- •A.2 Types
- •A.2.1 Classes
- •A.2.2 Structures
- •A.2.3 Interfaces
- •A.2.4 Enumerations
- •A.2.5 Delegates
- •A.3 Language elements
- •A.3.1 Built-in types
- •A.3.2 Operators
- •A.3.3 Keywords
- •A.4 Special features
- •A.4.1 Exceptions
- •A.4.2 Arrays
- •A.4.3 Main
- •A.4.4 Boxing
- •A.4.5 Documentation
- •.NET namespaces
- •B.1 System.Collections
- •B.2 System.ComponentModel
- •B.3 System.Data
- •B.4 System.Drawing
- •B.5 System.Globalization
- •B.6 System.IO
- •B.7 System.Net
- •B.8 System.Reflection
- •B.9 System.Resources
- •B.10 System.Security
- •B.11 System.Threading
- •B.12 System.Web
- •B.13 System.Windows.Forms
- •B.14 System.XML
- •Visual index
- •C.1 Objects
- •C.2 Marshal by reference objects
- •C.3 Components
- •C.4 Common dialogs
- •C.7 Event data
- •C.8 Enumerations
- •For more information
- •bibliography
- •Symbols
- •Index

this.AutoScaleBaseSize = new System.Drawing.Size(5, 13); this.ClientSize = new System.Drawing.Size(344, 125); this.ControlBox = false;
this.Controls.AddRange(new System.Windows.Forms.Control[] { this.txtCaption, this.lblImage, this.label2,
this.label1,
this.btnCancel,
this.btnOK});
this.FormBorderStyle
=System.Windows.Forms.FormBorderStyle.FixedDialog; this.MaximizeBox = false;
this.MinimizeBox = false; this.Name = "CaptionDlg"; this.ShowInTaskbar = false; this.StartPosition
=System.Windows.Forms.FormStartPosition.CenterParent; this.Text = "CaptionDlg";
this.ResumeLayout(false);
}
#endregion
Our dialog box is now ready from a display perspective. There is still the matter of making sure our main form can make use of it to edit a caption for an image. For this, we will need to add some properties to our CaptionDlg class.
8.3.4ADDING PROPERTIES TO THE CAPTIONDLG FORM
So far we have modified our data layer to understand photograph captions, and created a dialog to use for editing this caption. To integrate this dialog with the rest of our application, we need to ensure that the MainForm class can set the text to appear in the Label and TextBox controls of a CaptionDlg instance before the dialog is displayed, and retrieve the modified TextBox value after the dialog is finished. We must also ensure that the result of the dialog, whether the user pressed OK or Cancel, can be detected by the caller.
If we were programming in C++, we might create SetImage, SetCaption, and GetCaption methods to allow the lblImage and txtCaption values to be modified. In C#, the property construct provides a slightly more elegant solution.
ADD IMAGELABEL AND CAPTION PROPERTIES TO OUR DIALOG
|
Action |
Result |
|
|
|
1 |
Add an ImageLabel property |
public string ImageLabel |
|
to the CaptionDlg.cs source |
{ |
|
window. |
|
|
|
|
MODAL DIALOG BOXES |
247 |
ADD IMAGELABEL AND CAPTION PROPERTIES TO OUR DIALOG (continued)
|
Action |
Result |
|
|
|
2 |
Implement set for this |
set { lblImage.Text = value; } |
|
property to modify the text for |
} |
|
the lblImage label. |
Note: This code relies on the .NET Framework to dis- |
|
|
play this value in the control and deal with an empty |
|
|
or null string. |
|
|
|
3 |
Add a Caption property. |
public string Caption |
|
|
{ |
|
|
|
4 |
Implement set for this |
set { txtCaption.Text = value; } |
|
property to modify the text for |
|
|
the txtCaption text box. |
|
|
|
|
5 |
Implement get to return this |
get { return txtCaption.Text; } |
|
text value. |
} |
|
|
|
These properties will allow the values in the dialog to be set and retrieved as appropriate. Our last task is to return the appropriate value based on which button the user selects.
We have already seen how the DialogResult enumeration encapsulates the possible values returned by the MessageBox.Show method. For Form objects, the ShowDialog method returns this enumeration for a similar purpose. Here, we would like this method to return DialogResult.OK if the user clicks the OK button or presses the Enter key, and DialogResult.Cancel if the user clicks the Cancel button or presses the Esc key.
The Form class handles the keyboard values, namely the Enter and Esc keys, directly via the AcceptButton and CancelButton properties. We will look at returning the proper value from the ShowDialog method in a moment.
ALLOW THE DIALOG TO BE CLOSED VIA THE KEYBOARD
|
Action |
Result |
|
|
|
6 |
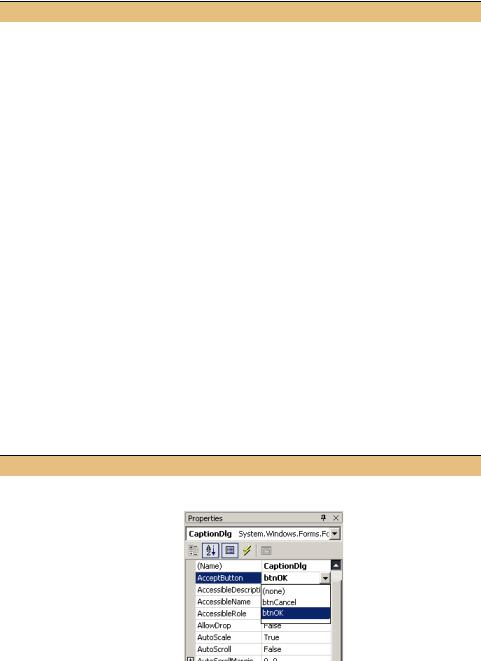
From the CaptionDlg.cs |
|
|
[Design] window, assign |
|
|
the OK button as the |
|
|
accept button for the form, |
|
|
to be activated when the |
|
|
user presses the Enter key. |
|
|
How-to |
|
|
a. Display the properties for |
|
|
the form. |
|
|
b. Click the down arrow to |
|
|
the right of the Accept- |
|
|
Button entry in the list. |
|
|
c. Select btnOK. |
|
|
|
|
248 |
CHAPTER 8 DIALOG BOXES |

ALLOW THE DIALOG TO BE CLOSED VIA THE KEYBOARD (continued)
|
Action |
Result |
|
|
|
7 |
Similarly, set the |
These settings assign each property to the selected button |
|
CancelButton property to |
object in the InitializeComponent method of the |
|
the btnCancel button. |
CaptionDlg.cs source file. |
|
|
this.AcceptButton = this.btnOK; |
|
|
this.CancelButton = this.btnCancel; |
|
|
|
The Form now invokes the OK or Cancel button when the user presses the Enter or Esc key, respectively.
We also need to ensure that the ShowDialog method returns the proper result when one of these buttons is clicked or invoked via the keyboard. The Button class provides a DialogResult property for this purpose. When this property is set, clicking the corresponding button will automatically hide the parent form and return the selected result.3 We already set these properties to the appropriate values while creating the buttons, so the InitializeComponent method already defines these settings.
btnOK.DialogResult = System.Windows.Forms.DialogResult.OK;
btnCancel.DialogResult = System.Windows.Forms.DialogResult.Cancel;
We will see how the settings interact with the ShowDialog method when we display the dialog from our MainForm class. This is our next topic.
8.3.5DISPLAYING THE DIALOG IN THE MAINFORM CLASS
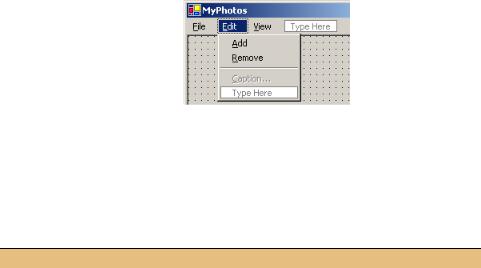
We can now turn to our MainForm class in order to invoke the dialog and edit a photo’s caption. We do this via our menu bar, of course. Since we are editing an aspect of the photo, we will place a Caption menu item under the Edit menu. This section defines our new menu and creates a Click handler for this menu to display the CaptionDlg form to the user.
We will begin by adding a new menu item to our main form.
|
ADD A CAPTION ITEM TO THE EDIT MENU |
||
|
|
|
|
|
Action |
|
Result |
|
|
|
|
1 |
Click the Edit menu in the |
|
|
|
MainForm.cs [Design] |
|
|
|
window. |
|
|
|
|
|
|
2 |
Add a menu separator after |
|
|
|
the Remove menu item. |
|
|
|
|
|
|
|
|
|
|
3 The term “hide” here is intentional. Pursuant to our earlier discussion on the equivalence of Close and Dispose, modal dialog boxes must be disposed of manually to allow their members to be accessed after ShowDialog returns. As a result, the framework only hides our dialog by calling the Hide method when the OK or Cancel button is clicked.
MODAL DIALOG BOXES |
249 |
|
|
|
ADD A CAPTION ITEM TO THE EDIT MENU |
(continued) |
||
|
|
|
|
|
|
|
|
|
Action |
|
Result |
||
|
|
|
|
|
|
|
3 |
Add a “&Caption…” menu |
|
|
|||
|
under the separator. |
|
|
|||
|
|
Settings |
|
|
||
|
|
|
|
|
|
|
|
|
Property |
Value |
|
|
|
|
|
(Name) |
menuCaption |
|
|
|
|
|
Enabled |
False |
|
|
|
|
|
Text |
&Caption... |
|
|
|
|
|
|
|
|
|
|
We set the Enabled property for the menu to false since an image will not be shown when the application starts.
To enable this menu, we could use the existing OnPaint method of our form. A simpler approach is to add a Popup event handler for the parent Edit menu, and enable or disable the Caption menu as required just before it displays.
ENABLE THE CAPTION MENU IN A POPUP HANDLER
|
Action |
Result |
|
|
|
4 |
Add a Popup event handler |
public void menuEdit_Popup |
|
for the Edit menu. |
(object sender, EventArgs e) |
|
How-to |
{ |
|
|
|
|
Double-click the Popup |
|
|
item in the list of events for |
|
|
the Edit menu. |
|
|
|
|
5 |
Set the Enabled property |
menuCaption.Enabled = (_album.Count > 0); |
|
for the Caption menu |
} |
|
based on whether an |
|
|
image is currently |
|
|
displayed. |
|
|
|
|
Our Caption menu is enabled whenever photographs are available and therefore displayed, and disabled when the album is empty.
The final task in this section is to implement a Click handler for our menu. This handler will display our CaptionDlg form and modify the caption as required. This task continues the previous steps and pulls together all the changes we have made in this section.
250 |
CHAPTER 8 DIALOG BOXES |