

- •brief contents
- •about this book
- •The Windows Forms namespace
- •Part 1: Hello Windows Forms
- •Part 2: Basic Windows Forms
- •Part 3: Advanced Windows Forms
- •Who should read this book?
- •Conventions
- •Action
- •Result
- •Source code downloads
- •Author online
- •acknowledgments
- •about .NET
- •Casting the .NET
- •Windows Forms overview
- •about the cover illustration
- •Hello Windows Forms
- •1.1 Programming in C#
- •1.1.1 Namespaces and classes
- •1.1.2 Constructors and methods
- •1.1.3 C# types
- •1.1.4 The entry point
- •1.1.5 The Application class
- •1.1.6 Program execution
- •1.2 Adding controls
- •1.2.1 Shortcuts and fully qualified names
- •1.2.2 Fields and properties
- •1.2.3 The Controls property
- •1.3 Loading files
- •1.3.1 Events
- •1.3.2 The OpenFileDialog class
- •1.3.3 Bitmap images
- •1.4 Resizing forms
- •1.4.1 Desktop layout properties
- •1.4.2 The Anchor property
- •1.4.3 The Dock property
- •1.5 Recap
- •2.1 Programming with Visual Studio .NET
- •2.1.1 Creating a project
- •Action
- •Result
- •2.1.2 Executing a program
- •Action
- •Result
- •2.1.3 Viewing the source code
- •View the code generated by Visual Studio .NET
- •Action
- •Result
- •2.2 Adding controls
- •2.2.1 The AssemblyInfo file
- •Action
- •Results
- •2.2.2 Renaming a form
- •Action
- •Result
- •2.2.3 The Toolbox window
- •Action
- •Result
- •2.3 Loading files
- •2.3.1 Event handlers in Visual Studio .NET
- •Action
- •Result
- •2.3.2 Exception handling
- •Action
- •Result
- •Action
- •Results and Comments
- •2.4 Resizing forms
- •2.4.1 Assign the Anchor property
- •Action
- •Result
- •2.4.2 Assign the MinimumSize property
- •Action
- •Result
- •2.5 Recap
- •Basic Windows Forms
- •Menus
- •Action
- •Result
- •Action
- •Result
- •Action
- •Result
- •Action
- •Result
- •3.3 Click events
- •Action
- •Result
- •Action
- •Result
- •Action
- •Result
- •Action
- •Result
- •Action
- •Result
- •Action
- •Result
- •3.5 Context menus
- •Action
- •Result
- •Action
- •Result
- •3.6 Recap
- •Status bars
- •4.1 The Control class
- •4.2 The StatusBar class
- •Action
- •Result
- •Action
- •Result
- •4.3.1 Adding panels to a status bar
- •Action
- •Result
- •Action
- •Result
- •Action
- •Result
- •Action
- •Result
- •4.5 Recap
- •Reusable libraries
- •5.1 C# classes and interfaces
- •5.2 Class libraries
- •Action
- •Result
- •Action
- •Result
- •Action
- •Result
- •Action
- •Result
- •Action
- •Result
- •Action
- •Result
- •Action
- •Result
- •Action
- •Result
- •Action
- •Result
- •5.3 Interfaces revisited
- •Action
- •Result
- •Action
- •Result
- •Action
- •Result
- •5.4 Robustness issues
- •Action
- •Result
- •Action
- •Result
- •Action
- •Result
- •Action
- •Result
- •Action
- •Result
- •Action
- •Result
- •Common file dialogs
- •Action
- •Results
- •Action
- •Result
- •Action
- •Result
- •Action
- •Result
- •Action
- •Result
- •6.3 Paint events
- •Action
- •Result
- •Action
- •Result
- •6.4 Context menus revisited
- •Action
- •Result
- •Action
- •Result
- •6.5 Files and paths
- •Action
- •Result
- •Action
- •Result
- •Action
- •Result
- •6.6 Save file dialogs
- •Action
- •Result
- •Action
- •Result
- •Action
- •Result
- •Action
- •Result
- •Action
- •Result
- •6.7 Open file dialogs
- •Action
- •Result
- •Action
- •Result
- •6.8 Recap
- •Drawing and scrolling
- •7.1 Form class hierarchy
- •Action
- •Result
- •Action
- •Result
- •Action
- •Result
- •Action
- •Result
- •Action
- •Result
- •Action
- •Result
- •Action
- •Result
- •Action
- •Result
- •Action
- •Result
- •Action
- •Result
- •Action
- •Result
- •Action
- •Result
- •7.4 Panels
- •Action
- •Result
- •Action
- •Result
- •Action
- •Result
- •Action
- •Result
- •Action
- •Result
- •Dialog boxes
- •8.1 Message boxes
- •Action
- •Result
- •Action
- •Result
- •8.1.4 Creating A YesNoCancel dialog
- •Action
- •Result
- •Action
- •Result
- •8.2 The Form.Close method
- •8.2.1 The relationship between Close and Dispose
- •Action
- •Result
- •8.3 Modal dialog boxes
- •Action
- •Result
- •Action
- •Result
- •8.3.2 Preserving caption values
- •Action
- •Result
- •Action
- •Result
- •Action
- •Result
- •Action
- •Result
- •Action
- •Result
- •Action
- •Result
- •Action
- •Result
- •Action
- •Result
- •Action
- •Result
- •Action
- •Result
- •Action
- •Result
- •Action
- •Result
- •Action
- •Result
- •Action
- •Result
- •Action
- •Result
- •Action
- •Result
- •Action
- •Result
- •Basic controls
- •Action
- •Result
- •Action
- •Result
- •Action
- •Result
- •9.1.2 Creating a derived form
- •Action
- •Result
- •9.2 Labels and text boxes
- •Action
- •Result
- •Action
- •Result
- •Action
- •Result
- •Action
- •Result
- •Action
- •Result
- •Action
- •Result
- •Action
- •Result
- •Action
- •Result
- •Action
- •Result
- •Action
- •Result
- •Action
- •Result
- •Action
- •Result
- •Action
- •Result
- •Action
- •Result
- •Action
- •Result
- •Action
- •Result
- •Action
- •Result
- •Action
- •Result
- •9.3.6 Adding AlbumEditDlg to our main form
- •Action
- •Result
- •Action
- •Result
- •9.4 Recap
- •List controls
- •10.1 List boxes
- •Action
- •Result
- •Action
- •Result
- •Action
- •Result
- •Action
- •Result
- •10.2 Multiselection list boxes
- •10.2.1 Enabling multiple selection
- •Action
- •Result
- •Action
- •Result
- •Action
- •Result
- •Action
- •Result
- •10.3 Combo boxes
- •Action
- •Result
- •Action
- •Result
- •10.4 Combo box edits
- •Action
- •Result
- •Action
- •Result
- •Action
- •Result
- •10.5 Owner-drawn lists
- •Action
- •Result
- •Action
- •Result
- •Action
- •Result
- •Action
- •Result
- •More controls
- •Action
- •Result
- •Action
- •Result
- •11.2 Tab pages
- •Action
- •Result
- •Action
- •Result
- •11.3.1 Dates and times
- •Action
- •Result
- •Action
- •Result
- •Action
- •Result
- •Action
- •Result
- •Action
- •Result
- •Action
- •Result
- •11.5 Recap
- •A .NET assortment
- •12.1 Keyboard events
- •Action
- •Result
- •Action
- •Result
- •12.2 Mouse events
- •Action
- •Result
- •Action
- •Result
- •Action
- •Result
- •12.3 Image buttons
- •Action
- •Result
- •Action
- •Result
- •Action
- •Result
- •Action
- •Result
- •Action
- •Result
- •Action
- •Result
- •Action
- •Result
- •Action
- •Result
- •Action
- •Result
- •12.4 Icons
- •Action
- •Result
- •Action
- •Result
- •Action
- •Result
- •12.5 Recap
- •Toolbars and tips
- •13.1 Toolbars
- •Action
- •Result
- •Action
- •Result
- •Action
- •Result
- •Action
- •Result
- •Action
- •Result
- •Action
- •Result
- •Action
- •Result
- •Action
- •Result
- •Action
- •Result
- •13.4.2 Creating tool tips
- •Action
- •Result
- •Action
- •Result
- •Advanced Windows Forms
- •List views
- •14.2 The ListView class
- •Action
- •Result
- •Action
- •Result
- •Action
- •Result
- •Action
- •Result
- •14.2.3 Populating a ListView
- •Action
- •Result
- •Action
- •14.3 ListView columns
- •Action
- •Result
- •Action
- •Result
- •Action
- •Result
- •Action
- •Result
- •Action
- •Result
- •Action
- •Result
- •Action
- •Result
- •Action
- •Result
- •Action
- •Result
- •Action
- •Result
- •Action
- •Result
- •Action
- •Result
- •Action
- •Result
- •Action
- •Result
- •Action
- •Result
- •Action
- •Result
- •Action
- •Result
- •Action
- •Result
- •Action
- •Result
- •14.6 Recap
- •Tree views
- •Action
- •Result
- •Action
- •Result
- •Action
- •Result
- •15.3 Dynamic tree nodes
- •Action
- •Result
- •Action
- •Result
- •Action
- •Result
- •Action
- •Result
- •Action
- •Result
- •15.4 Node selection
- •Action
- •Result
- •Action
- •Result
- •Action
- •Result
- •Action
- •Result
- •Action
- •Result
- •15.5 Fun with tree views
- •Action
- •Result
- •Action
- •Result
- •Action
- •Result
- •Multiple document interfaces
- •Action
- •Result
- •Action
- •Result
- •Action
- •Result
- •16.3 Merged menus
- •Action
- •Result
- •Action
- •Result
- •Action
- •Result
- •Action
- •Result
- •16.4 MDI children
- •Action
- •Result
- •Action
- •Result
- •Action
- •Result
- •Action
- •Result
- •Action
- •Result
- •Action
- •Result
- •Action
- •Result
- •Action
- •Result
- •Action
- •Result
- •Action
- •Result
- •16.5 MDI child window management
- •Action
- •Result
- •Action
- •Result
- •16.6 Recap
- •Data binding
- •17.1 Data grids
- •Action
- •Result
- •Action
- •Result
- •17.2 Data grid customization
- •Action
- •Result
- •Action
- •Result
- •Action
- •Result
- •Action
- •Result
- •Action
- •Result
- •Action
- •Result
- •Action
- •Result
- •Action
- •Result
- •Action
- •Result
- •Action
- •Result
- •Action
- •Result
- •Odds and ends .NET
- •Action
- •Result
- •Action
- •Result
- •Action
- •Result
- •Action
- •Result
- •18.2 Timers
- •Action
- •Result
- •Action
- •Result
- •18.3 Drag and drop
- •Action
- •Result
- •Action
- •Result
- •18.4 ActiveX controls
- •Action
- •Result
- •Action
- •Result
- •Action
- •Result
- •Action
- •Result
- •Action
- •Result
- •18.5 Recap
- •C# primer
- •A.1 C# programs
- •A.1.1 Assemblies
- •A.1.2 Namespaces
- •A.2 Types
- •A.2.1 Classes
- •A.2.2 Structures
- •A.2.3 Interfaces
- •A.2.4 Enumerations
- •A.2.5 Delegates
- •A.3 Language elements
- •A.3.1 Built-in types
- •A.3.2 Operators
- •A.3.3 Keywords
- •A.4 Special features
- •A.4.1 Exceptions
- •A.4.2 Arrays
- •A.4.3 Main
- •A.4.4 Boxing
- •A.4.5 Documentation
- •.NET namespaces
- •B.1 System.Collections
- •B.2 System.ComponentModel
- •B.3 System.Data
- •B.4 System.Drawing
- •B.5 System.Globalization
- •B.6 System.IO
- •B.7 System.Net
- •B.8 System.Reflection
- •B.9 System.Resources
- •B.10 System.Security
- •B.11 System.Threading
- •B.12 System.Web
- •B.13 System.Windows.Forms
- •B.14 System.XML
- •Visual index
- •C.1 Objects
- •C.2 Marshal by reference objects
- •C.3 Components
- •C.4 Common dialogs
- •C.7 Event data
- •C.8 Enumerations
- •For more information
- •bibliography
- •Symbols
- •Index
TRY IT! You may have noticed that our interface is not very friendly for albums that happen to contain a password. Since each album is opened in the OnLoad method, before the MainForm window is displayed, any passwords required must be entered before the user even sees the application window.
As an alternative approach, modify the PhotoAlbum class to provide a static GetInfo method, and use this new method in the MainForm.OpenAlbum method of our application. This method should simply return the required statistics for a given album and ignore any password required. While this alters the meaning of the existing password mechanism slightly, it does not provide access to the photographs contained in the album.
In your implementation of the GetInfo method, return a new AlbumInfo structure that provides access to the statistics for the album. This structure can use the same property names as the PhotoAlbum class. In order to accommodate changes made in the remainder of this chapter, you should implement properties to provide the title of the album, whether or not a password is required, and the number of photographs stored in the album. Make certain you close the album regardless of whether or not an exception occurs.
14.3LISTVIEW COLUMNS
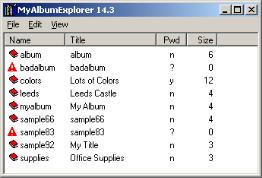
The MyAlbumExplorer application displays three out of four possible View settings just fine. Not the best percentage we could hope for, so let’s see what it takes to add a Details view to our application. This is the only view that displays the collection of subitems associated with each item. The subitems display in columns to the right of the item label, as shown in figure 14.3.
Figure 14.3
The size of a column in the Details view can be changed by clicking on the line at the end of the column.
The columns in a list view are contained in the control’s Columns property. This property contains a collection of ColumnHeader components. The order of objects in this collection reflects the order in which columns are displayed in the control. As a result, the order of subitems in each ListViewItem object must match the order of
LISTVIEW COLUMNS |
453 |

objects contained in the Columns collection. An overview of the ColumnHeader class is given in .NET Table 14.4. Note that the contents of the Columns property are cleared whenever the Clear method is called on the associated ListView control.
In order to fill in the Details view for our list control, we will first create the columns for the list, and then add the required subitems to each item as we populate the list. This section will finish with a discussion of how sorting can be performed in the Details view.
.NET Table 14.4 ColumnHeader class
The ColumnHeader class represents a single column in a ListView control. These columns appear when the View property for the control is set to Details, and they display the subitems associated with each item in the view. The ColumnHeader class is part of the System.Windows.Forms namespace. It is derived from the System.ComponentModel.Component class, and supports the IClonable interface.
|
Index |
Gets the location of the component within the containing |
|
|
ListView control’s Columns collection. |
|
ListView |
Gets the list view control containing this column header. |
Public Properties |
Text |
Gets or sets the text to display in the column header. |
|
TextAlign |
Gets or sets the horizontal alignment of both the text in the |
|
|
header and the subitems displayed in the column. |
|
Width |
Gets or sets the width of the header in pixels. |
|
|
|
Public Methods |
Clone |
Creates an identical copy of the column header. This new |
|
header is not contained in any list view control. |
|
|
|
|
|
|
|
14.3.1CREATING THE COLUMNS
We will create four columns in our application. Each column will represent a setting associated with our PhotoAlbum object. In this section, we will create our columns in the Forms Designer Window, and allow Visual Studio to generate them as part of the InitializeComponent method. Since columns are cleared whenever the list view is cleared, in many cases it is better to create the ColumnHeader objects programmatically. This also permits alternate columns to be used for different types of items displayed in the list. We will see this later in the chapter when we display both
Photograph and PhotoAlbum objects in our list.
The following table summarizes the columns for our application, providing the variable name we will use and the text to appear at the top of the column. A description of the contents of each column is given as well.
Columns for displaying the albums
ColumnHeader |
Text |
Description |
|
|
|
columnName |
Name |
The base name of the album file. |
columnTitle |
Title |
Value of the Title property. |
columnPassword |
Pwd |
Whether the album requires a password. |
columnSize |
Size |
Number of Photograph objects in the album. |
|
|
|
454 |
CHAPTER 14 LIST VIEWS |
So let’s see how this is done. The following steps create these four columns and initialize their settings.
Set the version number of the MyAlbumExplorer application to 14.3.
CREATE THE COLUMNS HEADERS FOR THE LIST
Action |
Result |
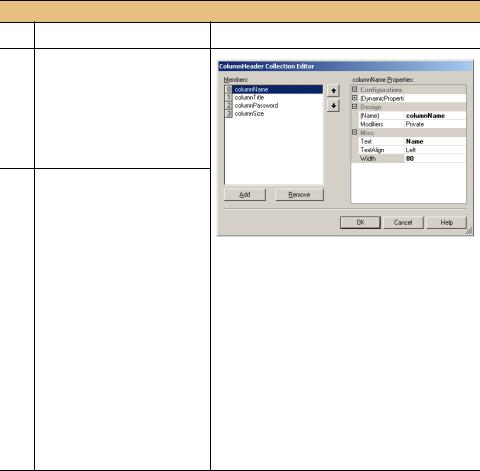
1In the MainForm.cs [Design] window, display the ColumnHeader Collection Editor for the ListView control.
How-to
Click the … button associated with the Columns property item in the Properties window.
2Add four ColumnHeader objects and assign their properties.
|
Settings |
|
|
|
|
|
|
Column |
Property |
Value |
|
File |
(Name) |
columnName |
Note: Visual Studio does not display the columns |
|
Text |
Name |
|
|
in the designer window because the View prop- |
||
|
Width |
80 |
|
|
erty for the list control is set to LargeIcon by |
||
Title |
(Name) |
columnTitle |
default. Set this property to Details and the col- |
|
Text |
Title |
umns will appear. |
|
Width |
100 |
|
Pwd |
(Name) |
columnPassword |
|
|
Text |
Pwd |
|
|
TextAlign |
Center |
|
|
Width |
40 |
|
Size |
(Name) |
columnSize |
|
|
Text |
Size |
|
|
TextAlign |
Right |
|
|
Width |
40 |
|
|
|
|
|
A quick excerpt of the InitializeComponent method follows. As the code generated here is similar to other collections we have created in earlier chapters, we will not discuss this code any further.
private void InitializeComponent()
{
. . .
this.columnTitle = new System.Windows.Forms.ColumnHeader();
this.columnSize = new System.Windows.Forms.ColumnHeader();
. . .
//
// columnTitle
LISTVIEW COLUMNS |
455 |
//
this.columnTitle.Text = "Title"; this.columnTitle.Width = 100;
//
//columnSize
this.columnSize.Text = "Size"; this.columnSize.TextAlign
=System.Windows.Forms.HorizontalAlignment.Center; this.columnSize.Width = 40;
. . .
//listViewMain
//
this.listViewMain.Columns.AddRange(
new System.Windows.Forms.ColumnHeader[] { this.columnName, this.columnTitle, this.columnPassword, this.columnSize});
. . .
}
Note that the order in which the ColumnHeader objects are added to the Columns collection is significant here as this determines the order in which the columns appear in the control. You can alter the order of a column in the ColumnHeader Collection Editor dialog using the up and down arrow buttons.
Feel free to run the application if you wish. You should now see the albums appear in the first column. The next section will populate these columns with the properties of each album.
14.3.2POPULATING THE COLUMNS
The columns in a Details listing contain both the item label and the text associated with each subitem. The first column always contains the item label, and the subsequent columns contain the contents of the list item’s SubItems property. The SubItems property contains a collection of ListViewSubItem objects. The ListViewSubItem class is only valid within the ListViewItem class, so the fully qualified class
name within the Windows Forms namespace is ListViewItem.ListViewSubItem. This class is typically created implicitly while initializing an existing
Item object or ListView control. A summary of this object appears in .NET Table 14.5.
456 |
CHAPTER 14 LIST VIEWS |

.NET Table 14.5 ListViewSubItem class
The ListViewSubItem class is an object that represents a property or other value associated with a ListViewItem object. A ListViewSubItem appears in a ListView control when the control’s View property is set to Details and a column is configured for the subitem. The set of ListViewSubItem objects associated with an item is defined by the SubItems property in the ListViewItem object.
This class is often written as ListViewItem.ListViewSubItem. It is defined within the ListViewItem class and is therefore part of the System.Windows.Forms namespace.
|
ListViewSubItem |
Initializes a new ListViewSubItem instance. |
|
|
Overloads |
|
|
ListViewItem.ListViewSubItem( |
Public |
|
ListViewItem owner, |
|
string text); |
|
Constructors |
|
ListViewItem.ListViewSubItem( |
|
|
ListViewItem owner, |
|
|
string text, |
|
|
Color foreColor, |
|
|
Color backColor, |
|
|
Font font); |
|
|
|
|
BackColor |
Gets or sets the background Color for this subitem. |
|
|
If null, or if the UserItemStyleForSubitems |
|
|
property for the containing ListViewItem is true, |
|
|
then the background color of this subitem is identical |
|
|
to the Color used for the item. |
Public Properties |
Font |
Gets or sets the Font for this subitem, with the |
|
identical caveat as that given for the BackColor |
|
|
|
property. |
|
ForeColor |
Gets or sets the foreground Color for this subitem, |
|
|
with the identical caveat as that given for the |
|
|
BackColor property. |
|
Text |
The text string for this subitem. |
|
|
|
There are a number of methods provided by the framework for adding subitems to items and items to list views. Some of the constructors available are shown here, and you can look through the online documentation to examine these and also the Add method overloads provided for each collection object. In our code we will use a fairly straightforward method to expose the individual steps along the way. In your own applications you can use the methods employed here or whatever other means works best for your situation.
Since the columns and items are already defined for our control, the only change required is to update the LoadAlbumData method to add the required subitems. The following steps outline the actions required to add the three required subitems, namely the password flag, the album size, and the album file name.
LISTVIEW COLUMNS |
457 |