

- •brief contents
- •about this book
- •The Windows Forms namespace
- •Part 1: Hello Windows Forms
- •Part 2: Basic Windows Forms
- •Part 3: Advanced Windows Forms
- •Who should read this book?
- •Conventions
- •Action
- •Result
- •Source code downloads
- •Author online
- •acknowledgments
- •about .NET
- •Casting the .NET
- •Windows Forms overview
- •about the cover illustration
- •Hello Windows Forms
- •1.1 Programming in C#
- •1.1.1 Namespaces and classes
- •1.1.2 Constructors and methods
- •1.1.3 C# types
- •1.1.4 The entry point
- •1.1.5 The Application class
- •1.1.6 Program execution
- •1.2 Adding controls
- •1.2.1 Shortcuts and fully qualified names
- •1.2.2 Fields and properties
- •1.2.3 The Controls property
- •1.3 Loading files
- •1.3.1 Events
- •1.3.2 The OpenFileDialog class
- •1.3.3 Bitmap images
- •1.4 Resizing forms
- •1.4.1 Desktop layout properties
- •1.4.2 The Anchor property
- •1.4.3 The Dock property
- •1.5 Recap
- •2.1 Programming with Visual Studio .NET
- •2.1.1 Creating a project
- •Action
- •Result
- •2.1.2 Executing a program
- •Action
- •Result
- •2.1.3 Viewing the source code
- •View the code generated by Visual Studio .NET
- •Action
- •Result
- •2.2 Adding controls
- •2.2.1 The AssemblyInfo file
- •Action
- •Results
- •2.2.2 Renaming a form
- •Action
- •Result
- •2.2.3 The Toolbox window
- •Action
- •Result
- •2.3 Loading files
- •2.3.1 Event handlers in Visual Studio .NET
- •Action
- •Result
- •2.3.2 Exception handling
- •Action
- •Result
- •Action
- •Results and Comments
- •2.4 Resizing forms
- •2.4.1 Assign the Anchor property
- •Action
- •Result
- •2.4.2 Assign the MinimumSize property
- •Action
- •Result
- •2.5 Recap
- •Basic Windows Forms
- •Menus
- •Action
- •Result
- •Action
- •Result
- •Action
- •Result
- •Action
- •Result
- •3.3 Click events
- •Action
- •Result
- •Action
- •Result
- •Action
- •Result
- •Action
- •Result
- •Action
- •Result
- •Action
- •Result
- •3.5 Context menus
- •Action
- •Result
- •Action
- •Result
- •3.6 Recap
- •Status bars
- •4.1 The Control class
- •4.2 The StatusBar class
- •Action
- •Result
- •Action
- •Result
- •4.3.1 Adding panels to a status bar
- •Action
- •Result
- •Action
- •Result
- •Action
- •Result
- •Action
- •Result
- •4.5 Recap
- •Reusable libraries
- •5.1 C# classes and interfaces
- •5.2 Class libraries
- •Action
- •Result
- •Action
- •Result
- •Action
- •Result
- •Action
- •Result
- •Action
- •Result
- •Action
- •Result
- •Action
- •Result
- •Action
- •Result
- •Action
- •Result
- •5.3 Interfaces revisited
- •Action
- •Result
- •Action
- •Result
- •Action
- •Result
- •5.4 Robustness issues
- •Action
- •Result
- •Action
- •Result
- •Action
- •Result
- •Action
- •Result
- •Action
- •Result
- •Action
- •Result
- •Common file dialogs
- •Action
- •Results
- •Action
- •Result
- •Action
- •Result
- •Action
- •Result
- •Action
- •Result
- •6.3 Paint events
- •Action
- •Result
- •Action
- •Result
- •6.4 Context menus revisited
- •Action
- •Result
- •Action
- •Result
- •6.5 Files and paths
- •Action
- •Result
- •Action
- •Result
- •Action
- •Result
- •6.6 Save file dialogs
- •Action
- •Result
- •Action
- •Result
- •Action
- •Result
- •Action
- •Result
- •Action
- •Result
- •6.7 Open file dialogs
- •Action
- •Result
- •Action
- •Result
- •6.8 Recap
- •Drawing and scrolling
- •7.1 Form class hierarchy
- •Action
- •Result
- •Action
- •Result
- •Action
- •Result
- •Action
- •Result
- •Action
- •Result
- •Action
- •Result
- •Action
- •Result
- •Action
- •Result
- •Action
- •Result
- •Action
- •Result
- •Action
- •Result
- •Action
- •Result
- •7.4 Panels
- •Action
- •Result
- •Action
- •Result
- •Action
- •Result
- •Action
- •Result
- •Action
- •Result
- •Dialog boxes
- •8.1 Message boxes
- •Action
- •Result
- •Action
- •Result
- •8.1.4 Creating A YesNoCancel dialog
- •Action
- •Result
- •Action
- •Result
- •8.2 The Form.Close method
- •8.2.1 The relationship between Close and Dispose
- •Action
- •Result
- •8.3 Modal dialog boxes
- •Action
- •Result
- •Action
- •Result
- •8.3.2 Preserving caption values
- •Action
- •Result
- •Action
- •Result
- •Action
- •Result
- •Action
- •Result
- •Action
- •Result
- •Action
- •Result
- •Action
- •Result
- •Action
- •Result
- •Action
- •Result
- •Action
- •Result
- •Action
- •Result
- •Action
- •Result
- •Action
- •Result
- •Action
- •Result
- •Action
- •Result
- •Action
- •Result
- •Action
- •Result
- •Basic controls
- •Action
- •Result
- •Action
- •Result
- •Action
- •Result
- •9.1.2 Creating a derived form
- •Action
- •Result
- •9.2 Labels and text boxes
- •Action
- •Result
- •Action
- •Result
- •Action
- •Result
- •Action
- •Result
- •Action
- •Result
- •Action
- •Result
- •Action
- •Result
- •Action
- •Result
- •Action
- •Result
- •Action
- •Result
- •Action
- •Result
- •Action
- •Result
- •Action
- •Result
- •Action
- •Result
- •Action
- •Result
- •Action
- •Result
- •Action
- •Result
- •Action
- •Result
- •9.3.6 Adding AlbumEditDlg to our main form
- •Action
- •Result
- •Action
- •Result
- •9.4 Recap
- •List controls
- •10.1 List boxes
- •Action
- •Result
- •Action
- •Result
- •Action
- •Result
- •Action
- •Result
- •10.2 Multiselection list boxes
- •10.2.1 Enabling multiple selection
- •Action
- •Result
- •Action
- •Result
- •Action
- •Result
- •Action
- •Result
- •10.3 Combo boxes
- •Action
- •Result
- •Action
- •Result
- •10.4 Combo box edits
- •Action
- •Result
- •Action
- •Result
- •Action
- •Result
- •10.5 Owner-drawn lists
- •Action
- •Result
- •Action
- •Result
- •Action
- •Result
- •Action
- •Result
- •More controls
- •Action
- •Result
- •Action
- •Result
- •11.2 Tab pages
- •Action
- •Result
- •Action
- •Result
- •11.3.1 Dates and times
- •Action
- •Result
- •Action
- •Result
- •Action
- •Result
- •Action
- •Result
- •Action
- •Result
- •Action
- •Result
- •11.5 Recap
- •A .NET assortment
- •12.1 Keyboard events
- •Action
- •Result
- •Action
- •Result
- •12.2 Mouse events
- •Action
- •Result
- •Action
- •Result
- •Action
- •Result
- •12.3 Image buttons
- •Action
- •Result
- •Action
- •Result
- •Action
- •Result
- •Action
- •Result
- •Action
- •Result
- •Action
- •Result
- •Action
- •Result
- •Action
- •Result
- •Action
- •Result
- •12.4 Icons
- •Action
- •Result
- •Action
- •Result
- •Action
- •Result
- •12.5 Recap
- •Toolbars and tips
- •13.1 Toolbars
- •Action
- •Result
- •Action
- •Result
- •Action
- •Result
- •Action
- •Result
- •Action
- •Result
- •Action
- •Result
- •Action
- •Result
- •Action
- •Result
- •Action
- •Result
- •13.4.2 Creating tool tips
- •Action
- •Result
- •Action
- •Result
- •Advanced Windows Forms
- •List views
- •14.2 The ListView class
- •Action
- •Result
- •Action
- •Result
- •Action
- •Result
- •Action
- •Result
- •14.2.3 Populating a ListView
- •Action
- •Result
- •Action
- •14.3 ListView columns
- •Action
- •Result
- •Action
- •Result
- •Action
- •Result
- •Action
- •Result
- •Action
- •Result
- •Action
- •Result
- •Action
- •Result
- •Action
- •Result
- •Action
- •Result
- •Action
- •Result
- •Action
- •Result
- •Action
- •Result
- •Action
- •Result
- •Action
- •Result
- •Action
- •Result
- •Action
- •Result
- •Action
- •Result
- •Action
- •Result
- •Action
- •Result
- •14.6 Recap
- •Tree views
- •Action
- •Result
- •Action
- •Result
- •Action
- •Result
- •15.3 Dynamic tree nodes
- •Action
- •Result
- •Action
- •Result
- •Action
- •Result
- •Action
- •Result
- •Action
- •Result
- •15.4 Node selection
- •Action
- •Result
- •Action
- •Result
- •Action
- •Result
- •Action
- •Result
- •Action
- •Result
- •15.5 Fun with tree views
- •Action
- •Result
- •Action
- •Result
- •Action
- •Result
- •Multiple document interfaces
- •Action
- •Result
- •Action
- •Result
- •Action
- •Result
- •16.3 Merged menus
- •Action
- •Result
- •Action
- •Result
- •Action
- •Result
- •Action
- •Result
- •16.4 MDI children
- •Action
- •Result
- •Action
- •Result
- •Action
- •Result
- •Action
- •Result
- •Action
- •Result
- •Action
- •Result
- •Action
- •Result
- •Action
- •Result
- •Action
- •Result
- •Action
- •Result
- •16.5 MDI child window management
- •Action
- •Result
- •Action
- •Result
- •16.6 Recap
- •Data binding
- •17.1 Data grids
- •Action
- •Result
- •Action
- •Result
- •17.2 Data grid customization
- •Action
- •Result
- •Action
- •Result
- •Action
- •Result
- •Action
- •Result
- •Action
- •Result
- •Action
- •Result
- •Action
- •Result
- •Action
- •Result
- •Action
- •Result
- •Action
- •Result
- •Action
- •Result
- •Odds and ends .NET
- •Action
- •Result
- •Action
- •Result
- •Action
- •Result
- •Action
- •Result
- •18.2 Timers
- •Action
- •Result
- •Action
- •Result
- •18.3 Drag and drop
- •Action
- •Result
- •Action
- •Result
- •18.4 ActiveX controls
- •Action
- •Result
- •Action
- •Result
- •Action
- •Result
- •Action
- •Result
- •Action
- •Result
- •18.5 Recap
- •C# primer
- •A.1 C# programs
- •A.1.1 Assemblies
- •A.1.2 Namespaces
- •A.2 Types
- •A.2.1 Classes
- •A.2.2 Structures
- •A.2.3 Interfaces
- •A.2.4 Enumerations
- •A.2.5 Delegates
- •A.3 Language elements
- •A.3.1 Built-in types
- •A.3.2 Operators
- •A.3.3 Keywords
- •A.4 Special features
- •A.4.1 Exceptions
- •A.4.2 Arrays
- •A.4.3 Main
- •A.4.4 Boxing
- •A.4.5 Documentation
- •.NET namespaces
- •B.1 System.Collections
- •B.2 System.ComponentModel
- •B.3 System.Data
- •B.4 System.Drawing
- •B.5 System.Globalization
- •B.6 System.IO
- •B.7 System.Net
- •B.8 System.Reflection
- •B.9 System.Resources
- •B.10 System.Security
- •B.11 System.Threading
- •B.12 System.Web
- •B.13 System.Windows.Forms
- •B.14 System.XML
- •Visual index
- •C.1 Objects
- •C.2 Marshal by reference objects
- •C.3 Components
- •C.4 Common dialogs
- •C.7 Event data
- •C.8 Enumerations
- •For more information
- •bibliography
- •Symbols
- •Index
own MDI applications that multiple menus must be merged. The principles and methods for doing this are identical to those utilized here.
With our menus completed, the next item in the development of our MDI application is to tidy up other parts of the interface such as the toolbar and the pixel data dialog. This cleanup is our next topic.
16.4MDI CHILDREN
Our MDI application is coming along nicely. So far we have a parent form that contains MainForm class instances as child forms. Each form displays a new or existing album, and the menu bars have been integrated to present a logical set of choices for the user. There are additional members of the Form class that are related to the creation of MDI applications. This section will examine a few of these members as we correct some issues with our MyPhotos MDI application.
If you have experimented with the MyPhotos interface created in the previous section, you may have found the following three issues that do not behave as you might expect.
•The toolbar control. The toolbar on the child form gives access to the New and Open menu in the MainForm class, which we are trying not to expose in the MDI version of our application.
•The pixel data form. This dialog appears separate from the MDI application, rather than as a child form within it. In addition, when multiple album windows are open, each window opens its own separate PixelDlg form, which can get rather confusing.
•Opening multiple albums. If you open the same album twice, you end up with two windows both showing the same album. Aside from the errors that can occur from having two instances operate on different versions of the same album simultaneously, it seems a bit strange to permit two copies of the same file to open in the same parent window.
We will address each of these items separately, and make use of MDI-related members of the Form class as required.
16.4.1REPLACING THE TOOLBAR
Our toolbar was designed to interact with the menu bar for our MainForm class, and not the merged menu in our MDI application. As a result, it is no longer appropriate for our purposes. As a simple solution to this problem, we will simply hide the toolbar when the MainForm object is an MDI child form. While we are at it, we can create a very simple toolbar in the ParentForm class to demonstrate such a control in an MDI application. Figure 16.6 shows our application after these changes have been made.
MDI CHILDREN |
543 |
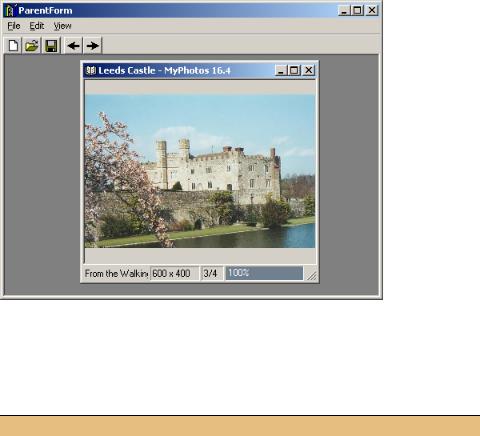
Figure 16.6 The toolbar here must locate the appropriate event handler for the active child form whenever a button is clicked.
This following table shows the changes required to hide the toolbar in the child window.
Set the version number of the MyPhotos application to 16.4.
HIDE THE TOOLBAR IN OUR CHILD FORM
|
Action |
Result |
|
|
|
1 |
Locate the OnLoad method in |
protected override void OnLoad(EventArgs e) |
|
the MainForm.cs code window. |
{ |
|
|
|
2 |
Update this method to hide the |
if (IsMdiChild) |
|
toolbar when this form is an MDI |
{ |
|
child form. |
menuExit.Text = "&Close"; |
|
toolBarMain.Visible = false; |
|
|
|
|
|
|
} |
|
|
base.OnLoad(e); |
|
|
} |
|
|
|
Not very exciting, but it does the job. A similar argument could be made for the status bar. In this case, since the status bar is still accurate and provides some useful information related to the displayed album, we will simply leave this control alone.
As for a Toolbar control in the parent form, we will create a simple control with five buttons to demonstrate how this is done. Our buttons will correspond to the New, Open, Save, Previous, and Next menu items in our merged menu. The one
544 |
CHAPTER 16 MULTIPLE DOCUMENT INTERFACES |

change from what we saw in chapter 13 when creating our original toolbar is that the Save, Previous, and Next buttons must operate on the active child form, rather than the parent form.
The ActiveMdiChild property in the Form class is used to identify the active child for a form. We will use this to implement our toolbar buttons in the parent form.
We will also use the C# internal keyword here to expose some of our MenuItem objects in the MainForm class to other classes in our assembly, and in particular to our ParentForm class. This keyword is an access modifier like public or protected, and permits any other class in the same assembly to have access to the class member.
Let’s see how these constructs are used by creating the Toolbar control for our parent form. Since toolbars were discussed in chapter 13, we will simply highlight the required changes without too much detailed discussion.
CREATE A TOOLBAR IN THE PARENT FORM
|
|
|
Action |
Result |
||
|
|
|
|
|
|
|
3 |
Add an ImageList called |
The image list appears in the component tray for |
||||
|
imageListParent to the ParentForm |
the form. |
||||
|
class in the ParentForm.cs [Design] |
|
||||
|
window. |
|
|
|
||
|
|
|
|
|
|
|
4 |
Add the following images to the Images |
|
||||
|
property of this list: |
|
|
|
||
|
• |
bitmaps/OffCtlBr/Small/Color/ |
|
|||
|
|
NEW.BMP |
|
|
|
|
|
• |
bitmaps/OffCtlBr/Small/Color/ |
|
|||
|
|
OPEN.BMP |
|
|
|
|
|
• |
bitmaps/OffCtlBr/Small/Color/ |
|
|||
|
|
SAVE.BMP |
|
|
|
|
|
• icons/arrows/ARW08LT.ICO |
|
||||
|
• icons/arrows/ARW08RT.ICO |
|
||||
|
|
|
|
|
|
|
5 |
Add a ToolBar control to the |
|
||||
|
ParentForm class. |
|
|
|
||
|
|
|
Settings |
|
||
|
|
|
|
|
|
|
|
|
|
Property |
Value |
|
|
|
|
|
(Name) |
toolBarParent |
|
|
|
|
|
ImageList |
imageListParent |
|
|
|
|
|
TextAlign |
Right |
|
|
|
|
|
|
|
|
|
MDI CHILDREN |
545 |
CREATE A TOOLBAR IN THE PARENT FORM (continued)
|
|
|
Action |
|
|
Result |
|
|
|
|
|
|
|
6 |
Using the ToolBarButton Collections |
|
||||
|
Editor, add six ToolBarButton objects |
|
||||
|
to this toolbar. |
|
|
|
||
|
|
|
Settings |
|
|
|
|
|
|
|
|
|
|
|
|
Button |
Property |
Value |
|
|
|
|
New |
(Name) |
tbbNew |
|
|
|
|
|
ImageIndex |
0 |
|
|
|
|
|
ToolTipText |
New |
|
|
|
|
Open |
(Name) |
tbbOpen |
|
|
|
|
|
ImageIndex |
1 |
|
|
|
|
|
ToolTipText |
Open |
|
|
|
|
Save |
(Name) |
tbbSave |
|
|
|
|
|
ImageIndex |
2 |
|
|
|
|
|
ToolTipText |
Save |
|
|
|
|
separator |
(Name) |
tbbSep |
|
|
|
|
|
Style |
Separator |
|
|
|
|
Previous |
(Name) |
tbbPrev |
|
|
|
|
|
ImageIndex |
3 |
|
|
|
|
|
ToolTipText |
Previous |
|
|
|
|
Next |
(Name) |
tbbNext |
|
|
|
|
|
ImageIndex |
4 |
|
|
|
|
|
ToolTipText |
Next |
|
|
|
|
|
|
|
|
|
|
|
|
|
|
|
|
This adds the toolbar and toolbar buttons to the form. Next we need to add the code to handle the ButtonClick event for our toolbar. As you may recall from chapter 13, this event occurs when the user clicks one of the toolbar buttons.
HANDLE THE BUTTONCLICK EVENT IN THE PARENT FORM
|
Action |
Result |
|
|
|
7 |
In the MainForm class, add |
internal void ClickSaveMenu() |
|
internal methods to click the |
{ |
|
menuSave, menuPrevious, and |
menuSave.PerformClick(); |
|
} |
|
|
menuNext menu items. |
|
|
|
|
|
Note: We could alternately |
internal void ClickPreviousMenu() |
|
{ |
|
|
change the access for these |
|
|
menuPrevious.PerformClick(); |
|
|
objects from private to |
} |
|
internal. This approach is a bit |
internal void ClickNextMenu() |
|
more robust. |
|
|
{ |
|
|
|
|
|
|
menuNext.PerformClick(); |
|
|
} |
|
|
|
546 |
CHAPTER 16 MULTIPLE DOCUMENT INTERFACES |

HANDLE THE BUTTONCLICK EVENT IN THE PARENT FORM (continued)
|
Action |
Result |
|
|
|
8 |
In the ParentForm constructor, |
public ParentForm() |
|
assign the Tag property for the |
{ |
|
New and Open buttons to the |
// Required for Designer support |
|
InitializeComponent(); |
|
|
corresponding menu item. |
|
|
|
|
|
|
// Initialize toolbar buttons |
|
|
tbbNew.Tag = menuNew; |
|
|
tbbOpen.Tag = menuOpen; |
|
|
} |
|
|
|
9 |
Also in the ParentForm class, |
private void toolBarParent_ButtonClick |
|
add an event handler for the |
(object sender, System.Windows.Forms. |
|
ButtonClick event in the |
ToolBarButtonClickEventArgs e) |
|
{ |
|
|
toolbar. |
|
|
|
|
|
|
|
10 |
Implement this handler to invoke |
if (e.Button.Tag is MenuItem) |
|
the corresponding menus for the |
{ |
|
New and Open buttons. |
MenuItem mi = e.Button.Tag as MenuItem; |
|
mi.PerformClick(); |
|
|
|
|
|
|
return; |
|
|
} |
|
|
|
11 |
For the other buttons, convert |
// Must be MDI child button |
|
the active child form, if any, to a |
MainForm child |
|
MainForm instance. |
= ActiveMdiChild as MainForm; |
|
|
|
|
|
|
12 |
If the active child is a MainForm |
if (child != null) |
|
object, then click the menu item |
{ |
|
corresponding to the selected |
if (e.Button == tbbSave) |
|
child.ClickSaveMenu(); |
|
|
button. |
|
|
else if (e.Button == tbbPrev) |
|
|
|
child.ClickPreviousMenu(); |
|
|
else if (e.Button == tbbNext) |
|
|
child.ClickNextMenu(); |
|
|
} |
|
|
} |
|
|
|
This code invokes the menus in the ParentForm class for the New and Open buttons, and the appropriate menu in the active MainForm object, if any, otherwise. Note the use of the internal keyword for the new methods in the MainForm class. This permits these members to be accessed from within the MyPhotos.exe assembly only, in this case from the ParentForm class.
Compile and run the code to verify that your toolbar works property. Make sure the buttons perform as expected when no child window is present, and when the active child does and does not contain any photographs in its album.
TRY IT! Add a new button to the parent form similar to the tbbImages button in our MainForm toolbar. This will require a DropDownButton style of toolbar button, and a new internal method in MainForm to assign the display mode for the form.
With our toolbar complete, our next task is to handle the PixelDlg form.
MDI CHILDREN |
547 |
16.4.2DISPLAYING PIXEL DATA
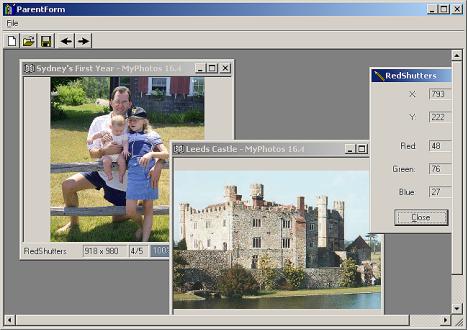
The PixelDlg form is another area where the behavior in our MDI application is not quite as desired. Right now each child has a separate pixel dialog, and these dialogs are separate from the parent form. To integrate this feature with our MDI application, it would be nice if a single PixelDlg was used for all album windows, and if this dialog was an MDI child form as well. We would also like to preserve our ability to run the MyPhotos application as an SDI where only a single album is displayed at a time.
This section will make the changes in our code required by these features, the result of which appears in figure 16.7. These changes will involve the following tasks:
•Create a global PixelDlg instance that can be shared by all MainForm instances.
•Provide a means to display this dialog as an MDI child form.
•Access this global instance from the MainForm class instances.
•Ensure this dialog is always associated with any active MainForm window.
Figure 16.7 The PixelDlg form in this figure is partially obscured to prove that it really is a child form in our MDI application, rather than the modeless dialog originally created in chapter 8.
This may seem like a daunting task for a single section. In fact, our application is well-prepared for these changes. Pulling out my soap box for a moment, the real test
548 |
CHAPTER 16 MULTIPLE DOCUMENT INTERFACES |