

- •brief contents
- •about this book
- •The Windows Forms namespace
- •Part 1: Hello Windows Forms
- •Part 2: Basic Windows Forms
- •Part 3: Advanced Windows Forms
- •Who should read this book?
- •Conventions
- •Action
- •Result
- •Source code downloads
- •Author online
- •acknowledgments
- •about .NET
- •Casting the .NET
- •Windows Forms overview
- •about the cover illustration
- •Hello Windows Forms
- •1.1 Programming in C#
- •1.1.1 Namespaces and classes
- •1.1.2 Constructors and methods
- •1.1.3 C# types
- •1.1.4 The entry point
- •1.1.5 The Application class
- •1.1.6 Program execution
- •1.2 Adding controls
- •1.2.1 Shortcuts and fully qualified names
- •1.2.2 Fields and properties
- •1.2.3 The Controls property
- •1.3 Loading files
- •1.3.1 Events
- •1.3.2 The OpenFileDialog class
- •1.3.3 Bitmap images
- •1.4 Resizing forms
- •1.4.1 Desktop layout properties
- •1.4.2 The Anchor property
- •1.4.3 The Dock property
- •1.5 Recap
- •2.1 Programming with Visual Studio .NET
- •2.1.1 Creating a project
- •Action
- •Result
- •2.1.2 Executing a program
- •Action
- •Result
- •2.1.3 Viewing the source code
- •View the code generated by Visual Studio .NET
- •Action
- •Result
- •2.2 Adding controls
- •2.2.1 The AssemblyInfo file
- •Action
- •Results
- •2.2.2 Renaming a form
- •Action
- •Result
- •2.2.3 The Toolbox window
- •Action
- •Result
- •2.3 Loading files
- •2.3.1 Event handlers in Visual Studio .NET
- •Action
- •Result
- •2.3.2 Exception handling
- •Action
- •Result
- •Action
- •Results and Comments
- •2.4 Resizing forms
- •2.4.1 Assign the Anchor property
- •Action
- •Result
- •2.4.2 Assign the MinimumSize property
- •Action
- •Result
- •2.5 Recap
- •Basic Windows Forms
- •Menus
- •Action
- •Result
- •Action
- •Result
- •Action
- •Result
- •Action
- •Result
- •3.3 Click events
- •Action
- •Result
- •Action
- •Result
- •Action
- •Result
- •Action
- •Result
- •Action
- •Result
- •Action
- •Result
- •3.5 Context menus
- •Action
- •Result
- •Action
- •Result
- •3.6 Recap
- •Status bars
- •4.1 The Control class
- •4.2 The StatusBar class
- •Action
- •Result
- •Action
- •Result
- •4.3.1 Adding panels to a status bar
- •Action
- •Result
- •Action
- •Result
- •Action
- •Result
- •Action
- •Result
- •4.5 Recap
- •Reusable libraries
- •5.1 C# classes and interfaces
- •5.2 Class libraries
- •Action
- •Result
- •Action
- •Result
- •Action
- •Result
- •Action
- •Result
- •Action
- •Result
- •Action
- •Result
- •Action
- •Result
- •Action
- •Result
- •Action
- •Result
- •5.3 Interfaces revisited
- •Action
- •Result
- •Action
- •Result
- •Action
- •Result
- •5.4 Robustness issues
- •Action
- •Result
- •Action
- •Result
- •Action
- •Result
- •Action
- •Result
- •Action
- •Result
- •Action
- •Result
- •Common file dialogs
- •Action
- •Results
- •Action
- •Result
- •Action
- •Result
- •Action
- •Result
- •Action
- •Result
- •6.3 Paint events
- •Action
- •Result
- •Action
- •Result
- •6.4 Context menus revisited
- •Action
- •Result
- •Action
- •Result
- •6.5 Files and paths
- •Action
- •Result
- •Action
- •Result
- •Action
- •Result
- •6.6 Save file dialogs
- •Action
- •Result
- •Action
- •Result
- •Action
- •Result
- •Action
- •Result
- •Action
- •Result
- •6.7 Open file dialogs
- •Action
- •Result
- •Action
- •Result
- •6.8 Recap
- •Drawing and scrolling
- •7.1 Form class hierarchy
- •Action
- •Result
- •Action
- •Result
- •Action
- •Result
- •Action
- •Result
- •Action
- •Result
- •Action
- •Result
- •Action
- •Result
- •Action
- •Result
- •Action
- •Result
- •Action
- •Result
- •Action
- •Result
- •Action
- •Result
- •7.4 Panels
- •Action
- •Result
- •Action
- •Result
- •Action
- •Result
- •Action
- •Result
- •Action
- •Result
- •Dialog boxes
- •8.1 Message boxes
- •Action
- •Result
- •Action
- •Result
- •8.1.4 Creating A YesNoCancel dialog
- •Action
- •Result
- •Action
- •Result
- •8.2 The Form.Close method
- •8.2.1 The relationship between Close and Dispose
- •Action
- •Result
- •8.3 Modal dialog boxes
- •Action
- •Result
- •Action
- •Result
- •8.3.2 Preserving caption values
- •Action
- •Result
- •Action
- •Result
- •Action
- •Result
- •Action
- •Result
- •Action
- •Result
- •Action
- •Result
- •Action
- •Result
- •Action
- •Result
- •Action
- •Result
- •Action
- •Result
- •Action
- •Result
- •Action
- •Result
- •Action
- •Result
- •Action
- •Result
- •Action
- •Result
- •Action
- •Result
- •Action
- •Result
- •Basic controls
- •Action
- •Result
- •Action
- •Result
- •Action
- •Result
- •9.1.2 Creating a derived form
- •Action
- •Result
- •9.2 Labels and text boxes
- •Action
- •Result
- •Action
- •Result
- •Action
- •Result
- •Action
- •Result
- •Action
- •Result
- •Action
- •Result
- •Action
- •Result
- •Action
- •Result
- •Action
- •Result
- •Action
- •Result
- •Action
- •Result
- •Action
- •Result
- •Action
- •Result
- •Action
- •Result
- •Action
- •Result
- •Action
- •Result
- •Action
- •Result
- •Action
- •Result
- •9.3.6 Adding AlbumEditDlg to our main form
- •Action
- •Result
- •Action
- •Result
- •9.4 Recap
- •List controls
- •10.1 List boxes
- •Action
- •Result
- •Action
- •Result
- •Action
- •Result
- •Action
- •Result
- •10.2 Multiselection list boxes
- •10.2.1 Enabling multiple selection
- •Action
- •Result
- •Action
- •Result
- •Action
- •Result
- •Action
- •Result
- •10.3 Combo boxes
- •Action
- •Result
- •Action
- •Result
- •10.4 Combo box edits
- •Action
- •Result
- •Action
- •Result
- •Action
- •Result
- •10.5 Owner-drawn lists
- •Action
- •Result
- •Action
- •Result
- •Action
- •Result
- •Action
- •Result
- •More controls
- •Action
- •Result
- •Action
- •Result
- •11.2 Tab pages
- •Action
- •Result
- •Action
- •Result
- •11.3.1 Dates and times
- •Action
- •Result
- •Action
- •Result
- •Action
- •Result
- •Action
- •Result
- •Action
- •Result
- •Action
- •Result
- •11.5 Recap
- •A .NET assortment
- •12.1 Keyboard events
- •Action
- •Result
- •Action
- •Result
- •12.2 Mouse events
- •Action
- •Result
- •Action
- •Result
- •Action
- •Result
- •12.3 Image buttons
- •Action
- •Result
- •Action
- •Result
- •Action
- •Result
- •Action
- •Result
- •Action
- •Result
- •Action
- •Result
- •Action
- •Result
- •Action
- •Result
- •Action
- •Result
- •12.4 Icons
- •Action
- •Result
- •Action
- •Result
- •Action
- •Result
- •12.5 Recap
- •Toolbars and tips
- •13.1 Toolbars
- •Action
- •Result
- •Action
- •Result
- •Action
- •Result
- •Action
- •Result
- •Action
- •Result
- •Action
- •Result
- •Action
- •Result
- •Action
- •Result
- •Action
- •Result
- •13.4.2 Creating tool tips
- •Action
- •Result
- •Action
- •Result
- •Advanced Windows Forms
- •List views
- •14.2 The ListView class
- •Action
- •Result
- •Action
- •Result
- •Action
- •Result
- •Action
- •Result
- •14.2.3 Populating a ListView
- •Action
- •Result
- •Action
- •14.3 ListView columns
- •Action
- •Result
- •Action
- •Result
- •Action
- •Result
- •Action
- •Result
- •Action
- •Result
- •Action
- •Result
- •Action
- •Result
- •Action
- •Result
- •Action
- •Result
- •Action
- •Result
- •Action
- •Result
- •Action
- •Result
- •Action
- •Result
- •Action
- •Result
- •Action
- •Result
- •Action
- •Result
- •Action
- •Result
- •Action
- •Result
- •Action
- •Result
- •14.6 Recap
- •Tree views
- •Action
- •Result
- •Action
- •Result
- •Action
- •Result
- •15.3 Dynamic tree nodes
- •Action
- •Result
- •Action
- •Result
- •Action
- •Result
- •Action
- •Result
- •Action
- •Result
- •15.4 Node selection
- •Action
- •Result
- •Action
- •Result
- •Action
- •Result
- •Action
- •Result
- •Action
- •Result
- •15.5 Fun with tree views
- •Action
- •Result
- •Action
- •Result
- •Action
- •Result
- •Multiple document interfaces
- •Action
- •Result
- •Action
- •Result
- •Action
- •Result
- •16.3 Merged menus
- •Action
- •Result
- •Action
- •Result
- •Action
- •Result
- •Action
- •Result
- •16.4 MDI children
- •Action
- •Result
- •Action
- •Result
- •Action
- •Result
- •Action
- •Result
- •Action
- •Result
- •Action
- •Result
- •Action
- •Result
- •Action
- •Result
- •Action
- •Result
- •Action
- •Result
- •16.5 MDI child window management
- •Action
- •Result
- •Action
- •Result
- •16.6 Recap
- •Data binding
- •17.1 Data grids
- •Action
- •Result
- •Action
- •Result
- •17.2 Data grid customization
- •Action
- •Result
- •Action
- •Result
- •Action
- •Result
- •Action
- •Result
- •Action
- •Result
- •Action
- •Result
- •Action
- •Result
- •Action
- •Result
- •Action
- •Result
- •Action
- •Result
- •Action
- •Result
- •Odds and ends .NET
- •Action
- •Result
- •Action
- •Result
- •Action
- •Result
- •Action
- •Result
- •18.2 Timers
- •Action
- •Result
- •Action
- •Result
- •18.3 Drag and drop
- •Action
- •Result
- •Action
- •Result
- •18.4 ActiveX controls
- •Action
- •Result
- •Action
- •Result
- •Action
- •Result
- •Action
- •Result
- •Action
- •Result
- •18.5 Recap
- •C# primer
- •A.1 C# programs
- •A.1.1 Assemblies
- •A.1.2 Namespaces
- •A.2 Types
- •A.2.1 Classes
- •A.2.2 Structures
- •A.2.3 Interfaces
- •A.2.4 Enumerations
- •A.2.5 Delegates
- •A.3 Language elements
- •A.3.1 Built-in types
- •A.3.2 Operators
- •A.3.3 Keywords
- •A.4 Special features
- •A.4.1 Exceptions
- •A.4.2 Arrays
- •A.4.3 Main
- •A.4.4 Boxing
- •A.4.5 Documentation
- •.NET namespaces
- •B.1 System.Collections
- •B.2 System.ComponentModel
- •B.3 System.Data
- •B.4 System.Drawing
- •B.5 System.Globalization
- •B.6 System.IO
- •B.7 System.Net
- •B.8 System.Reflection
- •B.9 System.Resources
- •B.10 System.Security
- •B.11 System.Threading
- •B.12 System.Web
- •B.13 System.Windows.Forms
- •B.14 System.XML
- •Visual index
- •C.1 Objects
- •C.2 Marshal by reference objects
- •C.3 Components
- •C.4 Common dialogs
- •C.7 Event data
- •C.8 Enumerations
- •For more information
- •bibliography
- •Symbols
- •Index
13.4.1THE TOOLTIP CLASS
An overview of the ToolTip class is provided in .NET Table 13.5. Note that a
ToolTip object is not strictly speaking a control, although it is sometimes referred to as such. Normally, a single ToolTip object is used to create the tips for all controls in
a single Form.
13.4.2Creating tool tips
While it is certainly possible to assign tool tips for our MainForm controls in the MyPhotos project, this would not be a very exciting example. Since menu objects are
not controls, we cannot assign tool tip text to our menu items. As we saw earlier in this chapter and in chapter 4, the ToolBar and StatusBar controls provide their own tool tip mechanism. That leaves the Panel object, which is only a single control.
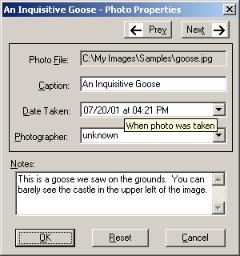
Instead, we will look to our now-famous MyPhotoAlbum library for a rich source of tool tip hungry controls. Figure 13.4 shows the PhotoEditDlg form with a tool tip displayed for the Date Taken text box.
Figure 13.4
The framework displays tool tip text just below the mouse cursor, which in most cases will not obscure the control’s contents from view.
Let’s crank up an Action-Result table and create a ToolTip object for this dialog. Once the tool tip exists, we can discuss how to associate specific messages with individual controls.
TOOL TIPS |
431 |
Set the version number of the MyPhotoAlbum library to 13.4.
ADD A TOOL TIP OBJECT TO THE PHOTOEDITDLG FORM
|
Action |
Result |
|
|
|
1 |
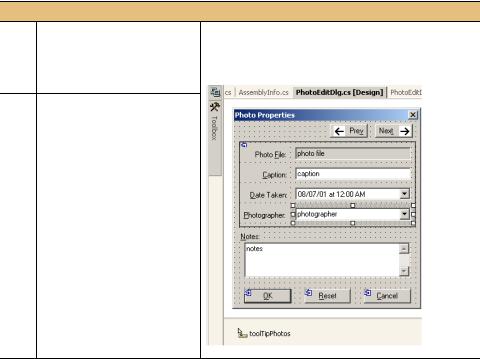
In the PhotoEditDlg.cs [Design] |
The new object appears in the component tray below the |
|
window, add a ToolTip object |
form designer. |
|
to the form. |
|
2Set the (Name) for the tool tip to “toolTipPhotos.”
As usual, the new object is defined within the PhotoEditDlg class and initialized in the InitializeComponent method.
private System.Windows.Forms.ToolTip toolTipPhotos;
. . .
private void InitializeComponent()
{
. . .
this.toolTipPhotos = new System.Windows.Forms.ToolTip(this.components);
. . .
}
As we saw for the ImageList in our MyPhotos application, the ToolTip is created within the Form object’s components container to ensure that the object is disposed of when the Form itself is disposed.
We can add a series of tool tip strings for our controls using Visual Studio directly. This table continues our previous steps.
432 |
CHAPTER 13 TOOLBARS AND TIPS |
ADD TOOL TIP STRINGS TO THE FORM’S CONTROLS
|
|
Action |
Result |
||
|
|
|
|
|
|
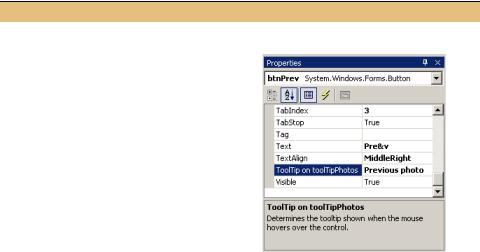
3 |
Add the tool tip “Previous photo” for the |
: |
|||
|
|||||
|
Prev button control on the form. |
|
|||
|
How-to |
|
|
|
|
|
a. Display the properties for the button in |
|
|||
|
|
the Properties window. |
|
||
|
b. Locate the new entry “ToolTip on toolTip- |
|
|||
|
|
Photos” that is now present |
|
||
|
c. Enter the string “Previous photo.” |
|
|||
|
|
|
|
|
|
4 |
Define tool tip strings for the other controls |
Visual Studio .NET generates the code |
|||
|
on the form. |
|
|
required for each tool tip in the |
|
|
|
Settings |
InitializeComponent method. |
||
|
|
|
|||
|
|
|
|
|
private void InitializeComponent() |
|
|
Control |
ToolTip String |
||
|
|
{ |
|||
|
|
|
|
|
|
|
|
btnNext |
Next photo |
. . . |
|
|
|
txtPhotoFile |
Image file containing |
this.toolTipPhotos.SetToolTip( |
|
|
|
this.btnNext, "Next photo"); |
|||
|
|
|
photo |
||
|
|
|
. . . |
||
|
|
|
|
|
|
|
|
txtCaption |
Short caption for photo |
this.toolTipPhotos.SetToolTip( |
|
|
|
dateTimeTaken |
When photo was taken |
this.txtNotes, |
|
|
|
"Details about this photo"); |
|||
|
|
cmbxPhotographer |
Person who took photo |
||
|
|
. . . |
|||
|
|
txtNotes |
Details about this photo |
} |
|
|
|
Note: You can assign tool tips to Label |
|
||
|
|
controls as well. Since the user cannot nor- |
|
||
|
|
mally interact with such controls, it is typi- |
|
||
|
|
cally not appropriate to do so. |
|
||
|
|
|
|
|
|
That’s all it takes. Visual Studio .NET generates the code as is shown in the table. Of course, you can define tool tips explicitly in your code using the SetToolTip method without using Visual Studio. The steps used here simply demonstrate the support provided by the development environment.
Compile and run the program to make sure your tool tips work. Open an album and display the PhotoEditDlg dialog for a photo. Place the mouse over a control and watch the tool tip appear. As you look at the tool tips we just defined, note the following features:
•There is a short pause, about half a second, before the tool tip text appears, and then it disappears after about 5 seconds. These intervals are controlled by the
InitialDelay and AutoPopDelay properties.
TOOL TIPS |
433 |
•Display a tool tip, then move the mouse to another control and note how the tool tip for the second control appears almost immediately. This secondary delay defaults to 100 milliseconds, and is specified by the ReshowDelay property.
•The tool tips for the Next and Prev buttons do not appear when these buttons are inactive. The behavior for inactive controls is determined by the ShowAlways property.
TRY IT! Create a ToolTip object for the AlbumEditDlg form and set tool tip text for the nonlabel controls in this form. Note that you can set tool tips for Panel and GroupBox objects, although this may confuse users and is probably not a good idea for this form.
That’s pretty much all you need to know about tool tips. You may wonder if you can create balloon-style or custom drawn tool tips. Right now the answer is no, at least within the ToolTip class. We might see this type of support in a future release of the framework, or you can build a custom control for this purpose yourself.
More .NET The HelpProvider class is a component that provides popup help using a mechanism similar to the ToolTip class. The HelpProvider class provides a SetHelpString method for this purpose, in a manner similar to the SetToolTip method for the ToolTip component. You can see this by dragging a HelpProvider component onto a form and modifying the HelpString entry that appears in the Properties window. This string will appear when the user hits the F1 key while the control has the focus.
The Form class also provides a related HelpButton property. When the MinimizeBox and MaximizeBox properties for a form are false, setting the HelpButton property to true will cause a Help button to appear in the title bar. Clicking on this button and then on a control displays the popup help string assigned to that control.
It is also worth noting that the HelpProvider class supports more sophisticated help for an application. In particular, this class can specify a link into an HTML file where help text on specific elements of a form is available. Consult the online documentation for more information on this feature.
13.5RECAP
This completes chapter 13 as well as part 2 of the book. We’ve come a long way from figure 1.1 on page 4, and hopefully have learned how to create Windows applications with a large variety of controls and behaviors.
In this chapter we looked at the ToolBar and ToolTip classes. We created a toolbar in our MyPhotos application, and used the four different styles of toolbar buttons supported by .NET. We also saw how to dynamically change the image displayed on a button.
434 |
CHAPTER 13 TOOLBARS AND TIPS |
We then created some tool tips for our PhotoEditDlg form. We associated a ToolTip instance with our form, and saw how to assign tool tips to the various controls contained within this form.
Along the way we examined the ImageList class as a way to store and manage a collection of Image objects on behalf of a control or other object. We again looked at the resource file generated by Visual Studio .NET to contain the images assigned to such a list, and we created an image list for use within our ToolBar control.
In addition, we pointed out how Component objects such as ImageList and ToolTip instances are disposed of when created within Visual Studio. Such objects are contained within the form’s components member to ensure they can be tidied up when the Dispose method is invoked.
I would encourage you to experiment with the controls and features discussed here and in earlier chapters in this book. The foundation presented so far is critical to developing and understanding Windows Forms applications, and will come in handy as we discuss the concepts presented in part 3.
RECAP |
435 |