


•AssemblyInfo.cs—a file containing the assembly information for the project. We talk about this file in section 2.2.1.
•Form1.cs—a file containing the default Form class created for our application. We look at the contents of this file below.
We will discuss the meaning and use of these items later in this chapter and throughout the book.
2.1.2Executing a program
Our MyPhotos project is in fact a fully functional application. To see this, let’s compile and run the application from within Visual Studio.
COMPILE AND RUN THE MYPHOTOS APPLICATION
|
Action |
Result |
|
|
|
1 |
Compile the project. |
This compiles the project and creates an executable file. |
|
How-to |
Note: The default keyboard shortcut is Ctrl+Shift+B. |
|
a. Click the Build menu. |
Depending on your keyboard setting, you may see a dif- |
|
b. Select the Build Solution |
ferent shortcut in your application. Click on the “My |
|
item. |
Profile” option on the Start pge to see your setting. |
|
Alternately |
|
|
Use the keyboard shortcut |
|
|
Ctrl+Shift+B. |
|
|
|
|
2 |
Run the application. |
The MyPhotos application executes, displaying our not-so- |
|
How-to |
exciting blank form. |
|
|
|
|
a. Click the Debug menu. |
Note: This window is very similar to the original MyForm |
|
b. Select the Start Without |
application written in chapter 1. Here and throughout the |
|
Debugging item. |
book, you can run applications with or without debug- |
|
Alternately |
ging. The result should be the same in either case. |
|
|
|
|
Use the keyboard shortcut |
|
|
Ctrl+F5. |
|
|
|
|
Note that we have not written any code to create this application. The code has been generated for us by Visual Studio. By default, Visual Studio displays the Windows Forms Designer window for the default Form class created in the project, which presents a graphical display of the form. We can also display the source code for the Form1.cs file containing this default class.
2.1.3Viewing the source code
As in section 1.1, our application here is not all that glamorous. The source code is quite similar to the code from chapter 1. The following table shows how to view this code so that we can discuss it in more detail.
PROGRAMMING WITH VISUAL STUDIO .NET |
39 |
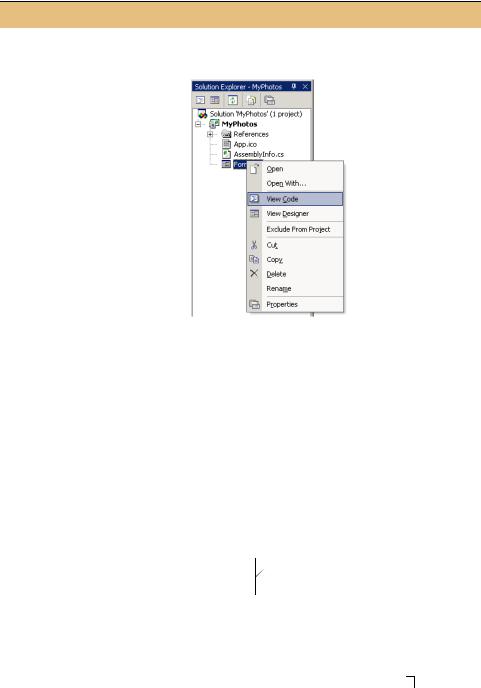
View the code generated by Visual Studio .NET
|
Action |
Result |
|
|
|
1 |
Right-click the Form1.cs file |
A menu of options appears. |
|
in the Solution Explorer |
|
|
window. |
|
|
|
Note: We will also use the Rename item in this menu |
|
|
later in the chapter to rename the Form1.cs file. |
|
|
|
2 |
Select the View Code item. |
A Form1.cs tab appears in the main window containing the C# |
|
|
code for your application. |
|
|
|
A listing of the Form1.cs code that appears in Visual Studio is shown below.
using |
System; |
|
using |
System.Drawing; |
|
using |
System.Collections; |
|
using |
System.ComponentModel; |
|
using |
System.Windows.Forms; |
|
using |
System.Data; |
|
namespace MyPhotos |
|
|
{ |
|
|
/// |
<summary> |
b XML documentation |
///Summary description for Form1.
///</summary>
public class Form1 : System.Windows.Forms.Form
{
///<summary>
///Required designer variable.
///</summary>
private System.ComponentModel.Container components = null;
public Form1() |
Internal components variable c |
{ |
|
40 |
CHAPTER 2 GETTING STARTED WITH VISUAL STUDIO .NET |

//
// Required for Windows Form Designer support
//
InitializeComponent();
//
// TODO: Add any constructor code after InitializeComponent call
//
}
///<summary>
///Clean up any resources being used.
///</summary>
protected override void Dispose( bool disposing )
{
if( disposing )
{
if (components != null)
{
components.Dispose();
}
}
base.Dispose( disposing );
}
 d Dispose
method
#region Windows Form Designer generated code
///<summary>
///Required method for Designer support - do not modify
///the contents of this method with the code editor.
///</summary>
private void InitializeComponent()
{
this.components = new System.ComponentModel.Container(); this.Size = new System.Drawing.Size(300,300);
this.Text = "Form1";
} |
|
|
#endregion |
Region for designer |
|
|
e |
|
/// <summary> |
generated code |
///The main entry point for the application.
///</summary>
[STAThread] |
|
f Declare thread as single |
static void |
Main() |
threaded apartment |
{
Application.Run(new Form1());
}
}
}
This code for MyPhotos looks a lot like our original MyForm application. The namespace MyPhotos is used, and a class Form1 is created that is based on the System.Windows.Forms.Form class. Some key differences to notice are listed on page 42. Note that the numbers here correspond to the numbered annotations in the above code.
PROGRAMMING WITH VISUAL STUDIO .NET |
41 |
bVisual Studio inserts comments for documenting your program and its methods. The C# language defines a standard for XML documentation of code. Such lines must begin with three slashes and precede certain C# constructs such as classes, properties, and namespaces. There is a standard for what this documentation should look like that is summarized in appendix A. Check out the online documentation for complete details. The C# compiler csc accepts a /doc switch that gathers all such documentation lines and generates HTML reference pages. Visual Studio will do this for your code using the Build Comment Web Pages… menu item located in the top-level Tools menu.
///<summary>
///Summary description for Form1.
///</summary>
cThe Windows Forms Designer requires this field in order to ensure that components are properly managed on the form at run time, and specifically for components that are not also Windows Forms controls. We will discuss this field later in chapter 13 when we talk about specific components such as the ImageList class.
private System.ComponentModel.Container components;
dThe use of garbage collection in .NET means that you have no idea when memory will be freed from objects no longer in use. Since some objects use critical system resources such as file handles or database connections that should be cleaned up as quickly as possible, a Dispose method is provided to do just this. All Windows Forms controls provide a Dispose method, and it is normally an error to use an object after its Dispose method has been called. We will discuss this method in greater detail in chapter 5.
protected override void Dispose( bool disposing )
{
eA special InitializeComponent method is created for initializing the controls for the form. This method is processed by the Windows Forms Designer window whenever this design window is displayed. While Microsoft recommends that you do not edit this method manually; if you are very careful, manual changes can be made. By default, this region is hidden in the source code window using the C# preprocessor
#region directive. The #region directive defines a block of code that can be expanded and collapsed in editors such Visual Studio .NET.
#region Windows Form Designer generated code
///<summary>
///Required method for Designer support - do not modify
///the contents of this method with the code editor.
///</summary>
private void InitializeComponent()
{
this.components = new System.ComponentModel.Container(); this.Size = new System.Drawing.Size(300,300);
42 |
CHAPTER 2 GETTING STARTED WITH VISUAL STUDIO .NET |