

When you have finished reviewing the code, compile and run the program as before. As in chapter 1 for version 1.2 of the MyForm application, this version displays our controls but does not allow you to do anything with them. Enabling the user to load an image is our next topic.
2.3Loading files
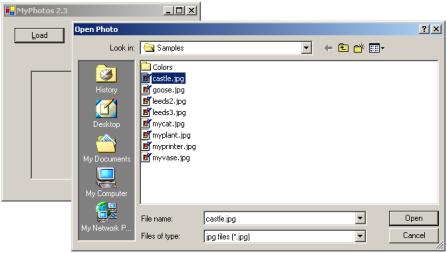
Now that the controls are on the form, we can load an image into the PictureBox control using the OpenFileDialog class. Up until this point we really haven’t typed any C# code for our MyPhotos application. We simply set values via Visual Studio and let the environment do the work on our behalf. In this section we finally get our hands dirty. The result of our labors will allow a file to be selected as shown in figure 2.2.
Figure 2.2 The dialog used to select a file in our application. This dialog is created using the OpenFileDialog class.
There are a couple of topics worth discussing here. First we will discuss how to support the dialog shown in figure 2.2. Then we will discuss how to handle the case where the user selects an invalid file.
2.3.1Event handlers in Visual Studio .NET
As discussed in chapter 1, an event is a predefined action that a program can respond to, such as a user clicking a button or resizing a window. In chapter 1 we handled the event that occurs when the user clicks on the Load button. Here we will do the same using Visual Studio rather than a text editor.
As before, the Load button handler will allow the user to select a file and then load a Bitmap image of the file into our PictureBox control. If you recall, this involves
54 |
CHAPTER 2 GETTING STARTED WITH VISUAL STUDIO .NET |

setting a Click event handler for the button and using the OpenFileDialog class to prompt the user for an image to load.
Let’s duplicate our code from chapter 1 in Visual Studio. Our code for the event handler will be identical to that already shown and discussed, so if you skipped ahead and missed this discussion, go back to chapter 1
Set the version number of the application to 2.3.
IMPLEMENT A CLICK HANDLER FOR THE BTNLOAD BUTTON
|
Action |
Result |
|
|
|
1 |
Display the MainForm.cs |
|
|
[Design] window (the |
|
|
Windows Forms Designer |
|
|
window). |
|
|
|
|
2 |
Add a Click event handler for |
The MainForm.cs source code window is displayed with a |
|
the Load button. |
new btnLoad_Click method added. |
|
How-to |
protected void btnLoad_Click(object sender, |
|
Double-click the Load button. |
System.EventArgs e) |
|
{ |
|
|
|
|
|
|
} |
|
|
Note: Visual Studio uses the naming convention for |
|
|
all event handlers consisting of the variable name, fol- |
|
|
lowed by an underscore, followed by the event name. |
|
|
|
3 |
Add our code to handle the |
protected void btnLoad_Click(object sender, |
|
Click event. |
System.EventArgs e) |
|
|
{ |
|
How-to |
OpenFileDialog dlg = new OpenFileDialog(); |
|
Cut and paste your previous |
dlg.Title = "Open Photo"; |
|
code, or enter the code shown |
|
|
dlg.Filter = "jpg files (*.jpg)|*.jpg" |
|
|
here by hand. |
+ "|All files (*.*)|*.*"; |
|
|
if (dlg.ShowDialog() == DialogResult.OK) |
|
|
{ |
|
|
pbxPhoto.Image = new Bitmap(dlg.OpenFile()); |
|
|
} |
|
|
dlg.Dispose(); |
|
|
} |
|
|
Note: Some of these lines do not fit this table. The |
|
|
dlg.Filter line, in particular, should be a single |
|
|
string. Here and throughout the book, we will refor- |
|
|
mat the code to fit the table in a way that is equiva- |
|
|
lent to the code in the online examples. |
|
|
|
LOADING FILES |
55 |
IMPLEMENT A CLICK HANDLER FOR THE BTNLOAD BUTTON (continued)
|
Action |
Result |
|
|
|
4 |
Set the SizeMode property for |
When an image is displayed, the entire image will now be |
|
the PictureBox control to |
stretched and distorted to fit within the box. |
|
StretchImage. |
Note: In the Properties window, notice how nonde- |
|
How-to |
|
|
fault properties for a control are displayed in bold |
|
|
a. Display the designer |
type. |
|
window. |
|
|
b. Right-click the PictureBox |
|
|
control. |
|
|
c. Select Properties. |
|
|
d. Locate the SizeMode prop- |
|
|
erty. |
|
|
e. Set its value to Stretch- |
|
|
Image. |
|
|
|
|
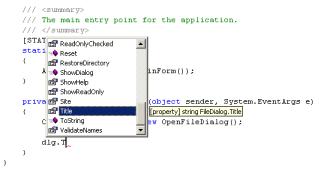
Before we discuss the code here, it is worth calling attention to the statement completion feature of Visual Studio .NET, both what it is and how to disable it. If you typed in the above code by hand, then you probably noticed how Visual Studio pops up with class member information as you type. Figure 2.3 shows what you might see after entering part of the first line of the btnLoad_Click method. After you type “new,” Visual Studio pops up a list of possible classes. The list changes to reflect the characters you type, so that after typing “Ope” the list will look something like the figure. At this point, you can press the Enter key to have Visual Studio automatically finish your typing with the highlighted entry.
Notice in this figure how Visual Studio uses a different icon for namespaces, structures, classes, and enumerations. In the figure, OleDB is a namespace, OpenFileDialog is a class, and Orientation is an enumeration type. We will not discuss these types here, other than OpenFileDialog. A structure type is not shown in this figure, but you can scroll through the list in Visual Studio to find a structure such as Point or Size.
Figure 2.3 An example of statement completion for the new keyword in Visual Studio after typing the letters “Ope.”
56 |
CHAPTER 2 GETTING STARTED WITH VISUAL STUDIO .NET |
The feature applies to variables and classes as well. As another example, when you begin typing the next line to set the Title property of the dialog box, you may see something like figure 2.4. Here Visual Studio displays the class properties, methods, and events available to the dlg variable. These correspond to the members of the
OpenFileDialog class.
Once again note how Visual Studio uses different icons for different types. In the figure, ShowDialog is a method and Title is a property. You can scroll through the dialog to locate an event such as Disposed or FileOk in order to see its icon.
You will notice other statement completion popups as you type as well. One particularly nice feature is that signatures of methods are displayed as you type, and you can step through the various overloaded versions of a method using the arrow keys. In addition, as you will see in chapter 5, Visual Studio automatically picks up the classes and structures defined in your solution and incorporates them into these popup menus. Any documentation provided by <summary> tags within these classes is included as well, providing an automated forum for conveying important comments about a particular member to other programmers.
Figure 2.4
An example of statement completion for a class variable after typing the letter “T” for an OpenFileDialog class instance. Notice the small popup indicating that Title is declared as a string property in the FileDialog class.
Of course, like any feature, all these popup windows require a certain amount of CPU and system resources. If you are running Visual Studio on a slower machine, or do not want such windows popping up, you can turn statement completion off in the Options dialog box. Click the Options item under the top-level Tools menu to display this dialog. Click the Text Editor settings, select the C# item, followed by the General item. This dialog is shown in figure 2.5.
As you can see in the figure, you can disable the automatic listing of members, the display of parameter information, or both of these features. Other option settings are available here as well, of course. Feel free to look around and use the ever-ready Help button for any questions you may have.
LOADING FILES |
57 |