

- •brief contents
- •about this book
- •The Windows Forms namespace
- •Part 1: Hello Windows Forms
- •Part 2: Basic Windows Forms
- •Part 3: Advanced Windows Forms
- •Who should read this book?
- •Conventions
- •Action
- •Result
- •Source code downloads
- •Author online
- •acknowledgments
- •about .NET
- •Casting the .NET
- •Windows Forms overview
- •about the cover illustration
- •Hello Windows Forms
- •1.1 Programming in C#
- •1.1.1 Namespaces and classes
- •1.1.2 Constructors and methods
- •1.1.3 C# types
- •1.1.4 The entry point
- •1.1.5 The Application class
- •1.1.6 Program execution
- •1.2 Adding controls
- •1.2.1 Shortcuts and fully qualified names
- •1.2.2 Fields and properties
- •1.2.3 The Controls property
- •1.3 Loading files
- •1.3.1 Events
- •1.3.2 The OpenFileDialog class
- •1.3.3 Bitmap images
- •1.4 Resizing forms
- •1.4.1 Desktop layout properties
- •1.4.2 The Anchor property
- •1.4.3 The Dock property
- •1.5 Recap
- •2.1 Programming with Visual Studio .NET
- •2.1.1 Creating a project
- •Action
- •Result
- •2.1.2 Executing a program
- •Action
- •Result
- •2.1.3 Viewing the source code
- •View the code generated by Visual Studio .NET
- •Action
- •Result
- •2.2 Adding controls
- •2.2.1 The AssemblyInfo file
- •Action
- •Results
- •2.2.2 Renaming a form
- •Action
- •Result
- •2.2.3 The Toolbox window
- •Action
- •Result
- •2.3 Loading files
- •2.3.1 Event handlers in Visual Studio .NET
- •Action
- •Result
- •2.3.2 Exception handling
- •Action
- •Result
- •Action
- •Results and Comments
- •2.4 Resizing forms
- •2.4.1 Assign the Anchor property
- •Action
- •Result
- •2.4.2 Assign the MinimumSize property
- •Action
- •Result
- •2.5 Recap
- •Basic Windows Forms
- •Menus
- •Action
- •Result
- •Action
- •Result
- •Action
- •Result
- •Action
- •Result
- •3.3 Click events
- •Action
- •Result
- •Action
- •Result
- •Action
- •Result
- •Action
- •Result
- •Action
- •Result
- •Action
- •Result
- •3.5 Context menus
- •Action
- •Result
- •Action
- •Result
- •3.6 Recap
- •Status bars
- •4.1 The Control class
- •4.2 The StatusBar class
- •Action
- •Result
- •Action
- •Result
- •4.3.1 Adding panels to a status bar
- •Action
- •Result
- •Action
- •Result
- •Action
- •Result
- •Action
- •Result
- •4.5 Recap
- •Reusable libraries
- •5.1 C# classes and interfaces
- •5.2 Class libraries
- •Action
- •Result
- •Action
- •Result
- •Action
- •Result
- •Action
- •Result
- •Action
- •Result
- •Action
- •Result
- •Action
- •Result
- •Action
- •Result
- •Action
- •Result
- •5.3 Interfaces revisited
- •Action
- •Result
- •Action
- •Result
- •Action
- •Result
- •5.4 Robustness issues
- •Action
- •Result
- •Action
- •Result
- •Action
- •Result
- •Action
- •Result
- •Action
- •Result
- •Action
- •Result
- •Common file dialogs
- •Action
- •Results
- •Action
- •Result
- •Action
- •Result
- •Action
- •Result
- •Action
- •Result
- •6.3 Paint events
- •Action
- •Result
- •Action
- •Result
- •6.4 Context menus revisited
- •Action
- •Result
- •Action
- •Result
- •6.5 Files and paths
- •Action
- •Result
- •Action
- •Result
- •Action
- •Result
- •6.6 Save file dialogs
- •Action
- •Result
- •Action
- •Result
- •Action
- •Result
- •Action
- •Result
- •Action
- •Result
- •6.7 Open file dialogs
- •Action
- •Result
- •Action
- •Result
- •6.8 Recap
- •Drawing and scrolling
- •7.1 Form class hierarchy
- •Action
- •Result
- •Action
- •Result
- •Action
- •Result
- •Action
- •Result
- •Action
- •Result
- •Action
- •Result
- •Action
- •Result
- •Action
- •Result
- •Action
- •Result
- •Action
- •Result
- •Action
- •Result
- •Action
- •Result
- •7.4 Panels
- •Action
- •Result
- •Action
- •Result
- •Action
- •Result
- •Action
- •Result
- •Action
- •Result
- •Dialog boxes
- •8.1 Message boxes
- •Action
- •Result
- •Action
- •Result
- •8.1.4 Creating A YesNoCancel dialog
- •Action
- •Result
- •Action
- •Result
- •8.2 The Form.Close method
- •8.2.1 The relationship between Close and Dispose
- •Action
- •Result
- •8.3 Modal dialog boxes
- •Action
- •Result
- •Action
- •Result
- •8.3.2 Preserving caption values
- •Action
- •Result
- •Action
- •Result
- •Action
- •Result
- •Action
- •Result
- •Action
- •Result
- •Action
- •Result
- •Action
- •Result
- •Action
- •Result
- •Action
- •Result
- •Action
- •Result
- •Action
- •Result
- •Action
- •Result
- •Action
- •Result
- •Action
- •Result
- •Action
- •Result
- •Action
- •Result
- •Action
- •Result
- •Basic controls
- •Action
- •Result
- •Action
- •Result
- •Action
- •Result
- •9.1.2 Creating a derived form
- •Action
- •Result
- •9.2 Labels and text boxes
- •Action
- •Result
- •Action
- •Result
- •Action
- •Result
- •Action
- •Result
- •Action
- •Result
- •Action
- •Result
- •Action
- •Result
- •Action
- •Result
- •Action
- •Result
- •Action
- •Result
- •Action
- •Result
- •Action
- •Result
- •Action
- •Result
- •Action
- •Result
- •Action
- •Result
- •Action
- •Result
- •Action
- •Result
- •Action
- •Result
- •9.3.6 Adding AlbumEditDlg to our main form
- •Action
- •Result
- •Action
- •Result
- •9.4 Recap
- •List controls
- •10.1 List boxes
- •Action
- •Result
- •Action
- •Result
- •Action
- •Result
- •Action
- •Result
- •10.2 Multiselection list boxes
- •10.2.1 Enabling multiple selection
- •Action
- •Result
- •Action
- •Result
- •Action
- •Result
- •Action
- •Result
- •10.3 Combo boxes
- •Action
- •Result
- •Action
- •Result
- •10.4 Combo box edits
- •Action
- •Result
- •Action
- •Result
- •Action
- •Result
- •10.5 Owner-drawn lists
- •Action
- •Result
- •Action
- •Result
- •Action
- •Result
- •Action
- •Result
- •More controls
- •Action
- •Result
- •Action
- •Result
- •11.2 Tab pages
- •Action
- •Result
- •Action
- •Result
- •11.3.1 Dates and times
- •Action
- •Result
- •Action
- •Result
- •Action
- •Result
- •Action
- •Result
- •Action
- •Result
- •Action
- •Result
- •11.5 Recap
- •A .NET assortment
- •12.1 Keyboard events
- •Action
- •Result
- •Action
- •Result
- •12.2 Mouse events
- •Action
- •Result
- •Action
- •Result
- •Action
- •Result
- •12.3 Image buttons
- •Action
- •Result
- •Action
- •Result
- •Action
- •Result
- •Action
- •Result
- •Action
- •Result
- •Action
- •Result
- •Action
- •Result
- •Action
- •Result
- •Action
- •Result
- •12.4 Icons
- •Action
- •Result
- •Action
- •Result
- •Action
- •Result
- •12.5 Recap
- •Toolbars and tips
- •13.1 Toolbars
- •Action
- •Result
- •Action
- •Result
- •Action
- •Result
- •Action
- •Result
- •Action
- •Result
- •Action
- •Result
- •Action
- •Result
- •Action
- •Result
- •Action
- •Result
- •13.4.2 Creating tool tips
- •Action
- •Result
- •Action
- •Result
- •Advanced Windows Forms
- •List views
- •14.2 The ListView class
- •Action
- •Result
- •Action
- •Result
- •Action
- •Result
- •Action
- •Result
- •14.2.3 Populating a ListView
- •Action
- •Result
- •Action
- •14.3 ListView columns
- •Action
- •Result
- •Action
- •Result
- •Action
- •Result
- •Action
- •Result
- •Action
- •Result
- •Action
- •Result
- •Action
- •Result
- •Action
- •Result
- •Action
- •Result
- •Action
- •Result
- •Action
- •Result
- •Action
- •Result
- •Action
- •Result
- •Action
- •Result
- •Action
- •Result
- •Action
- •Result
- •Action
- •Result
- •Action
- •Result
- •Action
- •Result
- •14.6 Recap
- •Tree views
- •Action
- •Result
- •Action
- •Result
- •Action
- •Result
- •15.3 Dynamic tree nodes
- •Action
- •Result
- •Action
- •Result
- •Action
- •Result
- •Action
- •Result
- •Action
- •Result
- •15.4 Node selection
- •Action
- •Result
- •Action
- •Result
- •Action
- •Result
- •Action
- •Result
- •Action
- •Result
- •15.5 Fun with tree views
- •Action
- •Result
- •Action
- •Result
- •Action
- •Result
- •Multiple document interfaces
- •Action
- •Result
- •Action
- •Result
- •Action
- •Result
- •16.3 Merged menus
- •Action
- •Result
- •Action
- •Result
- •Action
- •Result
- •Action
- •Result
- •16.4 MDI children
- •Action
- •Result
- •Action
- •Result
- •Action
- •Result
- •Action
- •Result
- •Action
- •Result
- •Action
- •Result
- •Action
- •Result
- •Action
- •Result
- •Action
- •Result
- •Action
- •Result
- •16.5 MDI child window management
- •Action
- •Result
- •Action
- •Result
- •16.6 Recap
- •Data binding
- •17.1 Data grids
- •Action
- •Result
- •Action
- •Result
- •17.2 Data grid customization
- •Action
- •Result
- •Action
- •Result
- •Action
- •Result
- •Action
- •Result
- •Action
- •Result
- •Action
- •Result
- •Action
- •Result
- •Action
- •Result
- •Action
- •Result
- •Action
- •Result
- •Action
- •Result
- •Odds and ends .NET
- •Action
- •Result
- •Action
- •Result
- •Action
- •Result
- •Action
- •Result
- •18.2 Timers
- •Action
- •Result
- •Action
- •Result
- •18.3 Drag and drop
- •Action
- •Result
- •Action
- •Result
- •18.4 ActiveX controls
- •Action
- •Result
- •Action
- •Result
- •Action
- •Result
- •Action
- •Result
- •Action
- •Result
- •18.5 Recap
- •C# primer
- •A.1 C# programs
- •A.1.1 Assemblies
- •A.1.2 Namespaces
- •A.2 Types
- •A.2.1 Classes
- •A.2.2 Structures
- •A.2.3 Interfaces
- •A.2.4 Enumerations
- •A.2.5 Delegates
- •A.3 Language elements
- •A.3.1 Built-in types
- •A.3.2 Operators
- •A.3.3 Keywords
- •A.4 Special features
- •A.4.1 Exceptions
- •A.4.2 Arrays
- •A.4.3 Main
- •A.4.4 Boxing
- •A.4.5 Documentation
- •.NET namespaces
- •B.1 System.Collections
- •B.2 System.ComponentModel
- •B.3 System.Data
- •B.4 System.Drawing
- •B.5 System.Globalization
- •B.6 System.IO
- •B.7 System.Net
- •B.8 System.Reflection
- •B.9 System.Resources
- •B.10 System.Security
- •B.11 System.Threading
- •B.12 System.Web
- •B.13 System.Windows.Forms
- •B.14 System.XML
- •Visual index
- •C.1 Objects
- •C.2 Marshal by reference objects
- •C.3 Components
- •C.4 Common dialogs
- •C.7 Event data
- •C.8 Enumerations
- •For more information
- •bibliography
- •Symbols
- •Index
16.2.1CREATING AN MDI CONTAINER FORM
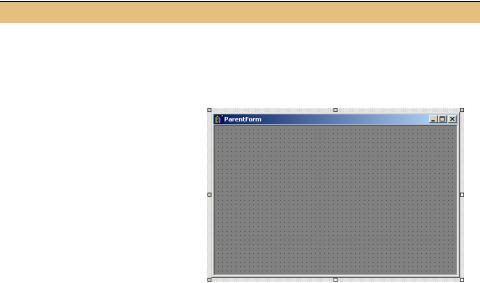
The creation of an MDI container form is much like the creation of any other form. Such a form is often referred to as a parent form, since it acts as the parent for one or more MDI child forms. The following table details the steps required for this task.
Set the version number of the MyPhotos application to 16.2.
CREATE A NEW FORM AS AN MDI CONTAINER
|
Action |
Result |
|
|
|
1 |
In the Solution Explorer window, |
The new file appears in the Solution Explorer window and |
|
add a new Windows Form to the |
the ParentForm.cs [Design] window is displayed. |
|
application called ParentForm. |
|
|
|
|
2 |
Set the icon property for the |
|
|
form to the “icons/Writing/ |
|
|
BOOKS04.ICO” file in the |
|
|
common image directory. |
|
|
|
|
3 |
Set the IsMdiContainer |
|
|
property to true. |
|
|
Note: This establishes the form |
|
|
as an MDI container form. |
|
|
|
|
4 |
Set the Size property to |
|
|
600×400 pixels. |
|
|
|
|
As you can see, the contents of the window appear in a darker color and includes a 3- D border to indicate that this form is now an MDI container. This color is the tem.AppWorkspace color, which is typically a darker version of the System.Control color. This background is a hidden MdiClient control, and cannot be manipulated in code as it is not exposed by the Form class. This background contains the MDI child forms, and is always last in the z-order. As a result, any controls added to the form will appear above this background, and therefore in front of any MDI children. Typically, controls added to an MDI container are docked to one edge of the parent form.
The code generated for our ParentForm class is much like other forms we have seen in this book. The InitializeComponent method generated by Visual Studio
.NET is as follows:
private void InitializeComponent()
{
//
// ParentForm
//
this.AutoScaleBaseSize = new System.Drawing.Size(5, 13);
this.ClientSize = new System.Drawing.Size(592, 373);
MDI FORMS |
531 |
this.IsMdiContainer = true;
this.Name = “ParentForm”;
this.Text = “ParentForm”;
}
With the parent form created, we can turn our attention to the child form.
16.2.2CREATING AN MDI CHILD FORM
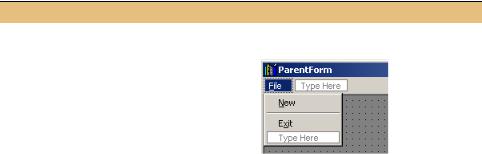
With our MDI container in place, we can add the infrastructure required for generating MDI child forms. This will consist of a menu bar and a New menu item. Fortunately, we already have our MainForm class available to act as the child form.
The following table shows how to create a child form in our application. As part of this task, we will add an Exit menu as well.
ADD ABILITY TO CREATE CHILD FORMS
|
|
|
Action |
|
|
Result |
|
|
|
|
|
|
|
|
|
1 |
Add a MainMenu object to the ParentForm |
|
|||||
|
class in the ParentForm.cs [Design] window. |
|
|||||
|
|
|
|
|
|
|
|
2 |
Add a top-level File menu containing the |
|
|||||
|
three menu items as shown. |
|
|
|
|||
|
|
|
Settings |
|
|
|
|
|
|
|
|
|
|
|
|
|
|
Menu |
Property |
|
Value |
|
|
|
|
File |
(Name) |
|
menuFile |
|
|
|
|
|
Text |
|
&File |
|
|
|
|
New |
(Name) |
|
menuNew |
|
|
|
|
|
Shortcut |
|
CtrlN |
|
|
|
|
|
Text |
|
&New |
|
|
|
|
separator |
|
|
|
|
|
|
|
Exit |
(Name) |
|
menuExit |
|
|
|
|
|
Text |
|
E&xit |
|
|
|
|
|
|
|
|
|
|
|
|
|
|
|
|
|
|
3 |
Add a Click event handler for the Exit |
private void menuExit_Click |
|||||
|
menu to close the form. |
|
|
(object sender, System.EventArgs e) |
|||
|
|
|
|
|
|
|
{ |
|
|
|
|
|
|
|
Close(); |
|
|
|
|
|
|
|
} |
|
|
|
|
|
|
|
|
4 |
Add a Click event handler for the New |
private void menuNew_Click |
|||||
|
menu. |
|
|
|
|
(object sender, System.EventArgs e) |
|
|
|
|
|
|
|
|
{ |
|
|
|
|
|
|
|
|
532 |
CHAPTER 16 MULTIPLE DOCUMENT INTERFACES |

ADD ABILITY TO CREATE CHILD FORMS (continued)
|
Action |
Result |
|
|
|
5 |
Within this handler, create a MainForm |
MainForm newChild = new MainForm(); |
|
object as an MDI child form. |
newChild.MdiParent = this; |
|
|
newChild.Show(); |
|
How-to |
} |
|
a. Create a new MainForm object. |
|
|
b. Define this form as an MDI child by set- |
|
|
ting the current form as its MDI parent. |
|
|
c. Display the child form using the Show |
|
|
method. |
|
|
|
|
That’s all it takes to create a child form. You have almost created your first MDI application.
If you compile and run the application, you will note that the MyPhotos application runs exactly as before. This is because the MainForm.Main method is still the entry point for the application, and it displays the MainForm object using the Application.Run method. To fix this, we need to display the ParentForm class in the entry point for the application. This is our next subject.
16.2.3ADDING A NEW ENTRY POINT
One quite simple means to fix our entry point would be to modify the Main method in the MainForm class directly. The new code would look as follows, with the change highlighted in bold:
public class MainForm : System.Windows.Forms.Form
{
. . .
[STAThread]
static void Main()
{
Application.Run(new ParentForm());
}
. . .
}
While this code would do exactly what we want, a drawback of this change is that we could no longer compile the application as the single document interface we created in chapter 13. To preserve this ability, we will instead create a Main method as part of the ParentForm class, and modify the project to use this new method as the entry point.
The following table creates a new entry point within the ParentForm class.
MDI FORMS |
533 |
CREATE AN ENTRY POINT IN THE PARENT FORM
|
Action |
Result |
|
|
|
1 |
Create a Main method in the |
/// <summary> |
|
ParentForm.cs code window to |
/// Entry point for MDI application. |
|
serve as the entry point for our |
/// </summary> |
|
[STAThread] |
|
|
MDI application. |
|
|
static void Main() |
|
|
Note: If you compile the applica- |
{ |
|
Application.Run(new ParentForm()); |
|
|
tion after this step, you will get an |
|
|
} |
|
|
error indicating that the program |
|
|
defines more than one entry |
|
|
point. |
|
|
|
|
2 |
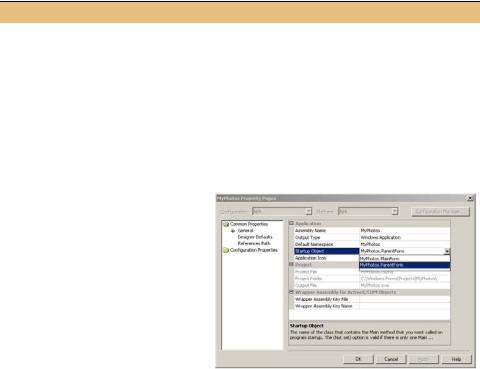
Set the Startup Object for the |
|
|
MyPhotos project to the |
|
|
MyPhotos.ParentForm class. |
|
|
How-to |
|
|
a. Display the Property Pages dia- |
|
|
log for the project. |
|
|
b. Click the down arrow associ- |
|
|
ated with the Startup Object |
|
|
entry. |
|
|
c. Select the MyPhotos.Parent- |
|
|
Form class. |
|
|
|
|
The application is now ready. The startup object specified here is used by the C# compiler to establish the entry point for the application, and is only required if there are multiple Main methods in your project. On the command-line, the C# compiler accepts the /main switch to specify the class containing the Main method to use as the application’s entry point.
Run the application to verify that the ParentForm window appears and the New menu can be used to create MainForm objects as child windows. If you explore this new application, you will find some rather peculiar behavior for some of the controls. We will discuss and address these issues throughout the remainder of this chapter.
TRY IT! Of course, the MyPhotos Property Pages dialog used in step 2 can also be used to set the Startup Object to the MyPhotos.MainForm class. When this is done, the application displays the familiar single document interface created in part 2 of this book. Make this change and run the application to observe this behavior.
Among the odd features you may notice in the MDI version of this application is the menu bar. In particular, there are two File menus when a MainForm window is displayed. Adjusting this behavior is our next topic.
534 |
CHAPTER 16 MULTIPLE DOCUMENT INTERFACES |