

- •brief contents
- •about this book
- •The Windows Forms namespace
- •Part 1: Hello Windows Forms
- •Part 2: Basic Windows Forms
- •Part 3: Advanced Windows Forms
- •Who should read this book?
- •Conventions
- •Action
- •Result
- •Source code downloads
- •Author online
- •acknowledgments
- •about .NET
- •Casting the .NET
- •Windows Forms overview
- •about the cover illustration
- •Hello Windows Forms
- •1.1 Programming in C#
- •1.1.1 Namespaces and classes
- •1.1.2 Constructors and methods
- •1.1.3 C# types
- •1.1.4 The entry point
- •1.1.5 The Application class
- •1.1.6 Program execution
- •1.2 Adding controls
- •1.2.1 Shortcuts and fully qualified names
- •1.2.2 Fields and properties
- •1.2.3 The Controls property
- •1.3 Loading files
- •1.3.1 Events
- •1.3.2 The OpenFileDialog class
- •1.3.3 Bitmap images
- •1.4 Resizing forms
- •1.4.1 Desktop layout properties
- •1.4.2 The Anchor property
- •1.4.3 The Dock property
- •1.5 Recap
- •2.1 Programming with Visual Studio .NET
- •2.1.1 Creating a project
- •Action
- •Result
- •2.1.2 Executing a program
- •Action
- •Result
- •2.1.3 Viewing the source code
- •View the code generated by Visual Studio .NET
- •Action
- •Result
- •2.2 Adding controls
- •2.2.1 The AssemblyInfo file
- •Action
- •Results
- •2.2.2 Renaming a form
- •Action
- •Result
- •2.2.3 The Toolbox window
- •Action
- •Result
- •2.3 Loading files
- •2.3.1 Event handlers in Visual Studio .NET
- •Action
- •Result
- •2.3.2 Exception handling
- •Action
- •Result
- •Action
- •Results and Comments
- •2.4 Resizing forms
- •2.4.1 Assign the Anchor property
- •Action
- •Result
- •2.4.2 Assign the MinimumSize property
- •Action
- •Result
- •2.5 Recap
- •Basic Windows Forms
- •Menus
- •Action
- •Result
- •Action
- •Result
- •Action
- •Result
- •Action
- •Result
- •3.3 Click events
- •Action
- •Result
- •Action
- •Result
- •Action
- •Result
- •Action
- •Result
- •Action
- •Result
- •Action
- •Result
- •3.5 Context menus
- •Action
- •Result
- •Action
- •Result
- •3.6 Recap
- •Status bars
- •4.1 The Control class
- •4.2 The StatusBar class
- •Action
- •Result
- •Action
- •Result
- •4.3.1 Adding panels to a status bar
- •Action
- •Result
- •Action
- •Result
- •Action
- •Result
- •Action
- •Result
- •4.5 Recap
- •Reusable libraries
- •5.1 C# classes and interfaces
- •5.2 Class libraries
- •Action
- •Result
- •Action
- •Result
- •Action
- •Result
- •Action
- •Result
- •Action
- •Result
- •Action
- •Result
- •Action
- •Result
- •Action
- •Result
- •Action
- •Result
- •5.3 Interfaces revisited
- •Action
- •Result
- •Action
- •Result
- •Action
- •Result
- •5.4 Robustness issues
- •Action
- •Result
- •Action
- •Result
- •Action
- •Result
- •Action
- •Result
- •Action
- •Result
- •Action
- •Result
- •Common file dialogs
- •Action
- •Results
- •Action
- •Result
- •Action
- •Result
- •Action
- •Result
- •Action
- •Result
- •6.3 Paint events
- •Action
- •Result
- •Action
- •Result
- •6.4 Context menus revisited
- •Action
- •Result
- •Action
- •Result
- •6.5 Files and paths
- •Action
- •Result
- •Action
- •Result
- •Action
- •Result
- •6.6 Save file dialogs
- •Action
- •Result
- •Action
- •Result
- •Action
- •Result
- •Action
- •Result
- •Action
- •Result
- •6.7 Open file dialogs
- •Action
- •Result
- •Action
- •Result
- •6.8 Recap
- •Drawing and scrolling
- •7.1 Form class hierarchy
- •Action
- •Result
- •Action
- •Result
- •Action
- •Result
- •Action
- •Result
- •Action
- •Result
- •Action
- •Result
- •Action
- •Result
- •Action
- •Result
- •Action
- •Result
- •Action
- •Result
- •Action
- •Result
- •Action
- •Result
- •7.4 Panels
- •Action
- •Result
- •Action
- •Result
- •Action
- •Result
- •Action
- •Result
- •Action
- •Result
- •Dialog boxes
- •8.1 Message boxes
- •Action
- •Result
- •Action
- •Result
- •8.1.4 Creating A YesNoCancel dialog
- •Action
- •Result
- •Action
- •Result
- •8.2 The Form.Close method
- •8.2.1 The relationship between Close and Dispose
- •Action
- •Result
- •8.3 Modal dialog boxes
- •Action
- •Result
- •Action
- •Result
- •8.3.2 Preserving caption values
- •Action
- •Result
- •Action
- •Result
- •Action
- •Result
- •Action
- •Result
- •Action
- •Result
- •Action
- •Result
- •Action
- •Result
- •Action
- •Result
- •Action
- •Result
- •Action
- •Result
- •Action
- •Result
- •Action
- •Result
- •Action
- •Result
- •Action
- •Result
- •Action
- •Result
- •Action
- •Result
- •Action
- •Result
- •Basic controls
- •Action
- •Result
- •Action
- •Result
- •Action
- •Result
- •9.1.2 Creating a derived form
- •Action
- •Result
- •9.2 Labels and text boxes
- •Action
- •Result
- •Action
- •Result
- •Action
- •Result
- •Action
- •Result
- •Action
- •Result
- •Action
- •Result
- •Action
- •Result
- •Action
- •Result
- •Action
- •Result
- •Action
- •Result
- •Action
- •Result
- •Action
- •Result
- •Action
- •Result
- •Action
- •Result
- •Action
- •Result
- •Action
- •Result
- •Action
- •Result
- •Action
- •Result
- •9.3.6 Adding AlbumEditDlg to our main form
- •Action
- •Result
- •Action
- •Result
- •9.4 Recap
- •List controls
- •10.1 List boxes
- •Action
- •Result
- •Action
- •Result
- •Action
- •Result
- •Action
- •Result
- •10.2 Multiselection list boxes
- •10.2.1 Enabling multiple selection
- •Action
- •Result
- •Action
- •Result
- •Action
- •Result
- •Action
- •Result
- •10.3 Combo boxes
- •Action
- •Result
- •Action
- •Result
- •10.4 Combo box edits
- •Action
- •Result
- •Action
- •Result
- •Action
- •Result
- •10.5 Owner-drawn lists
- •Action
- •Result
- •Action
- •Result
- •Action
- •Result
- •Action
- •Result
- •More controls
- •Action
- •Result
- •Action
- •Result
- •11.2 Tab pages
- •Action
- •Result
- •Action
- •Result
- •11.3.1 Dates and times
- •Action
- •Result
- •Action
- •Result
- •Action
- •Result
- •Action
- •Result
- •Action
- •Result
- •Action
- •Result
- •11.5 Recap
- •A .NET assortment
- •12.1 Keyboard events
- •Action
- •Result
- •Action
- •Result
- •12.2 Mouse events
- •Action
- •Result
- •Action
- •Result
- •Action
- •Result
- •12.3 Image buttons
- •Action
- •Result
- •Action
- •Result
- •Action
- •Result
- •Action
- •Result
- •Action
- •Result
- •Action
- •Result
- •Action
- •Result
- •Action
- •Result
- •Action
- •Result
- •12.4 Icons
- •Action
- •Result
- •Action
- •Result
- •Action
- •Result
- •12.5 Recap
- •Toolbars and tips
- •13.1 Toolbars
- •Action
- •Result
- •Action
- •Result
- •Action
- •Result
- •Action
- •Result
- •Action
- •Result
- •Action
- •Result
- •Action
- •Result
- •Action
- •Result
- •Action
- •Result
- •13.4.2 Creating tool tips
- •Action
- •Result
- •Action
- •Result
- •Advanced Windows Forms
- •List views
- •14.2 The ListView class
- •Action
- •Result
- •Action
- •Result
- •Action
- •Result
- •Action
- •Result
- •14.2.3 Populating a ListView
- •Action
- •Result
- •Action
- •14.3 ListView columns
- •Action
- •Result
- •Action
- •Result
- •Action
- •Result
- •Action
- •Result
- •Action
- •Result
- •Action
- •Result
- •Action
- •Result
- •Action
- •Result
- •Action
- •Result
- •Action
- •Result
- •Action
- •Result
- •Action
- •Result
- •Action
- •Result
- •Action
- •Result
- •Action
- •Result
- •Action
- •Result
- •Action
- •Result
- •Action
- •Result
- •Action
- •Result
- •14.6 Recap
- •Tree views
- •Action
- •Result
- •Action
- •Result
- •Action
- •Result
- •15.3 Dynamic tree nodes
- •Action
- •Result
- •Action
- •Result
- •Action
- •Result
- •Action
- •Result
- •Action
- •Result
- •15.4 Node selection
- •Action
- •Result
- •Action
- •Result
- •Action
- •Result
- •Action
- •Result
- •Action
- •Result
- •15.5 Fun with tree views
- •Action
- •Result
- •Action
- •Result
- •Action
- •Result
- •Multiple document interfaces
- •Action
- •Result
- •Action
- •Result
- •Action
- •Result
- •16.3 Merged menus
- •Action
- •Result
- •Action
- •Result
- •Action
- •Result
- •Action
- •Result
- •16.4 MDI children
- •Action
- •Result
- •Action
- •Result
- •Action
- •Result
- •Action
- •Result
- •Action
- •Result
- •Action
- •Result
- •Action
- •Result
- •Action
- •Result
- •Action
- •Result
- •Action
- •Result
- •16.5 MDI child window management
- •Action
- •Result
- •Action
- •Result
- •16.6 Recap
- •Data binding
- •17.1 Data grids
- •Action
- •Result
- •Action
- •Result
- •17.2 Data grid customization
- •Action
- •Result
- •Action
- •Result
- •Action
- •Result
- •Action
- •Result
- •Action
- •Result
- •Action
- •Result
- •Action
- •Result
- •Action
- •Result
- •Action
- •Result
- •Action
- •Result
- •Action
- •Result
- •Odds and ends .NET
- •Action
- •Result
- •Action
- •Result
- •Action
- •Result
- •Action
- •Result
- •18.2 Timers
- •Action
- •Result
- •Action
- •Result
- •18.3 Drag and drop
- •Action
- •Result
- •Action
- •Result
- •18.4 ActiveX controls
- •Action
- •Result
- •Action
- •Result
- •Action
- •Result
- •Action
- •Result
- •Action
- •Result
- •18.5 Recap
- •C# primer
- •A.1 C# programs
- •A.1.1 Assemblies
- •A.1.2 Namespaces
- •A.2 Types
- •A.2.1 Classes
- •A.2.2 Structures
- •A.2.3 Interfaces
- •A.2.4 Enumerations
- •A.2.5 Delegates
- •A.3 Language elements
- •A.3.1 Built-in types
- •A.3.2 Operators
- •A.3.3 Keywords
- •A.4 Special features
- •A.4.1 Exceptions
- •A.4.2 Arrays
- •A.4.3 Main
- •A.4.4 Boxing
- •A.4.5 Documentation
- •.NET namespaces
- •B.1 System.Collections
- •B.2 System.ComponentModel
- •B.3 System.Data
- •B.4 System.Drawing
- •B.5 System.Globalization
- •B.6 System.IO
- •B.7 System.Net
- •B.8 System.Reflection
- •B.9 System.Resources
- •B.10 System.Security
- •B.11 System.Threading
- •B.12 System.Web
- •B.13 System.Windows.Forms
- •B.14 System.XML
- •Visual index
- •C.1 Objects
- •C.2 Marshal by reference objects
- •C.3 Components
- •C.4 Common dialogs
- •C.7 Event data
- •C.8 Enumerations
- •For more information
- •bibliography
- •Symbols
- •Index
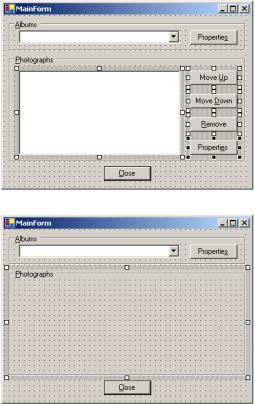
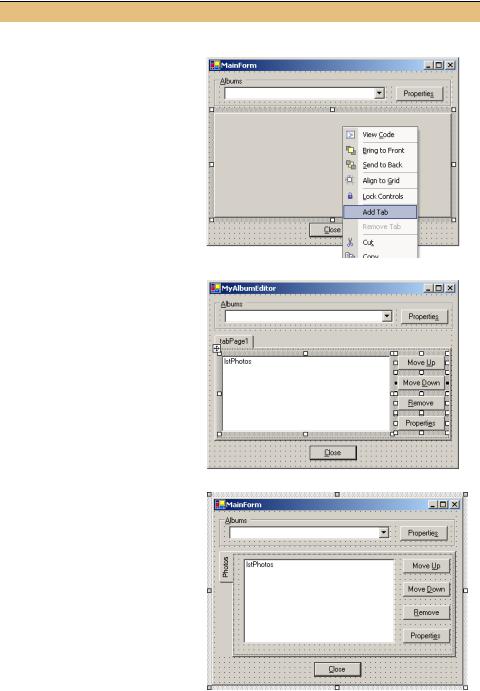
The solution is to use cut and paste just like you might when moving text around in a document. We will cut the controls from the group box and then paste them inside of a tab page. The steps required are described in the following table:
|
REPLACE THE GROUPBOX WITH A TABPAGE |
|
|
|
|
|
Action |
Result |
|
|
|
1 |
In the MainForm.cs [Design] |
|
|
window, highlight the set of |
|
|
controls inside the Photographs |
|
|
group box. |
|
|
How-to |
|
|
a. Click the ListBox control. |
|
|
b. Hold down the Ctrl key and |
|
|
click the four Button controls. |
|
|
Alternately |
|
|
Click inside the GroupBox |
|
|
control and drag a focus |
|
|
rectangle to include all five |
|
|
controls. |
|
|
|
|
2 |
Cut the selected controls to the |
|
|
Clipboard. |
|
|
How-to |
|
|
Select Cut from the Edit menu. |
|
|
Alternately |
|
|
Use the keyboard shortcut |
|
|
Ctrl+X. |
|
|
|
|
3 |
Delete the Photographs group |
|
|
box control from the form. |
|
|
|
|
4 |
Drag a TabControl object onto |
|
|
the form, and resize it to be |
|
|
about the same size as the |
|
|
deleted Photographs group box. |
|
|
|
|
364 |
CHAPTER 11 MORE CONTROLS |
REPLACE THE GROUPBOX WITH A TABPAGE (continued)
|
|
|
|
Action |
|
|
Result |
|
|
|
|
|
|
|
|
||
5 |
|
Add a TabPage object within the |
|
|||||
|
|
tab control. |
|
|
|
|
|
|
|
|
How-to |
|
|
|
|
|
|
|
|
a. Right-click the TabControl |
|
|||||
|
|
object. |
|
|
|
|
|
|
|
|
b. Select Add Tab from the |
|
|||||
|
|
menu. |
|
|
|
|
|
|
|
|
Alternately |
|
|
|
|
|
|
|
|
You can use the TabPages |
|
|||||
|
|
property of the tab control to |
|
|||||
|
|
display the TabPage Collection |
|
|||||
|
|
Editor dialog. |
|
|
|
|||
|
|
|
|
|
|
|
||
6 |
|
Insert the controls inside the |
|
|||||
|
|
TabPage control. Resize and |
|
|||||
|
|
position the controls if |
|
|
|
|||
|
|
necessary. |
|
|
|
|
|
|
|
|
How-to |
|
|
|
|
|
|
|
|
a. Click inside the TabPage |
|
|||||
|
|
object to make it the active |
|
|||||
|
|
control. |
|
|
|
|
|
|
|
|
b. Select Paste from the Edit |
|
|||||
|
|
menu. |
|
|
|
|
|
|
|
|
Alternately |
|
|
|
|
|
|
|
|
Click inside the control and use |
|
|||||
|
|
the keyboard shortcut Ctrl+V. |
|
|||||
|
|
|
|
|
|
|
||
7 |
|
Set the properties for the tab |
|
|||||
|
|
control and page. |
|
|
|
|||
|
|
|
|
Settings |
|
|
|
|
|
|
|
|
|
|
|
|
|
|
|
Control |
|
Property |
|
Value |
|
|
|
|
TabControl |
|
(Name) |
|
tcPhotos |
|
|
|
|
|
|
Alignment |
|
Left |
|
|
|
|
|
|
Anchor |
|
Top, |
|
|
|
|
|
|
|
|
Bottom, |
|
|
|
|
|
|
|
|
Left, Right |
|
|
|
|
TabPage |
|
(Name) |
|
tabPhotos |
|
|
|
|
|
|
Text |
|
Photos |
|
|
|
|
|
|
|
|
|
|
|
TAB PAGES |
365 |
REPLACE THE GROUPBOX WITH A TABPAGE (continued)
|
Action |
Result |
|
|
|
8 |
Manually reestablish the event |
The event handlers for the controls are assigned to the |
|
handlers for the controls. This |
appropriate events. |
|
includes the DoubleClick, |
Note: This step is required whenever a control is |
|
DrawItem, MeasureItem, and |
|
|
cut from one location and pasted into another. The |
|
|
SelectedIndexChanged event |
|
|
event handlers are not preserved, although the |
|
|
handlers for the list box, and the |
|
|
properties of the controls are. |
|
|
Click handlers for each of the |
|
|
|
|
|
four button controls. |
|
|
How-to |
|
|
Use the Events listing in the |
|
|
Properties window, and select |
|
|
the existing methods from the |
|
|
appropriate dropdown lists. |
|
|
|
|
The Photographs group box is now replaced with a Photos tab page. This tab is aligned on the left side of the tab control. The Alignment property uses the TabAlignment enumeration, with possible values Top, Bottom, Left, and Right.
As you may have noticed, when the Alignment property for a tab control is Left or Right, the Multiline property is automatically set to true. Compile and run the application to make sure the controls still behave as expected, including multiple selection and the owner-drawn list feature via the Thumbnails menu.
We will add a second TabPage later in the chapter to display the set of dates associated with the album in a calendar format. This will enable a discussion of the MonthCalendar class. Before we can do this, we will first provide the appropriate support for the DateTaken property of the Photograph class.
11.3DATES AND TIMES
We will return to tab pages and our MyAlbumEditor application in a moment. In this section we finally preserve the Date Taken value entered by the user in our toEditDlg form. As you may recall, in chapter 9 we intentionally ignored this value to avoid converting the user-entered string value into a date. At the time we said there was a better way to deal with date constructs. In this section we finally see exactly what this looks like.
Dealing with dates and times is one of those issues that prevent some programmers from getting a good night’s sleep. With 3600 seconds in an hour, and 24 hours in a day, and different days per month, and leap years almost but not quite every four years, it’s no wonder. Fortunately, most languages and environments these days provide direct support for date-time values to simplify handling of these constructs. In the
.NET Framework, this support extends to Windows Forms controls as well.
In chapter 5 we saw how the DateTime structure is used to represent a date-time value within a program. In this section we will look at representing a date-time value
366 |
CHAPTER 11 MORE CONTROLS |