

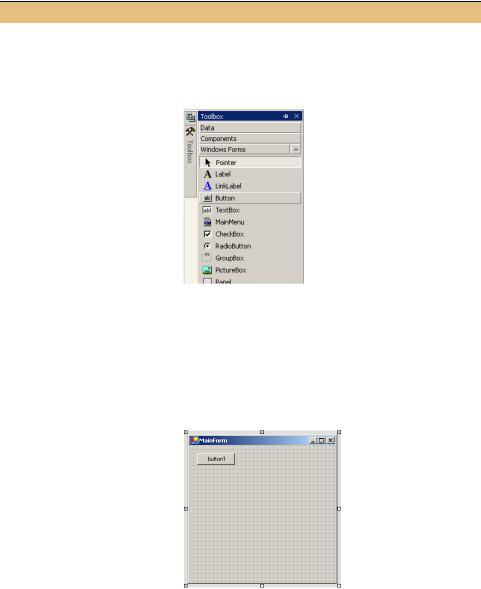
2.2.3The Toolbox window
Finally, we are ready to insert the controls onto the form. In future chapters, we will not include the excruciating details of adding controls to forms and setting their properties with the Forms Designer, so make sure you understand the process here.
If you recall, in chapter 1 we inserted a Button and a PictureBox on our form. We will do the same here using Visual Studio.
ADD THE CONTROLS TO OUR FORM
|
Action |
Result |
|
|
|
|
|
1 |
Click the MainForm.cs |
The Windows Form Designer appears, displaying our blank |
|
[Design] tab. |
form. |
||
|
|||
|
|
|
|
2 |
Click the Toolbox tab on the |
The Toolbox window appears. |
|
|
upper left side of the |
|
|
|
window. |
|
|
|
Note: Your Toolbox may |
|
|
|
appear on the right or left, |
|
|
|
depending on your |
|
|
|
settings. If the Toolbox tab |
|
|
|
is not visible, select the |
|
|
|
Toolbox item from the View |
|
|
|
menu. |
|
|
|
|
Note: The order of controls in your window may be differ- |
|
|
|
ent than what you see here. The contents of this window |
|
|
|
can be customized, and new controls can be added. Look |
|
|
|
up “toolbox, customizing” in the online documentation |
|
|
|
for more details on this latter point. |
|
|
|
|
|
3 |
Click the Button item in the |
The Button item is now highlighted. |
|
|
Toolbox window. |
|
|
|
|
|
|
4 |
Click the blank form. |
A new Button object appears on the form. |
|
|
|
|
48 |
CHAPTER 2 GETTING STARTED WITH VISUAL STUDIO .NET |

ADD THE CONTROLS TO OUR FORM (continued)
|
Action |
Result |
|
|
|
5 |
Similarly, add a Picture- |
A new PictureBox appears on the form. |
|
Box object to the form. |
Note: The order in which controls are added establishes |
|
|
|
|
|
the tab order and the z-order for these controls. All con- |
|
|
trols support the TabIndex property for this purpose, |
|
|
which we discuss later in the chapter. |
|
|
|
6 |
Arrange the controls so |
Your form should now look something like this. |
|
that the Button is at the |
|
|
top left and the |
|
|
PictureBox roughly in the |
|
|
middle. |
|
|
How-to |
|
|
Move each control by |
|
|
clicking it and dragging it |
|
|
around the form. You can |
|
|
also click and drag a |
|
|
control’s corners or edges |
|
|
to resize the control. |
|
|
|
|
Our controls are now on the form. Each control is named based on the type of control. The Button is called button1, while the PictureBox is called pictureBox1. Visual Studio .NET automatically creates a name for each new control based on the class name followed by a number. A second Button object added to the form would be called button2, and so forth. As for the Form1 class earlier in this chapter, we would prefer more descriptive names for our controls, so we rename these items in the following table.
In addition, we need to set the properties for our controls similar to the settings in chapter 1. Since we have set our control’s position and size graphically, there is no need to assign the positional properties such as Left and Height here. In chapter 1, we also set the Text property of the button to “&Load” and the BorderStyle property of the PictureBox control to Fixed3D.
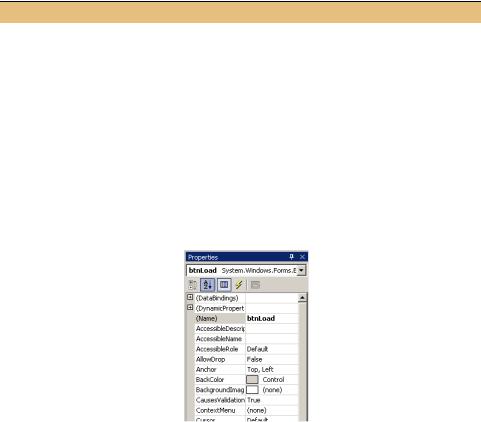
Visual Studio provides a special Properties window where the properties and name of a control can be viewed and modified. We can use these to update our controls. We will set the Button properties first by continuing our previous steps.
ADDING CONTROLS |
49 |
RENAME THE CONTROLS AND DEFINE THEIR PROPERTIES
|
Action |
Result |
|
|
|
7 |
Display the properties for |
The Properties window appears with the properties for the |
|
the Button control. |
button1 control displayed. |
|
How-to |
Note: On your PC, the Properties window may appear |
|
a. Right-click the Button |
|
|
below or to the right of the main window. You can move it |
|
|
control to display a list of |
by dragging its tab, located below the window, to a new |
|
options. |
location. I prefer this window on the right side of Visual |
|
b. Select the Properties item. |
Studio .NET to allow a longer list of properties to be dis- |
|
c. If the controls are not |
played. |
|
shown alphabetically, |
We will always display properties alphabetically in the |
|
click the A-Z button of the |
book, rather than by category. This will make it easier to |
|
Properties window. |
discuss and find required properties. You can display the |
|
|
entries either way in your own application. |
|
|
|
8 |
Rename the control from |
The variable associated with the button is renamed. |
|
“button1” to “btnLoad.” |
|
|
How-to |
|
|
a. Locate the (Name) entry |
|
|
at the top of the list. |
|
|
b. Click the “button1” text |
|
|
after this property.1 |
|
|
c. Type the new name |
|
|
“btnLoad.” |
|
|
|
|
9 |
Modify the Text property |
Note: As in chapter 1, the ampersand (&) is used to indi- |
|
for the button to be |
cate the access key for the button. |
|
“&Load.” |
Also notice that the TabIndex property for this con- |
|
How-to |
trol is set to 1, since it was the first control added to the |
|
form. |
|
|
a. Locate the Text entry in |
|
|
|
|
|
the Properties window. |
|
|
b. Change its value to |
|
|
“&Load.” |
|
|
|
|
50 |
CHAPTER 2 GETTING STARTED WITH VISUAL STUDIO .NET |

RENAME THE CONTROLS AND DEFINE THEIR PROPERTIES
|
Action |
Result |
|
|
|
10 |
Display the PictureBox |
The properties for the PictureBox control are shown. |
|
control properties. |
|
|
How-to |
|
|
Right-click the control and |
|
|
select Properties. |
|
|
Alternately |
|
|
You can select the |
|
|
pictureBox1 entry from |
|
|
the dropdown list at the top |
|
|
of the Properties window. |
|
|
|
|
11 |
Set the (Name) property to |
|
|
“pbxPhoto”. |
|
|
|
|
12 |
Set the BorderStyle |
Note: The BorderStyle property is displayed as a drop- |
|
property to Fixed3D. |
down list since this property is based on a fixed set of |
|
|
values, in this case those taken from the BorderStyle |
|
|
enumeration. |
|
|
|
13 |
Display the properties for |
|
|
our MainForm object. |
|
|
How-to |
|
|
Click the title bar of the |
|
|
form, or select the |
|
|
MainForm entry from the |
|
|
dropdown list. |
|
|
|
|
14 |
Set the Text property to |
This setting immediately appears in the title bar of the form in |
|
“MyPhotos” |
the designer window. |
|
|
Note: We already added code to assign a new title bar in |
|
|
the constructor of our class, but it’s nice to have a default |
|
|
title bar regardless. |
|
|
|
Before we compile and run this code, let’s check out the MainForm.cs source code generated by Visual Studio .NET to see how this code has changed in response to our actions. Take a look at the region marked Windows Form Designer generated code in the source file. You may need to click the plus (+) sign in front of this region to display this block of code. This region defines the InitializeComponent method where properties and other settings are defined. Your code should look something like this:
#region Windows Form Designer generated code
///<summary>
///Required method for Designer support - do not modify
///the contents of this method with the code editor.
///</summary>
ADDING CONTROLS |
51 |

private void InitializeComponent() |
|
Create the |
|||||
{ |
|
|
|
controls b |
|||
|
|
|
|
|
|||
this.btnLoad = new System.Windows.Forms.Button(); |
|
|
|
||||
|
|||||||
this.pbxPhoto = new System.Windows.Forms.PictureBox(); |
|
|
|
||||
|
|
|
|||||
this.SuspendLayout(); |
c Suspend layout logic |
|
|
|
|||
// |
d Control sections |
|
|
|
|
|
|
// btnLoad |
|
|
|
|
|
||
// |
|
|
|
|
|
|
|
this.btnLoad.Location = new System.Drawing.Point(16, 16); |
|||||||
this.btnLoad.Name = "btnLoad"; |
|
e Set standard |
|||||
|
|||||||
this.btnLoad.TabIndex = 0; |
|
control |
|||||
this.btnLoad.Text = "&Load"; |
|
settings |
|||||
// |
|
|
|
|
|
|
|
// pbxPhoto |
|
|
|
|
|
|
|
// |
|
|
|
|
|
|
|
this.pbxPhoto.BorderStyle = System.Windows.Forms.BorderStyle.Fixed3D;
this.pbxPhoto.Location = new System.Drawing.Point(40, 80); o |
|
|
|||||||
this.pbxPhoto.Name = "pbxPhoto"; |
|
|
|
|
|
|
|
||
this.pbxPhoto.Size = new System.Drawing.Size(216, 160); o |
|
|
|
||||||
this.pbxPhoto.TabIndex = 1; |
|
Set control |
|
|
|
|
|
|
|
|
|
|
|
|
|
|
|||
this.pbxPhoto.TabStop = false; |
|
|
|
|
|
|
|||
f |
|
|
|||||||
// |
|
location |
|
|
|||||
|
and size |
|
|
|
|
|
|
||
// MainForm |
|
|
|
|
|
|
|
||
|
|
|
|
|
|
|
|
||
// |
|
|
|
|
|
|
|
|
|
this.AutoScaleBaseSize = new System.Drawing.Size(5, 13); |
|
|
|||||||
this.ClientSize = new System.Drawing.Size(292, 273); |
|
|
|
|
|
|
|||
this.Controls.AddRange(new System.Windows.Forms.Control[] { |
|
|
|||||||
|
|
||||||||
|
|
this.pbxPhoto, |
|
|
|
|
|
|
|
|
|
|
|
|
|
|
|
||
|
|
this.btnLoad}); |
|
|
|
|
|
|
|
this.Name = "MainForm"; |
|
Add controls |
|
|
|||||
this.Text = "MyPhotos 2.2"; |
|
|
|
||||||
h Resume |
to form |
g |
|||||||
this.ResumeLayout(false); |
|||||||||
|
|
|
|
|
|
||||
layout logic
}
#endregion
A couple of points here are worth highlighting. The numbers from the previous code excerpt match the numbers in the following list.
bAs we saw in chapter 1, control variables are classes and therefore represent reference types. In order to create an actual object for each control, the new keyword is used.
this.btnLoad = new System.Windows.Forms.Button();
this.pbxPhoto = new System.Windows.Forms.PictureBox();
cTo ensure that the .NET Framework does not attempt to lay out the form while it is being created, the normal layout logic is suspended to prevent layout-related activities and events from occurring. The SuspendLayout method is available to all Windows Forms controls for this purpose.
this.SuspendLayout();
52 |
CHAPTER 2 GETTING STARTED WITH VISUAL STUDIO .NET |

dTo make the generated code easier to read and understand for both programmers and book authors, the settings for each control are defined in their own labeled section. The comments here indicate which control variable is configured by the subsequent code.
//
// btnLoad
//
eThe properties we set in the Windows Forms Designer are defined in each control’s section. The Name property is always set to the variable name of the control, while the TabIndex property is also set for each control, starting with zero (0), to establish the tab order for the controls on the form.
this.btnLoad.Name = "btnLoad";
this.btnLoad.TabIndex = 0;
this.btnLoad.Text = "&Load";
fThe size and location of each control is determined automatically by Visual Studio
.NET and defined here. The settings are defined using structures such as Point and Size from the System.Drawing namespace. A structure, unlike a class, is a value
type, so the new statement creates these objects on the stack and copies their value into the appropriate property.
this.pbxPhoto.Location = new System.Drawing.Point(40, 80);
. . .
this.pbxPhoto.Size = new System.Drawing.Size(216, 160);
. . .
this.AutoScaleBaseSize = new System.Drawing.Size(5, 13);
this.ClientSize = new System.Drawing.Size(292, 273);
gOnce all of the controls are created and initialized, they can be added to the form. Visual Studio adds the controls in one statement using the AddRange method available to the Form.Controls property. Note how this method accepts an array of
Control objects. All Windows Forms controls are based on the Control class, as we shall see in chapter 4. Note the use of square brackets to declare the array type, with the elements for the Control[] array defined in the subsequent braces.2 The order of the controls in the array defines the initial z-order of the controls.
this.Controls.AddRange(new System.Windows.Forms.Control[] {
this.pbxPhoto,
this.btnLoad});
hAt the end of the InitializeComponent method, normal layout processing must be resumed. The ResumeLayout method accepts a boolean value indicating whether an immediate layout should occur or not. For Visual Studio, an immediate layout is not necessary, so the method is invoked with false.
this.ResumeLayout(false);
2 For more details on declaring arrays in C#, see the discussion in appendix A.
ADDING CONTROLS |
53 |