

Classes in .NET contain one or more members that define the behavior and features of the class. We will discuss the members of our MyForm class next. Class members may be constants, fields, methods, properties, events, indexers, operators, constructors, and nested type declarations. Each of these members is discussed in subsequent chapters. For now, let’s take a quick look at the two members employed by our program.
1.1.2Constructors and methods
Take another look at the declaration of our MyForm class. Note how two members of this class are defined, namely the MyForm constructor and the Main method.
Both members are declared as public, as is the class MyForm. C# provides the accessibility levels public, protected, and private that C++ programmers should be familiar with. These are discussed in appendix A, as are the additional access levels provided by C#, namely internal and protected internal.
public class MyForm : System.Windows.Forms.Form
{
public MyForm()
{
this.Text = "Hello Form";
}
public static void Main()
{
System.Windows.Forms.Application.Run(new MyForm());
}
}
The first member is called a constructor, and works much like a constructor in C++. This is an instance constructor since it initializes new instances of the MyForm class. An instance constructor with no parameters, such as our constructor here, is called the default constructor. C# also supports static constructors to initialize the class itself. Appendix A contains more information on both kinds of constructors.
In the constructor for our MyForm class, a single statement sets the Text property of the form to the string "Hello Form". We will discuss exactly what a property is shortly. It is enough for now to know that this line simply places the string Hello Form on the title bar of the application window. As in C++, the this keyword refers to the current object.
The second member of our class is a method. A method is a member that performs an operation for the class. An instance method operates on a class instance, while a static method operates on the type itself. Methods in C# work much like their C++ counterparts.
An instance constructor for a class is invoked when an object of that class is first created. Typically, objects of any type are initialized using the new keyword, which we discuss next. A method must be invoked explicitly within a program. The Main method used here is the entry point for our program and is invoked by the .NET Framework itself, a topic we will return to in a moment.
8 |
CHAPTER 1 GETTING STARTED WITH WINDOWS FORMS |
1.1.3C# types
The new keyword is used to initialize any type in C#. This includes classes and structures as well as simple types such as int and enumerations. In fact, it is a compiler error to use an object before it has been initialized. Any instance constructor provided for a given type, in our code the Main constructor, is invoked during initialization. In our case, we initialize the MyForm class with the following code.
public static void Main()
{
System.Windows.Forms.Application.Run(new MyForm());
}
There are two classifications of types in C#, with different initialization behavior for each. Value types contain the actual data for the type. These include built-in types such as int, char, and bool as well as all structures created with the struct keyword. Value types are typically small or short-lived, making it useful to have their value stored in place, either on the stack or within the object containing them, such as an integer declared as a member of a class.
Reference types contain a reference to the actual data for the type. This is a bit like a pointer in C++, except that the reference is implicit in C#. All classes in C# are reference types, as are the built-in object and string types. The compiler automatically converts value types into reference types as required, using a process called boxing. We will discuss boxing later in the book.
As an example, consider the following code:
int x = new int();
x = 54;
string s = new string();
s = "Fifty-Four";
As you might guess, this can be abbreviated as:
int x = 54;
string s = "Fifty-Four";
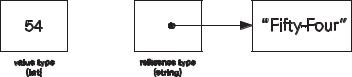
The storage allocated as a result of this code is illustrated in figure 1.2. The variable x is a value type and contains the integer 54. The variable s is a reference type, so that the string "Fifty-Four" exists somewhere else in memory. The variable s simply contains a reference to this memory.
Figure 1.2 This graphic illustrates the two kinds of types in C#. The integer type, a value type, contains the value 54, while the string type, a reference type, refers to the value “Fifty-Four.”
PROGRAMMING IN C# |
9 |
The area of memory reserved for reference data is called the heap. Memory allocated on the heap, such as the string in figure 1.2, is reclaimed using garbage collection. The garbage collector, as it is called, automatically identifies blocks of memory that are no longer accessible and reclaims it when the program has extra processing time or requires more memory. Rather than the constant memory management required by C++ programmers using the new and delete keywords, garbage collection manages memory behind the scenes so you can concentrate on writing your program. Of course, from a performance perspective, you have to pay the piper sooner or later, but delaying such reclamation may allow an idle CPU cycle or two to be discovered and provide better overall performance.
No need to get knee-deep in this topic. For our purposes, garbage collection means no more pointers lying around leaking memory and resources. Of course, there are other ways to mismanage your memory and resources, and garbage collection creates its own set of problems, but more on that as we go along.
We know from this discussion that classes are reference types, and an instance of a class cannot be used until it is assigned to an actual object using the new keyword or an existing object. In the case where one reference type is assigned to an existing reference type, both objects refer, or point, to the same block of data on the heap, and both variables must be destroyed before the object can be reclaimed by the garbage collector.
Back in our application, the MyForm class is a reference type, so we create a MyForm object using the new keyword.
TRY IT! Go ahead, break your code. Change your Main function to the following:
public static void Main()
{
MyForm badForm;
System.Windows.Forms.Application.Run(badForm);
}
If you compile this change, you should receive an error as follows:
Error Use of unassigned local variable ‘badForm.’
We could have implemented our Main function with a variable to represent the form.
public static void Main()
{
MyForm goodForm = new MyForm();
System.Windows.Forms.Application.Run(goodForm);
}
However, this variable is not needed, so we wrote the Main function without it.
public static void Main()
{
System.Windows.Forms.Application.Run(new MyForm());
}
Let’s talk about the Main function next.
10 |
CHAPTER 1 GETTING STARTED WITH WINDOWS FORMS |
1.1.4The entry point
Every C# program starts execution in a Main function, just like it does in C, C++, and Java (although in C# it must begin with a capital M). This function is the starting point, or entry point, for our application. After the Windows operating system creates a new process, initializes various internal data structures, and loads the executable program into memory, our program is invoked by calling this entry point, optionally providing the command-line arguments specified by the user.
The entry point in C# is similar to the main function found in C and C++, except that in C# it must be a static member of a class. The Main function can be void or return an int, and it can optionally receive the command-line parameters as an array of strings. The four possible forms for this function are shown below.
public static void Main(); public static int Main();
public static void Main(string[] args); public static int Main(string[] args);
The expression string[] specifies an array of string objects. Arrays in C# are zero-based, so the array args shown here has string values args[0], args[1], and so forth. Unlike C++, the first element in the array here, namely args[0], is the first parameter for the program, and not the name of the executable.
The C# compiler uses the first instance of Main it locates as the entry point for the program. In our case there is only one. If there are multiple Main functions, the /main switch can be used to specify which instance should be used.
public static void Main()
{
System.Windows.Forms.Application.Run(new MyForm());
}
Our Main function is void and accepts no arguments. It contains a single statement, which we will discuss next.
1.1.5The Application class
The Application class is used to manage applications, threads, and Windows messages. A summary of this class for future reference appears in .NET Table 1.1. This class is commonly used to display the initial form in an application and to wait for user actions to occur within this form, which is exactly how we use this class here.
public static void Main()
{
System.Windows.Forms.Application.Run(new MyForm());
}
The Run method begins a message loop in the current thread to wait for operating system messages. If a Form object is provided, as is done in our program, then this form is displayed on the desktop and starts interacting with the user.
PROGRAMMING IN C# |
11 |

.
.NET Table 1.1 Application class
The Application class is an object that encapsulates the static members necessary to manage and process forms, threads, and Windows messages on behalf of a program. This class is sealed, meaning that the class cannot be inherited. The Application class is part of the System.Windows.Forms namespace. You cannot create an instance of this class, as no accessible instance constructor is provided
|
CommonAppDataRegistry |
Gets the RegistryKey for application data |
|
|
shared among all users. |
|
CurrentCulture |
Gets or sets the locale (for internationalization) |
|
|
for the current thread. |
|
ProductName |
Gets the product name associated with the |
Public Static |
|
application. |
|
|
|
Properties |
ProductVersion |
Gets the product version associated with the |
|
||
|
|
application. |
|
StartupPath |
Gets the path for the executable file that |
|
|
started the application. |
|
UserAppDataRegistry |
Gets the RegistryKey for application data |
|
|
specific to the current user. |
|
|
|
|
AddMessageFilter |
Installs an IMessageFilter interface to |
|
|
monitor routing of Windows messages on the |
|
|
current thread. Such a monitor can be used to |
|
|
intercept incoming messages to a form. |
|
DoEvents |
Processes any Windows messages currently in |
|
|
the message queue. |
Public Static |
Exit |
Stops all running message loops and closes all |
Methods |
|
windows in the application. Note that this may |
|
|
not force the application to exit. |
|
ExitThread |
Stops the message loop and closes all |
|
|
windows on the current thread only. |
|
Run |
Starts a standard message loop on the current |
|
|
thread. If a Form is given, also makes that form |
|
|
visible. |
|
|
|
|
ApplicationExit |
Occurs when the application is about to shut |
|
|
down. |
Public Static |
Idle |
Occurs when the application is about to enter |
|
the idle state. |
|
Events |
ThreadException |
Occurs when an uncaught ThreadException |
|
||
|
|
occurs. |
|
ThreadExit |
Occurs when a thread is about to shut down. |
|
|
|
12 |
CHAPTER 1 GETTING STARTED WITH WINDOWS FORMS |