

- •Preface
- •Acknowledgments
- •Contents
- •Contributors
- •1. Introduction
- •2. Evaluation of the Craniomaxillofacial Deformity Patient
- •3. Craniofacial Deformities: Review of Etiologies, Distribution, and Their Classification
- •4. Etiology of Skeletal Malocclusion
- •5. Etiology, Distribution, and Classification of Craniomaxillofacial Deformities: Traumatic Defects
- •6. Etiology, Distribution, and Classification of Craniomaxillofacial Deformities: Review of Nasal Deformities
- •7. Review of Benign Tumors of the Maxillofacial Region and Considerations for Bone Invasion
- •8. Oral Malignancies: Etiology, Distribution, and Basic Treatment Considerations
- •9. Craniomaxillofacial Bone Infections: Etiologies, Distributions, and Associated Defects
- •11. Craniomaxillofacial Bone Healing, Biomechanics, and Rigid Internal Fixation
- •12. Metal for Craniomaxillofacial Internal Fixation Implants and Its Physiological Implications
- •13. Bioresorbable Materials for Bone Fixation: Review of Biological Concepts and Mechanical Aspects
- •14. Advanced Bone Healing Concepts in Craniomaxillofacial Reconstructive and Corrective Bone Surgery
- •15. The ITI Dental Implant System
- •16. Localized Ridge Augmentation Using Guided Bone Regeneration in Deficient Implant Sites
- •17. The ITI Dental Implant System in Maxillofacial Applications
- •18. Maxillary Sinus Grafting and Osseointegration Surgery
- •19. Computerized Tomography and Its Use for Craniomaxillofacial Dental Implantology
- •20B. Atlas of Cases
- •21A. Prosthodontic Considerations in Dental Implant Restoration
- •21B. Overdenture Case Reports
- •22. AO/ASIF Mandibular Hardware
- •23. Aesthetic Considerations in Reconstructive and Corrective Craniomaxillofacial Bone Surgery
- •24. Considerations for Reconstruction of the Head and Neck Oncologic Patient
- •25. Autogenous Bone Grafts in Maxillofacial Reconstruction
- •26. Current Practice and Future Trends in Craniomaxillofacial Reconstructive and Corrective Microvascular Bone Surgery
- •27. Considerations in the Fixation of Bone Grafts for the Reconstruction of Mandibular Continuity Defects
- •28. Indications and Technical Considerations of Different Fibula Grafts
- •29. Soft Tissue Flaps for Coverage of Craniomaxillofacial Osseous Continuity Defects with or Without Bone Graft and Rigid Fixation
- •30. Mandibular Condyle Reconstruction with Free Costochondral Grafting
- •31. Microsurgical Reconstruction of Large Defects of the Maxilla, Midface, and Cranial Base
- •32. Condylar Prosthesis for the Replacement of the Mandibular Condyle
- •33. Problems Related to Mandibular Condylar Prosthesis
- •34. Reconstruction of Defects of the Mandibular Angle
- •35. Mandibular Body Reconstruction
- •36. Marginal Mandibulectomy
- •37. Reconstruction of Extensive Anterior Defects of the Mandible
- •38. Radiation Therapy and Considerations for Internal Fixation Devices
- •39. Management of Posttraumatic Osteomyelitis of the Mandible
- •40. Bilateral Maxillary Defects: THORP Plate Reconstruction with Removable Prosthesis
- •41. AO/ASIF Craniofacial Fixation System Hardware
- •43. Orbital Reconstruction
- •44. Nasal Reconstruction Using Bone Grafts and Rigid Internal Fixation
- •46. Orthognathic Examination
- •47. Considerations in Planning for Bimaxillary Surgery and the Implications of Rigid Internal Fixation
- •48. Reconstruction of Cleft Lip and Palate Osseous Defects and Deformities
- •49. Maxillary Osteotomies and Considerations for Rigid Internal Fixation
- •50. Mandibular Osteotomies and Considerations for Rigid Internal Fixation
- •51. Genioplasty Techniques and Considerations for Rigid Internal Fixation
- •52. Long-Term Stability of Maxillary and Mandibular Osteotomies with Rigid Internal Fixation
- •53. Le Fort II and Le Fort III Osteotomies for Midface Reconstruction and Considerations for Internal Fixation
- •54. Craniofacial Deformities: Introduction and Principles of Management
- •55. The Effects of Plate and Screw Fixation on the Growing Craniofacial Skeleton
- •56. Calvarial Bone Graft Harvesting Techniques: Considerations for Their Use with Rigid Fixation Techniques in the Craniomaxillofacial Region
- •57. Crouzon Syndrome: Basic Dysmorphology and Staging of Reconstruction
- •58. Hemifacial Microsomia
- •59. Orbital Hypertelorism: Surgical Management
- •60. Surgical Correction of the Apert Craniofacial Deformities
- •Index
53
Le Fort II and Le Fort III Osteotomies for Midface Reconstruction and Considerations for Internal Fixation
Keith Jones
The Le Fort II and the Le Fort III osteotomies were initially made on the basis of reproducing the facial bone fracture patterns caused by trauma. The techniques are well described in the literature.1,2
However, with improvements in surgical access, technological developments in anaesthesia and surgery, and advanced fixation techniques, it is now possible to move the midface in almost any desired direction and fix it in this position with long-term stability.3,4
With regard to surgery, with the exception of the optic nerves and the cone (apex) of the orbit, movement of all else is possible. Moreover, the midface either in segments or en bloc can then be stabilized with bone grafts and internal fixation using titanium bone plates and screws of various dimensions.
Anaesthetic developments have allowed surgeons to gain experience in undertaking major facial corrective surgery on younger patients while maintaining the safety of the procedure.
Concomitant with this, the use of internal fixation techniques has allowed less reliance on the use of intermaxillary fixation with improved postoperative airway management and hence the decreased requirement for tracheostomy.
The selection of the Le Fort II procedure must be made carefully. The existing functional and cosmetic deformity must be considered and alternative procedures6 such as the high Le Fort I procedure with nasal augmentation should be excluded as a treatment option.
Indications
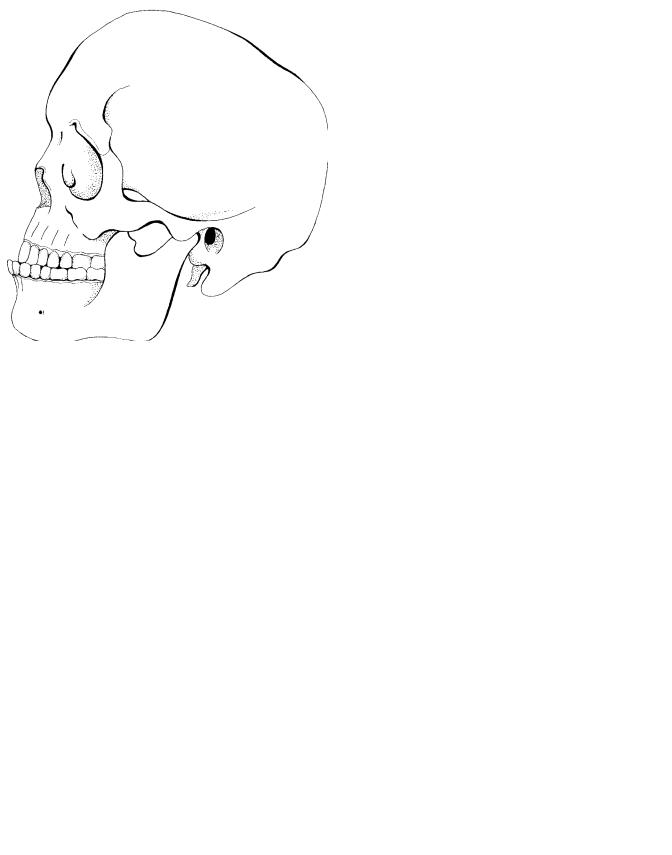
Correction of midface hypoplasia which is associated with nasomaxillary retrusion (Figure 53.1) includes:
1.Posttraumatic defects
2.Maxillonasal dysplasia in which a class I occlusion exists (Binders’ syndrome)
3.Secondary correction of cleft deformity
Three-dimensional movements of the midface are possible, and precise planning and surgery are essential to produce the desired end result. When planning surgery for maxillonasal dysplasia, cephalometric analysis can be misleading owing to the retrusion of the nasomaxillary sill.
Le Fort II Osteotomy
Anatomy
The Le Fort II procedure is the least commonly performed of the Le Fort advancements. It allows the central midface to be moved anteriorly (or inferiorly) with the maxillary dental arch. Its application5 is appropriate when the patient presents with a combination of:
1.A short nose
2.Nasomaxillary retrusion
3.A skeletal class III occlusion
If the midface hypoplasia affects the lateral part of the central midface, it is also possible to advance the infraorbital margins. By lateral extension of the osteotomy cuts the infraorbital margin can be included in the component to be advanced.
Soft Tissue Surgical Access
Surgical access is via the intraoral Le Fort I-type mucosal incision combined with one of two basic surgical approaches:
1.The coronal incision
2.Paranasal (inner canthus) skin incision
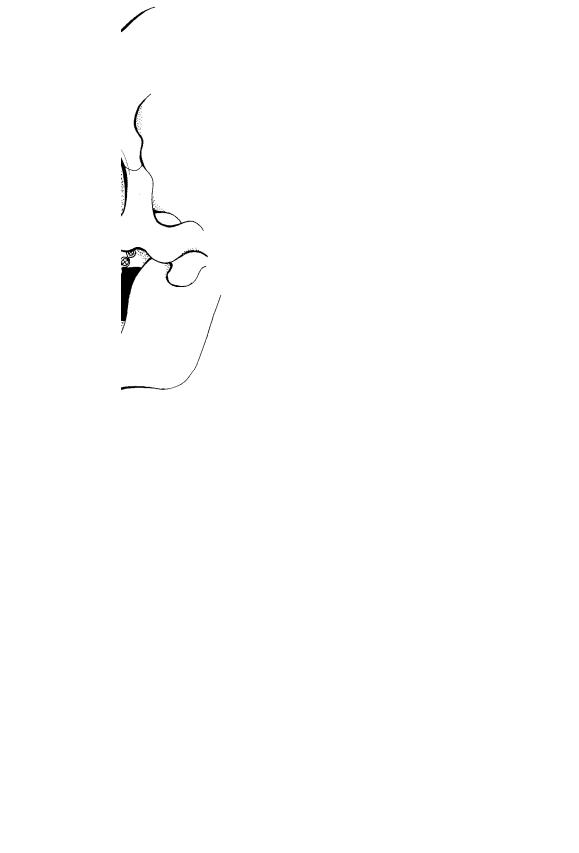
The latter may, in the younger patient, utilize separate bilateral paranasal incisions. In the older patient, it is possible to use a single incision via a natural dorsal skin crease to unite the inner canthal incisions (Figure 53.2). Following careful subperiosteal dissection (and tunneling) both options allow access to the entire nasofrontal area and the facial skeleton in the region of the infraorbital margin.
Surgical Technique
Following exposure of the nasofrontal region, elevation of the nasal periosteum is undertaken with a fine Obwegeser pe-
660
53. Le Fort II and Le Fort III Osteotomies |
661 |
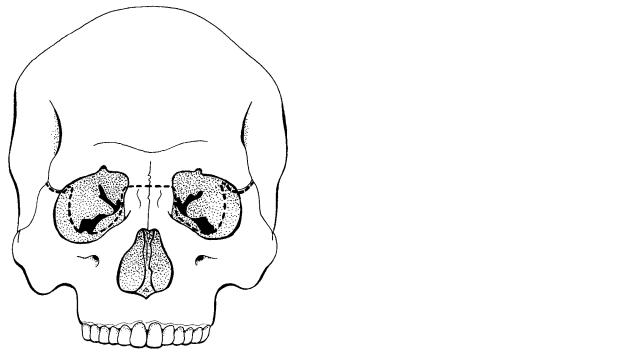
FIGURE 53.1 Skull with midface deformity. |
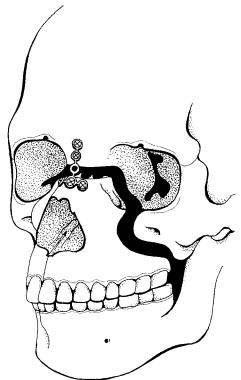
FIGURE 53.3 Skull showing Le Fort II osteotomy cuts. |
riosteal elevator. The horizontal glabella osteotomy is completed using a burr just below the level of the frontonasal suture (Figure 53.3). The osteotomy can then either be continued posteriorly into the ethmoid bone and inferiorly behind the lacrimal sac or made anteriorly.7 The anterior approach involves detachment of the anterior and superior arms of the medial canthal tendon, whereas the posterior approach invariably means detachment of the complete medial canthal area. The burr cut is then extended through the infraorbital margin between the nasolacrimal duct and the infraorbital
nerve (Figure 53.4). This is done in the presence of orbital retraction and allows completion of the cut through the infraorbital rim toward the anterior maxillary wall. A similar procedure is undertaken on the opposite side.
The infraorbital cut is then followed by the intraoral incisions and extended using a fine burr or saw around and inferior to the zygomatic buttress and posteroinferiorly toward the pterygoid plates. Where there is a very marked deficiency of the infraorbital region, it is possible to extend the os-
FIGURE 53.2 Paranasal and dorsal nasal access incisions. |
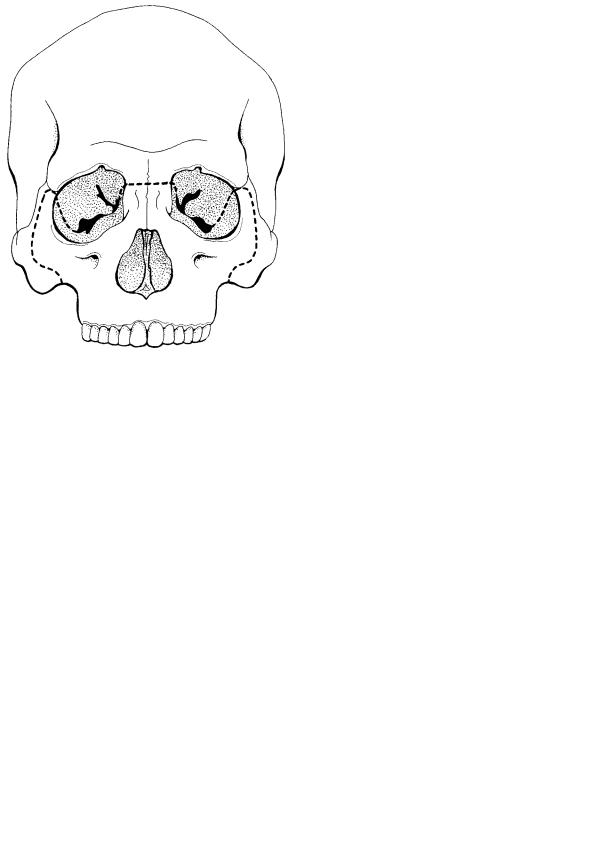
FIGURE 53.4 Frontal view of skull showing Le Fort II osteotomy cuts. |
662
teotomy laterally along the orbital floor using a fine burr cut. The limit of this extension is reached when the orbital floor begins to curve superiorly to form the lateral orbital wall. In a similar manner, the cut is taken anteriorly through the infraorbital rim and inferiorly along the anterior wall of the maxilla toward the zygomatic buttress. In the pterygomaxillary region, division can either take place using a small curved osteotome directed between the pterygomaxillary suture or by curving the maxillary osteotomy cut inferiorly through the maxillary tuberosity anterior to the pterygomaxillary junction. The nasal septum and vomer can be divided via the nasofrontal osteotomy using a curved Tessier chisel. It is important to direct this chisel downward and backward, and it is also important to remember that in patients with nasomaxillary hypoplasia, the distance between the nasofrontal region and the pharynx is relatively short. Mobilization of the maxilla can then be undertaken using maxillary mobilization forceps. The Smith spreader can be used to aid mobilization and the Tessier mobilizers to move the midface anteriorly.
Following mobilization of the midface, the maxillary teeth are placed into a preformed occlusal wafer, which reflects the planned final position of the midfacial movement. Intermaxillary fixation is then applied, and stabilization with bone grafts and internal fixation devices can commence.
If a significant increase (5 to 10 mm) in vertical height of the midface is planned, it is recommended that the medial nasal osteotomy be undertaken anterior to the medial canthal ligament and nasal lacrimal duct apparatus. Use of this modification when large movements are planned is less likely to lead to possible complications such as telecanthus.
Bone Graft Stabilization and Internal Fixation
There are two potential donor sites for bone grafting, and the choice is dependent on the access incisions used for the osteotomy procedure.
If the paranasal access incisions are used, the ilium is likely to be the donor site of choice. A large block of corticocancellous bone is harvested from the medial aspect of the ilium and segmentalized into smaller corticocancellous blocks for insertion into the spaces between the osteotomy cuts. Ideally, the graft should be contoured so that it can be wedged between the osteotomy cut in the desired position. In the nasofrontal region, two corticocancellous blocks are contoured to reconstruct the nasion. The fixation of the osteotomy at this site can be achieved either by the application of an H- or inverted T-shaped 1.5-mm titanium miniplate or by the contouring and adaptation of two short, straight 1.5-mm plates extending from the glabella onto the lateral aspect of the nasal complex bilaterally (Figure 53.5). Passive adaptation of the bone plates is essential, and use of the lower profile 1.5-mm plate is desirable at this location as the skin and subcutaneous tissue at this site is relatively thin, and as such, the larger dimension plates can be readily palpated. The bone thickness
K. Jones
FIGURE 53.5 Fixation at frontonasal osteotomy.
in the glabella and nasal complex is also relatively limited, and this consequently limits screw length to a maximum of 6 mm.
With regard to the pterygoid and maxillary buttress region, blocks of corticocancellous bone are contoured and wedged into both these sites. Fixation can be affected from the zygomatic buttress to the posterior maxilla using a long L-shaped 2-0 titanium plate and 6-mm screws (Figure 53.6). The anterior and lateral maxillary wall osteotomy defects can likewise be spanned using strips of corticocancellous bone. It is also possible using the Compact microsystem (Stratec-Walden- burg, Waldenburg, Switzerland) to span and stabilize the osteotomy defect between the frontal process of the maxilla and the infraorbital rim bilaterally. Care must be taken when inserting these plates to avoid morbidity to the lacrimal sac and the infraorbital nerve (Figure 53.7).
When the coronal incision is the access incision of choice, cranial bone offers itself as an alternative donor site.8 Splitthickness calvarium can be harvested and contoured for grafting at the nasofrontal-zygomatic buttress and in the anterior and lateral walls of the maxilla. It can also be inserted into the pterygoid region, but in this location, several contoured fragments of outer table are likely to be required to interpose between the bony defects. Split-thickness calvarium can be stabilized in the zygomatic buttress, lateral and anterior maxillary walls, and in the nasofrontal region utilizing lag screws.9
53. Le Fort II and Le Fort III Osteotomies |
663 |
FIGURE 53.6 Fixation at posterior maxilla.
a
b
FIGURE 53.7 (a) Overall fixation with block grafts in situ, lateral view. (b) Overall fixation with block grafts in situ rotated frontal view.
664
Le Fort III Osteotomy
Anatomy
This procedure is used for the correction of total midface hypoplasia affecting the maxilla and zygomatic complexes with associated exorbitism. Tessier2,10 pioneered the clinical application of the technique, and others11 have subsequently modified the procedure.
The original operation produces bony separation of the complete facial skeleton from the skull base, whereas modifications include isolated advancement of the nasozygomatic and zygomaticomaxillary components of the midface.
The procedure can be approached either via a subcranial (extracranial approach) or a transcranial procedure. The latter is more suitable when a major correction of the upper facial skeleton or hypertelorism is required. There has been an increasing tendency for major midfacial correction procedures to be performed on younger patients,12 and long-term follow-up information is available on such patients. The results are favorable with regard to the overall safety of the procedure and the degree of long-term stability of the facial advancement.
The classical deformity corrected by the Le Fort III procedure includes:
1.Retrusion of the nose, maxilla, and ZMCs
2.A shortened nose
3.A skeletal class III occlusion
Not only does the procedure improve the patient’s cosmetic appearance, it also produces more support of the globes by reduction of the exorbitism and a functional improvement by correcting the skeletal class III occlusion. Where there are differential degrees of deformity between the nasozygomatic component and maxilla an additional low-level osteotomy may be undertaken to provide the best aesthetic result. Thus when indicated (unlike the Le Fort II procedure), a Le Fort I procedure can be combined with the Le Fort III surgical approach.
Indications
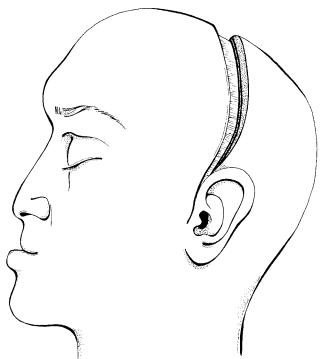
The Le Fort III osteotomy is used for correction of true retrusion of the complete facial skeleton, that is, the nasal complex, the zygomatic maxillary complexes, and the maxilla (Figure 53.8).
Selection of the Le Fort III procedure is appropriate for the correction of the following:
1.Posttraumatic deformity
2.Midface hypoplasia
3.Craniosynostoses, that is, the Crouzon, Apert, and Pfeiffer syndromes
The planning of surgery should be based on facial aesthetics and should not rely solely on cephalometric analysis,13 which
K. Jones
FIGURE 53.8 Midface hypoplasia and coronal access incision.
can be misleading. Cephalometrics should, ideally, be used only as a guide to planning the advancement procedure. For diagnosis, a full neuroradiological and ophthalmological assessment must be made and where indicated, neurosurgical evaluation should also be undertaken. Commonly, prolonged presurgical orthodontic correction is required to optimize the postoperative occlusion. The final position is influenced not only by the occlusion but also by facial aesthetics and other factors such as soft tissue coverage of the mobilized segments. Anterior advancement of the midface to more than 15 mm is possible; however, excessive inferior positioning of the midface to correct an anterior open bite can have an adverse result with excess lengthening of the nose.
Soft Tissue Surgical Access
The classical Le Fort III type procedure was originally described via a series of small incisions in the facial soft tissues:
1.The medial canthal region
2.The lateral orbital region
3.The lower eyelid incision
4.Intraoral vestibular incision
The most common current approach, however, involves
1.The coronal incision (Figure 53.8)
2.Intraoral sulcular incisions bilaterally
53. Le Fort II and Le Fort III Osteotomies
In addition, where problems are encountered with access to the orbital floor, a transconjunctival or lower eyelid approach can also be useful.
Surgical Technique
The scope of the description here is limited to the subcranial Le Fort III approach. Nasoendotracheal intubation and hypotensive anaesthesia are used for surgery. The coronal incision is the access incision of choice and the line of the incision is located well within the hairline toward the vertex of the skull. The initial dissection is undertaken in a supraperiosteal manner with a coronal incision being made through the pericranium 2 to 3 cm above the supraorbital ridge. Reflection of the coronal flap by careful subperiosteal dissection allows visualization and sequential exposure of the nasal bones, the medial canthal tendons, superior aspect of the lacrimal fossa, the lateral orbital rims, and the inferior orbital margins. A tunneling technique is used to ensure the latter. Circumferential dissection around the orbit allows mobilization of the periorbita so that the osteotomy cuts can be located approximately 10 mm inside the orbital margin. The zygomatic arch and temporal fossa are exposed by division of the temporal fascia and reflection of the temporalis muscle. Care must be taken to minimize stripping to avoid unsightly temporal hollowing. In the nasoethmoid region, the medial canthal tendons and lacrimal sac area are carefully identified. The medial canthal tendon is normally detached with the periorbital dissection and marked for subsequent reattachment.
a
665
Some authors12 advocate nondetachment of the medial canthal tendon if the presurgical position is judged to be clinically satisfactory and if the movement of the midface is only in the anterior direction.13 If this is the case, the osteotomy cuts are taken posteriorly behind the medial canthal tendon and lacrimal sac. The lateral canthus is normally detached during periorbital stripping. It is important that this is reattached at the end of the procedure, otherwise canthal drift can occur. To facilitate this, the location of the lateral canthal attachment can be marked when periorbital stripping is being undertaken.
The starting point for the bony osteotomy may be variable. In the midline, a fine horizontal burr cut is made just inferior to the frontonasal suture, which is extended posteriorly into the orbit behind the nasolacrimal duct. Care must be taken as the orbit is likely to be very shallow. The cut is extended inferiorly and then laterally toward the region of the infraorbital nerve. Access in this site can be difficult, and a fine osteotome may be preferable to the use of a burr. The orbital floor osteotomy is directed laterally toward the inferior orbital fissure.2
There are several patterns of osteotomy through the zygomatic complex, namely, total advancement of the zygomatic complex (Figure 53.9), sagittal splitting of the zygomatic complex (Figure 53.10), or total advancement with frontozygomatic extension (Figure 53.11). The zygomatic osteotomy can be undertaken using a fine saw. The osteotomy cut is taken through the lateral margin of the orbit and then passes inferiorly through the middle of the bony lateral orbital wall. It is important to maintain a bony rim posteriorly on the lateral orbital wall for grafting and fixation purposes. The cut is then extended back
b
FIGURE 53.9 (a) Frontal skull with Le Fort III osteotomy cuts for total advancement of zygomatic complex. (b) Lateral view of Le Fort III osteotomy cuts for total advancement of zygomatic complex.
666 |
K. Jones |
FIGURE 53.10 Frontal skull with Le Fort III osteotomy cuts with sagittal splitting of the zygomatic complex.
into the pterygopalatine fissure. Inside the orbit, the cut is extended inferiorly toward the inferior orbital fissure, and the medial and lateral cuts can be joined using a fine osteotome.
A fine saw is also used to divide the zygomatic arch.
FIGURE 53.11 Frontal skull with Le Fort III osteotomy cuts to include zygomaticofrontal advancement.
FIGURE 53.12 Lateral view to demonstrate use of osteotome to divide pterygoid region via coronal incision.
The pterygomaxillary dysjunction can be achieved either from above by insertion of a curved osteotome through the coronal incision into the temporal fossa (Figure 53.12),14 or it can be achieved from below via a posterior buccal sulcus incision. The latter allows the insertion of a curved osteotome, although it is important during this procedure to avoid comminution of the pterygoid region if possible and to avoid troublesome bleeding caused by damage to the maxillary vessels. Division of the nasal septum is undertaken at the end of the procedure immediately before mobilization of the midface to avoid excessive bleeding.15 The nasal septum and vomer can be divided with a fine osteotome. A finger is placed intraorally in the region of the posterior nasal spine, and the osteotome is directed inferiorly toward this site. The facial skeleton is now ready for mobilization, and this can be achieved by the use of maxillary disimpaction forceps and the use of leverage at the frontonasal and zygomaticofrontal regions (Figure 53.13). It is sometimes necessary to expand the osteotomy sites by use of osteotomes and this is clearly facilitated in the pterygomaxillary region if bony comminution has been avoided. Further anterior mobilization of the midface can be effected using the Tessier mobilizers. Progressive careful mobilization of the facial skeleton must take place and significant force is required to stretch the soft tissues to allow full mobilization to occur. At the end of the mobilization process, the maxilla should fit freely into the interocclusal wafer before intermaxillary fixation is established.
Bone Graft Stabilization and Internal Fixation
The inferior part of the mobilized facial skeleton can now be inserted into the interocclusal wafer and maxillomandibular
53. Le Fort II and Le Fort III Osteotomies
FIGURE 53.13 Lateral view demonstrating insertion of disimpaction forceps to mobilize Le Fort III osteotomy.
fixation can be established. Some authors recommend an overcorrection, which is planned into the final occlusal splint. Stabilization of the osteotomy sites can now be achieved by the insertion of bone grafts and internal fixation with plates and screws. Bone grafts either from the parietal skull in split thickness or ilium are fashioned and inserted into the nasofrontal, lateral orbital rim, and pterygomaxillary region. The zygomatic arch defect can also be grafted. Rigid fixation is applied in the nasofrontal region, the lateral orbital rims, and zygomatic arches. All screw holes in cortical bone more than 4 mm thick should be pretapped before screw insertion. A combination of low-profile plate configurations are used in the nasofrontal region, either an H- or inverted T-shaped plate can be used to span the defect and stabilize the bone graft (Figure 53.14). Dependent on the osteotomy pattern, either a curved C-shaped plate or a stepped, adapted straight plate can be used in the lateral orbital wall to establish stability. Selection of the plate size (1.5-mm or 2.0-mm Synthes Compact, Stratec-Waldenburg, Waldenburg, Switzerland) will be dependent, to some extent, on the thickness of the overlying soft tissue. A straight bone plate and calvarial bone graft is used to stabilize the zygomatic arch and similarly, split calvarium is also used to graft the orbital floor. Where appropriate, lag screws can be used to stabilize the calvarial graft, particularly if it has been utilized to augment an asymmetrical region within the midface. In the pterygomaxillary region, ideally a block graft is wedged in situ to buttress the advanced facial skeleton.
The lateral canthal tendons are reattached with a heavy,
667
FIGURE 53.14 Rotated frontal view of advanced and stabilized Le Fort III osteotomy with zygomaticofrontal advancement showing block bone graft insertion and plate fixation.
nonresorbable suture to the premarked location. Similarly, the medial canthal tendon can be reattached using a transnasal canthopexy ensuring that the site at which this reattachement occurs is more posterior and slightly superior than its former location. A curved microplate can also be used to anchor the relocated medial canthal tendon.
Complications
Infection
Infection is the most common complication associated with major craniofacial surgery, and several contributing factors have been identified. These include prolonged operative time, excessive blood loss, residual dead space, and open communication between the osteotomy sites and the nasal cavity and paranasal sinuses. A number of studies16–19 have reported similar infection rates of around 3%.
It is therefore normal practice to administer antibiotics intravenously for 72 hours postoperatively. Where appropriate, for example, the coronal flap, suction drainage is routinely used.
Hemorrhage
Hypotensive anaesthesia is used for these prolonged surgical procedures to reduce hemorrhage to a minimum. Specific care is taken at individual sites to minimize the risk of serious he-
668
morrhage. These include the pterygomaxillary region and the division of the nasal septum and nasal mucosa, which is normally undertaken immediately before the final mobilization of the facial skeleton. Meticulous hemostasis is applied during the elevation of the coronal flap with control of bleeding from the flap margins by the immediate application of disposable Rayne clips. During these procedures extensive areas of vascular bony soft tissue are frequently exposed, and it is important to minimize progressive oozing from these sites by meticulous hemostasis at each stage.
Lacrimal Apparatus
Damage to the lacrimal apparatus is possible, although it is a less common complication. Some authors11 have reported increased postoperative lacrimal problems when stripping and relocation of the medial canthal tendons has been undertaken.
Nerve Damage
Inadequate care during the dissection procedure can inadvertently lead to damage of both the supraorbital and infraorbital nerves. If subperiosteal tunneling via the coronal flap provides inadequate access to the infraorbital region, the lower eyelid or transconjunctival incision may be used to gain improved access and minimize the risk of damage to the orbital nerves during the orbital floor osteotomy. During elevation of the coronal flap, it is important to remain within the correct tissue plane and avoid the possible risk of damage to the frontal branch of the facial nerve.
Bone Graft Donor Site Morbidity
As a general principle the larger the donor defect when bone is harvested from the ilium, the greater the risk of morbidity experienced by the patient. By careful subperiosteal dissection and mobilization, it is possible to harvest a large block corticocancellous graft via a relatively small access incision. Similarly, morbidity can be minimized by harvesting the graft from the inner table of the ilium, and thereby minimizing the degree of muscle stripping required to gain access to the donor site.
With regard to split calvarial grafts, it is normal practice to control hemostasis by applying a hemostatic paste. Some surgeons also favor the application of several layers of methylcellulose gauze to the donor site, and it is always important to carefully bevel the cortical bony margins around the donor defect. It is not uncommon for adult patients to complain of local discomfort at calvarial donor defects for some significant time after surgery.20
Malocclusion
In the younger patient it appears that anterior growth of the midface does not return to normal and as such there is a sig-
K. Jones
nificant incidence of malocclusion with a skeletal class III malocclusion occurring.12,21
References
1.Jackson IT, Munro IR, Salyer KE, et al. Atlas of Craniomaxillofacial Surgery. St. Louis: Mosby; 1982.
2.Tessier P. Total osteotomy of the middle third of the face for faciostenosis or for sequelae of Le Fort III fractures. Plast Reconstr Surg. 1971;48:533.
3.Beals SP, Munro IR. The use of miniplates in craniomaxillofacial surgery. Plast Reconstr Surg. 1987;79(1):33–38.
4.Kaban LB, West B, Conover M, et al. Midface position after LeFort III advancement. Plast Reconstr Surg. 1984;73(5):758– 767.
5.Henderson D, Jackson IT. Nasomaxillary hypoplasia—the Le Fort II osteotomy. Br J Oral Surg. 1973;11:77.
6.Van Sickels JE, Tiner BD. A combined Le Fort I and bilateral zygomatic osteotomy for management of midface and maxillary deficiency. J Oral Maxillofac Surg. 1994;52:327–331.
7.Epker BN, Wolford LM. Middle third advancement: treatment considerations in atypical cases. J Oral Surg. 1979;37:3.
8.Tessier P. Autogenous bone grafts taken from the calvarium for facial and cranial applications. Clin Plast Surg. 1982;9:531.
9.Gruss JS. Craniofacial osteotomies and rigid fixation in the correction of post traumatic craniofacial deformities. Scand J Plast Reconstr Surg Hand Surg. 1995;27:83–95.
10.Tessier P. The definitive plastic surgical treatment of the severe facial deformities of craniofacial dysostosis. Crouzon’s and Apert’s diseases. Plast Reconstr Surg. 1971;48:419.
11.Epker BN, Wolford LM. Dentofacial Deformities. St. Louis: Mosby; 1980.
12.McCarthy JG, LaTrenta GS, Breitbart AS, et al. The Le Fort III advancement osteotomy in the child under seven years of age.
Plast Reconstr Surg. 1990;86:633.
13.Grayson BH. Cephalometric analysis for the surgeon. Clin Plast Surg. 1989;16:633.
14.Murray JE, Swanson LT. Midface osteotomy and advancement of craniosynostosis. Plast Reconstr Surg. 1968;41:299.
15.Ortiz-Monasterio F, Fuente del Campo A, Carrilo A. Advancement of the orbits and midface in one piece combined with frontal repositioning, for the correction of Crouzon’s deformities. Plast Reconstr Surg. 1978;61:507.
16.Whitaker LA, Munro IR, Salyer KE. Combined report of problems and complications in 793 craniofacial operations. Plast Reconstr Surg. 1979;64:198.
17.Munro IR, Sabiatier RD. An analysis of 12 years of craniomaxillofacial surgery in Toronto. Plast Reconstr Surg. 1985; 75:29.
18.David DJ, Cooter RD. Craniofacial infection in 10 years of transcranial surgery. Plast Reconstr Surg. 1987;80:213.
19.Poole MD. Complications in craniofacial surgery. Br J Plast Surg. 1988;41:608.
20.Frodel JL, Marentette LJ, Qualeta VC, et al. Calvarial bone graft harvest. Techniques, consideration and morbidity. Arch Otolaryngol Head Neck Surg. 1993;119(1):17–23.
21.Bachmayer KI, Ross RB, Munro IR. Maxillary growth following Le Fort III advancement surgery in Crouzon, Apert and Pfeiffer syndromes. Am J Orthod Dentofacial Orthop. 1986;90:420–430.
Section VI
Craniofacial Surgery
This page intentionally left blank