

GrafNav |
Chapter 2 |
|
|
|
|
2.3.10 Load
Existing Trajectory
Opening a project that has already been processed does not automatically load the processed solution. The FWD, REV and CMB files contain all the information computed for each GPS epoch by the software. Writing these files to disk allows you to load the solution from another project. For example, you can load a CMB file produced by the baseline combination in GrafNav Batch this way. To load a solution from another project, follow the steps in the shaded box.
Single Point Solution (from .gpb file)
This option loads a single point solution from a GPB file. The shaded box contains directions on how to use this option.
Loading Camera Event Marks
Use this feature to load external time-tagged events from an ASCII file. When you load these events, they must be referenced to GPS time and not UTC (coordinated universal) time. The source of the events can come from an aerial camera, sounding equipment or other real-time devices. The GPS receiver must support a mark or pulse input for this feature to work. See Section 2.6.7, on Page 100 for a discussion on how the event positions are interpolated in GrafNav.
Most events are automatically stored in the STA file during the conversion to GPB format and appear when the remote is added to the project. For user events and a few receivers such as Ashtech or B-file, this feature must be used.
How to load existing trajectories
1.Under File | Load, select Existing Solution File.
2.Select the appropriate solution file from the list of forward trajectory files (FWD), reverse trajectory files (REV), combined trajectory files (CMB), forward single point trajectory files (FSP), and so on.
How to load single point solution (from *.gpb file)
1.Choose File | Load | Single Point Solution (From .gpb file).
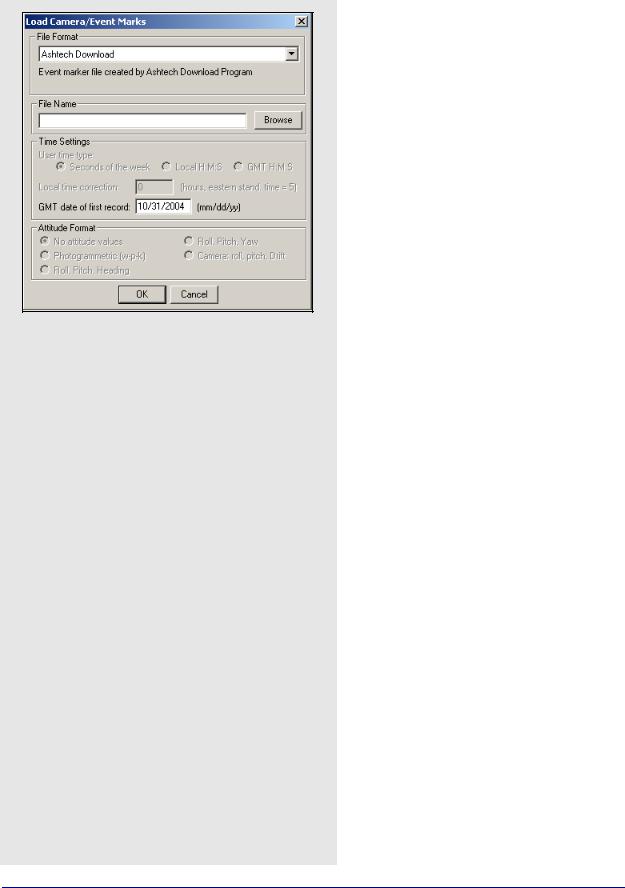
How to load camera event marks
1.Under File select Load | Camera Event Marks.
2.Choose the preferred file format from the selection in File Format.
3.Under File Name, use the Browse button to select the file of interest. The file name depends on the receiver format and is explained on Page 36.
4.If the files formats you use are User1User6, use Time Settings to select time formats. UTC time cannot be loaded and the correction has to be applied externally.
GrafNav / GrafNet 8.10 User Guide Rev 4 |
41 |
Chapter 2 |
GrafNav |
|
|
File Format
STA File
Many new converters save the camera event marks directly to the station file. If you are logging NovAtel data with LOGGPS, then your event marks are saved in a station file. The marks load when you add the GPB file to the project. If they do not load, then use the
File | Load | Station File feature.
MRK File
Leica SR receivers save event marks into a EVT file, which is converted into a MRK file by the Leica decoder. The MRK file can be loaded using this option. Numbering is performed by the converters.
Ashtech Download
Ashtech receivers with internal memory usually outputs a PHOTO.DAT file after the receiver data has been downloaded using HOSE or another corresponding utility. Newer variants might be under the format M????.###. Either file can be loaded using this option. The GMT date of the first event mark must be entered if it is not detected. Events are automatically numbered starting at 1.
Leica GeoSystems
EV0 and TDU files are produced by the Leica software and can be imported using this option. This file might contain time in the local time zone. If not, enter the time zone offset as zero. The time zone correction and the GMT date of the first mark must be entered. Events are automatically numbered starting at 1.
LH-Systems Ascot
LH Systems ASCOT (RC-30) has a format very similar to EV0 except that it contains the relative angles of the camera mount, which can be used to apply a 3-D offset for the antenna/camera difference.
User#
These formats allow you to import the time and name of each event mark. Optional variables include line number (description) and altitude information.
42 |
GrafNav / GrafNet 8.10 User Guide Rev 4 |
GrafNav |
Chapter 2 |
|
|
|
|
File Name
The file name depends on the receiver format.
Examples include the following:
•NovAtel is MRK
•Ashtech is PHOTO.DAT
•Trimble is SUM
•Leica is EVO
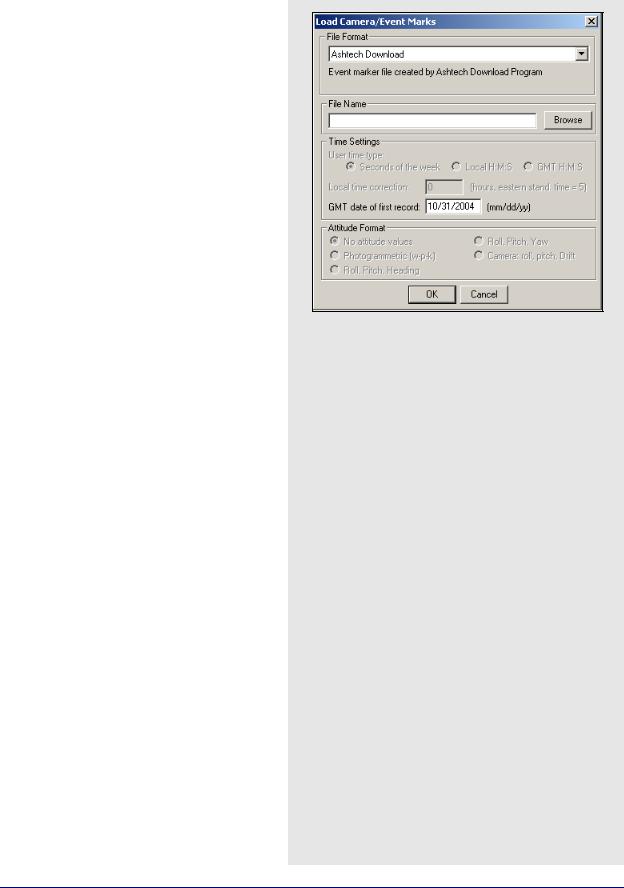
Time settings
User time type:
Seconds of the week – GPS time ranging from 0 to 604800.
Local H:M:S – Local hours, minutes and seconds (HH:MM:SS.SSSS).
GMT H:M:S – GMT hours, minutes and seconds (HH:MM:SS.SSSS).
Local time correction:
This is necessary for both Leica and User# formats using Local H:M:S. This is the offset, in hours, from GMT. For the Eastern Standard Time zone, this number is 5. For the Pacific Standard Time zone, this number is 8. During daylight savings time, these numbers are reduced by one. An incorrect entry causes the camera marks to be displayed incorrectly or not be displayed at all.
GMT date of first record:
This is necessary for Leica, Ashtech and User# formats implementing H:M:S timetagging. Enter the date of the first exposure record in month/day/year format. It is not the date in local time, which may differ towards the end of the day. An invalid date results in the marks not being displayed.
GrafNav / GrafNet 8.10 User Guide Rev 4 |
43 |
Chapter 2 |
GrafNav |
|
|
How to load a station file
1.Under File | Load, select Station File (.sta/ nst).
2.The program displays a list of station files (STA). Select the appropriate STA file.
How to load RTK Dat File (.sta/nst)
1.Choose File | Load | Single Point Solution (From .gpb file).
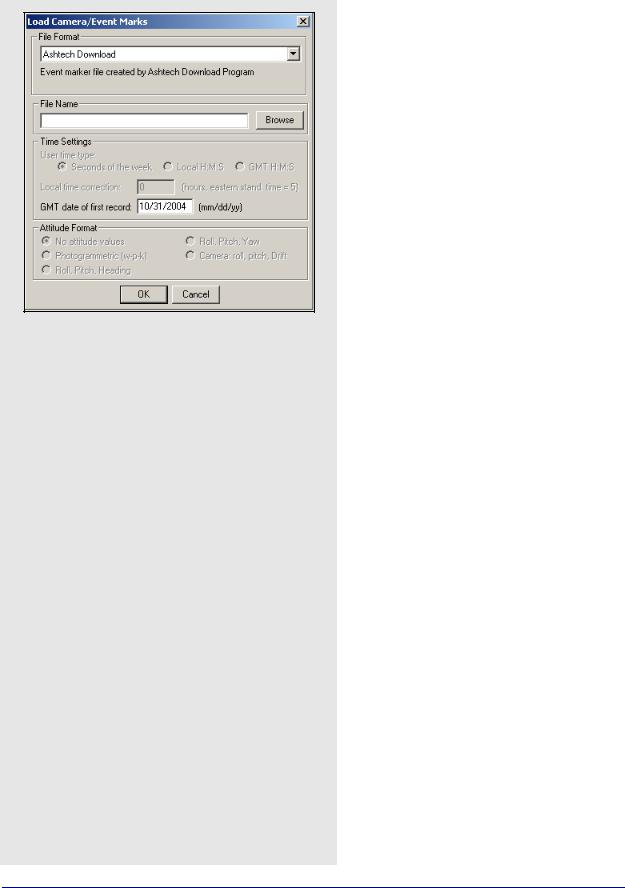
Attitude Format
For User5 and User6 formats that include attitude information, a definition of how the angles are defined is required. Currently, the following attitude formats are supported:
Photogrammetric (w-p-k):
These angles are defined as omega primary, phi secondary and kappa tertiary (ground- to-air).
Camera (roll, pitch, drift):
These angles are the relative ones between the frame of the camera and that of the aircraft.
If the raw GPS receiver data logs position records, there are small circular event marks on the trajectory map in bright blue. These also appear if the data has been processed. If no event marks are present after processing, then it is likely that the time tags are wrong or no event marks have been loaded. To determine what has been loaded, use the
Feature Editor by going to View | Features.
Station File (.sta/nst)
The program automatically loads the STA station file as long as the filename is the same as that of the remote GPB file. If the station file has a different filename than the GPB file, then load the file separately. Waypoint’s data logging software and most of the decoders produce station files. To load a station file, follow the steps in the shaded box.
RTK Dat File (.sta/nst)
This option loads converted RTK solution files and then uses the Export Wizard to re-format them for output. To load a RTK Dat file, follow the steps in the shaded box.
44 |
GrafNav / GrafNet 8.10 User Guide Rev 4 |

GrafNav |
Chapter 2 |
|
|
|
|
Stations with Known Lat/Long
This option allows you to load and display a file that contains stations with known coordinates. The coordinates are displayed with pink triangles and pink lines. The stations computed by the program have yellow triangles. To join the stations and generate a pink line, include a + sign before each station ID in the input file.
The Lat/Long Format option contains a list of formats that the coordinates from the file are in. These formats include the following:
Degrees Minutes Seconds
For example: 51° 03’ 28.3214”
Degrees Decimal Minutes
For Example: 51° 03.4720’
Decimal Degrees
For Example: 51.0579°
Id String Handling
The settings under this option tell the program how to separate the ID from the coordinates.
Use first continuous word (no spaces)
To be used if the station names are separated from their coordinates by a space.
Comma separation
Use this if commas separate the IDs from the coordinates.
Use first ‘n’ columns
If you know which column the coordinates start in, you can enter the number for the program to begin at. Each character is a column.
How to load Stations with known Latitude and longitude
1.Select File | Load | Stations with Known Lat/ Long.
2.Choose the file, under File Name, that contains the station information in one of the formats from the Lat/Long Format option list.
3.Choose the format, under the Lat/Long Format, that the coordinates from the file are in.
4.Choose an option under Id String Handling to tell the program how to separate the ID from the coordinates. The first column usually contains the station IDs.
GrafNav / GrafNet 8.10 User Guide Rev 4 |
45 |

Chapter 2 |
GrafNav |
|
|
How to create a Leica IDEX file (idx.)
1.Unplug the Waypoint hardware lock.
2.Run Ski 2.2 or higher.
3.Select Project, then Manager.
4.Click New to select an empty path, or Open to select an existing project.
5.Click on Close File to close the window.
6.Select Import | Measurement | Back Up/ PCMCIA.
7.Move to the rover directory containing DS and db files.
8.Select the jobs to include in IDEX file.
9.Press the Insert button, and then press OK.
10.Click Close to close the Import window.
11.Select View/Edit | Utilities | Export to IDEX.
12.Create a file name.
13.Clear variance/covariance information
(optional).
14.Select Measured.
15.Click Save and Close.
How to load a Leica IDEX file (idx.)
1.Create or open a GrafNav project containing the Leica data.
2.Select Load, and Leica IDEX file from the File menu,
3.Move to the directory containing the IDEX file. You should see a message indicating how many IDEX points were matched to TTP points.
How to load a Aschtech OUT file (.out)
1.Create or open a GrafNav project containing an Achtech OUT file (.out).
2.Select Load, and Aschtech OUT file from the
File menu.
3.Move to the directory containing the.out file.
4.Select the file
5.Click Open.
Leica IDEX File (.idx)
Time-tagged points created with Leica 5 data collectors can be given a name, position, and antenna height. However, firmware versions 3.0 and greater do not store the station names within the TTP file. These names are stored within the database structure (control.db) and cannot be accessed directly by the software. The point information contained within the database has to be converted to ASCII, which is done by creating an IDEX file using Leica's Ski software.
Once an IDEX file has been created, it can be loaded into GrafNav. The steps to so this are in the shaded box. After processing, at least one direction, the TTP points should be visible and numbered sequentially. These have been loaded from the STA file.
Points are matched via their times. Often, there are fewer matched points than the original number of TTP points due to several reasons, including the deletion of points in the field, and/or the addition of static session marks.
Aschtech OUT File (.out)
This type of file is created by Ashtech’s Seismark surveying system and can be loaded into a project. The steps to do this are in the shaded box.
46 |
GrafNav / GrafNet 8.10 User Guide Rev 4 |
GrafNav |
Chapter 2 |
|
|
|
|
Digital Elevation Mode (DEM)
You may import a DEM after processing the area of interest. Adjust the processing range to only include the mapping area. This limits the scope of the DEM to the observation area, save hard drive memory and improve speed.
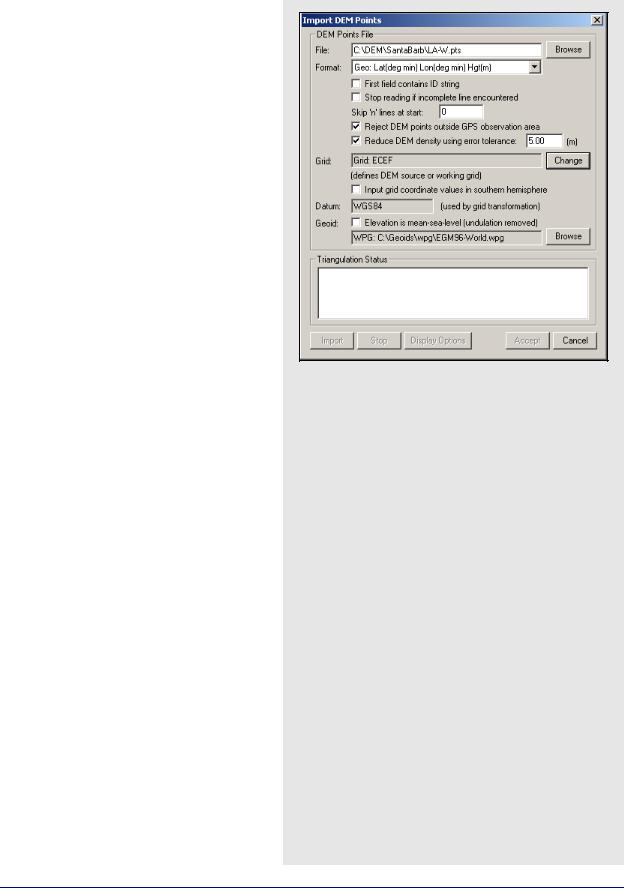
DEM Points File
The DEM file has to be organized in one of the formats listed under the Format drop-down menu. The following options are also available to help read the input file:
First field contains ID string
Shows if a point name leads each line.
Stop reading if incomplete line encountered
Aborts if there is any line missing from the required fields.
Skip ‘n’ lines at start
Skips past any header lines in the file.
Reject DEM points outside GPS observation area
This is recommended because it limits the size of the DEM to just the GPS observation area. To use this option, valid GPS position data has to be available from the GPS receiver or through processing.
Reduce DEM density using error tolerance
Rejects points if their height can be estimated from nearby ones within the error tolerance that are defined. Tolerances of 5-10 m are acceptable for VSF purposes. Larger error tolerances reduces densities significantly. This option should be used if you have either a DEM grid or a large high-density DEM that causes memory or speed problems.
How to import a Digital Elevation Model (DEM)
1.Select File | Load | Digital Elevation Model | Import DEM Points.
2.Select the DEM points (.pts) file under File Name.
3.Select one of the formats under the Format Menu to organize the DEM file.
4.Select the options that you would like to use to help read the input file.
5.Press Import. It takes the program some time to form a TIN model.
6.Press Accept once the geoid is formed and a TRI file is saved. In addition, the DEM is displayed in GrafNav. If no contour lines are visible, then the DEM is outside of the area.
GrafNav / GrafNet 8.10 User Guide Rev 4 |
47 |

Chapter 2 |
GrafNav |
|
|
How to load a DEM
1.After a DEM has been imported, select File |
Load | Digital Elevation Model | Load Triangulation (.tri).
2.Select the formed TIN file and press Open.
Import DEM Points
Grid
This option defines the DEM source or working grid. If the horizontal coordinates of the DEM are in a map projection, such as UTM (Universal Transverse Mercator) or State Plane, then GrafNav requires the details associated with this projection. If the DEM is stored in geographic coordinates, then a working map projection (grid system) is required. UTM is the easiest, but any system will do.
Datum
This option specifies the processing datum for the project, which should match the datum that the DEM values are stored in. Since only the ellipsoid component of the datum is used, NAD83 and WGS84 can be used in place of each other for most applications that do not require the utmost DEM accuracy.
Geoid
Generally, a geoid model should be selected since DEMs are generally stored in MSL (Mean Sea Level). This requires a WPG file, NRCAN or NGS geoid.
After a DEM has been imported, the TIN model does not need to be re-formed. Load the TRI file by selecting File | Load |
Digital Elevation Model | Load Triangulation (*.tri).
2.3.11Convert
The two conversion utilities that are available are the following:
Raw GPS to GPB
If you have logged your data without using Waypoint’s logging software, then convert your files to GPB format in order to process them with the software. See Chapter 8 on Page 221 for more information regarding this utility.
GPB to RINEX
See Chapter 8 on Page 221.
48 |
GrafNav / GrafNet 8.10 User Guide Rev 4 |