


Chapter 6 |
AutoNav |
|
|
6.1Overview of AutoNav
AutoNav is an automated differential GPS processing program that is capable of handling static or kinematic data. AutoNav is intended for processing multiple remote files that use the same processing options and / or base configurations.
The benefit of using AutoNav is that it allows for large amounts of data to be converted, have its base files downloaded, resampled, processed, and exported in a single operation. Once processing begins, no user interaction is required. For example, if processing is started at the end of the day, the results should be available by morning. While some initial work setting up the project is required, time will be saved in the long run. AutoNav can be used with projects that span multiple days, such as deformation monitoring.
The first step when creating an AutoNav project is to define the base stations and their coordinates. Bases can be either files, meaning the raw data is readily available from your computer, or Internet stations, which the program will download automatically. All of the stations that are available in the Download Service Data program are supported in AutoNav.
An unlimited number of base stations and remote files can be added, but a maximum of 8 base stations can be used with each remote.
Once the remote files and base stations are input, the processing options and output format need to be set. The processing options will be applied to all of the remote baselines that are to be processed. If two remote files require different processing or output options, then they must be in separate AutoNav projects. An output file containing trajectory information is created for each of the remote files.
This chapter describes how to get started with AutoNav, goes through each menu of its interface and provides step-by-step instructions for firsttime users.
GrafNav / GrafNet 8.10 User Guide Rev 4 |
197 |

Chapter 6 |
AutoNav |
|
|
6.2Getting Started with AutoNav
How to create a new project
1.Select AutoNav in the Waypoint program group.
2.Click the New button in the Project File box under the File Input tab.
3.Provide a name and destination folder for the project file (ANP).
4.Click Save.
How to set up a base station file
1.Click the New button in the Base Station File box.
2.Provide an appropriate name and destination folder for the base station file (ANB).
3.Click Save.
4.Click the Edit button in the Base Station File box under the File Input tab to add base station data to the ANB file. To add data files that are already on disk, click the Add File Base button. To add base stations that are available online, click the Add Internet Base button and then click Find Internet Station. In either case, base station coordinates must be provided.
Before you start a project in AutoNav, verify installation and convert data. This section provides a quick tutorial on how to get started with GrafMov.
Install Software
Verify that the installation was successful by ensuring that you have a Waypoint GPS program group on your computer. If this program group is not there, see Section 1.2.2, on Page 24 for installation instructions.
Convert Data
To be processed, raw GPS data files have to be converted into Waypoint’s GPB format, including raw data from Waypoint’s data-logger program. See Chapter 3 on Page 221 for a complete description of the Convert utility.
Start AutoNav
The first step to get started with AutoNav is to create a new project. To do this, follow the steps in the shaded box.
Set Up a Base Station File
The steps to set up a base station file are in the shaded box.
198 |
GrafNav / GrafNet 8.10 User Guide Rev 4 |

AutoNav |
Chapter 6 |
|
|
|
|
Add Remote Files
To add remote files, follow the steps in the shaded box. Be sure to specify the receiver type and data type.
Select Base Stations for Processing
To select base stations for processing, follow the steps in the shaded box.
Set Processing Options
Select the options most suitable to the application. Generally, both directions should be processed, and KAR should be enabled. Set the Static Initialization to Float solution or KAR, unless there is sufficient static data for a Fixed static solution.
Be sure to select the proper datum, as well as the processing profile most appropriate for the application.
Set Exporting Options
The steps to set the exporting options are in the shaded box.
Process
Click the Process button to allow the software to begin processing the data. No further user interaction should be required as the program will automatically download any required base station data, and create the desired output upon successful completion of processing.
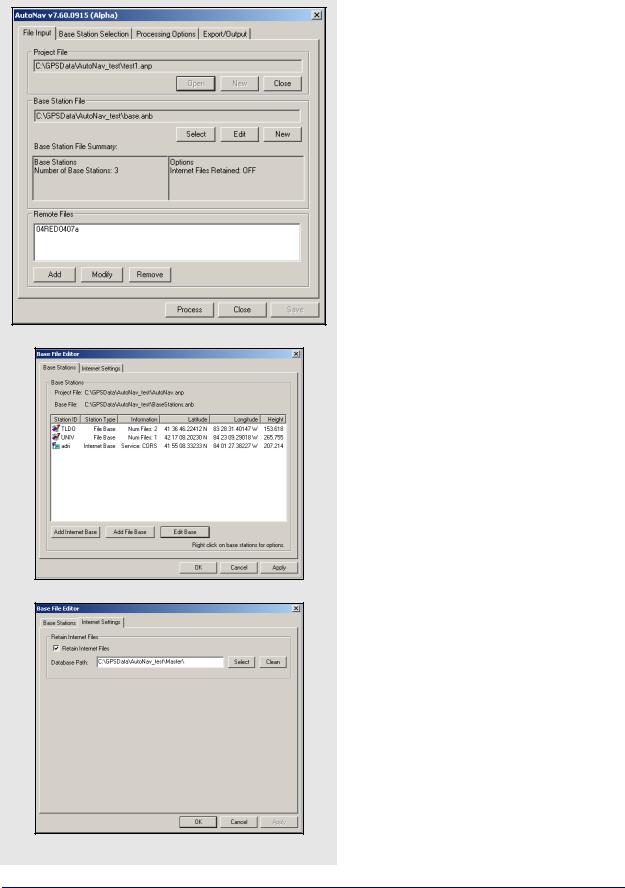
File Input
The File Input tab allows for the selection of the project (ANP), base station (ANB), and remote files.
Project File
Use the Open button to select an existing project file. Otherwise, the New button creates a new project. To close the active project, use the Close button without quitting the application.
Base Station File
You can choose to either select an existing base station file, or else create a new one. In either case, you may make changes to it via the Edit button. See Section 6.3, on Page 200 for information regarding base station files. You can also share ANB files among projects.
How to add a remote file
1.Click the Add button in the Remote Files box.
2.Click the Browse button n the window that appears to locate the remote data files to be processed.
How to select base stations for processing
1.Select Automatic Base Station Selection under the Base Station Selection tab to allow the software to decide which base stations are for processing.
This decision is based on the criteria outlined under the Automatic Selection Options box.
How to set exporting options
1.Specify the data desired for output by selecting the appropriate Export Profile under the Export/Output tab.
2.Select Epochs under the Export Type Source to obtain the coordinates of the remote trajectory
3.Select Features/Stations for any loaded points of interest such as camera or station marks, or Static Sessions if static data was processed.
Depending on the profile chosen, some of the options available on this tab may also need to be set.
GrafNav / GrafNet 8.10 User Guide Rev 4 |
199 |
Chapter 6 |
AutoNav |
|
|
Base Station File Summary
This window is used to display information regarding the selected base station file. The lefthand side of the window features the number of base stations contained within the current ANB file, while the right-hand side displays the path to which any stations downloaded from the Internet will be saved, if the appropriate option is enabled.
Remote Files
You may add or remove remote files to the project, or else edit any existing ones. See Section 6.3, on Page 200 for more information about adding and modifying remote files.
6.3 Base Station Files
For every project, AutoNav requires a base station file (ANB) from which to obtain important information regarding the master stations to be used for processing. These can be shared among multiple projects.
Base File Editor
This window shows a list of all base stations currently in the ANB file.
To remove a station from an ANB file, simply right-click on it and select Delete File Base.
You can choose to add either Internet or file base stations. The former requires clicking on the Add Internet Base button, which will open the Download Service Data utility. Here, select the desired base station. See Section 2.8.12, on Page 140 for help using this utility.
If a file base station is desired, click on the Add File Base button. You can edit any existing files using the Edit Base button.
Users with Internet base stations should consult the
Internet Settings tab of the Base File Editor window for additional options.
Under this tab, you have the option to save any downloaded RINEX files. Otherwise, they will be deleted after the conversion to GPB. The Clean button available under this tab should only be used if you is wishing to delete all GPB, EPP and STA files in the specified path.
200 |
GrafNav / GrafNet 8.10 User Guide Rev 4 |
AutoNav |
Chapter 6 |
|
|
|
|
If the Retain Internet Files option is enabled, the software will use the naming convention in the shaded box when saving the GPB, EPP, and STA files to disk.
Base Editor
Base Type
Lists the type of station.
Station Information
Enter a station name, as well as the coordinates for the point.
The coordinates can be loaded via the
Select From Favourites button if they have been previously stored.
If available, the antenna information should also be provided here. See Section 2.3.6, on Page 36 for information regarding antenna models.
For users adding an Internet base station, consult the Internet Base box to ensure that the proper station and service names are loaded.
The List of Base Files box is only relevant to those users looking to process data that is already stored on their computer. In such cases, click on the Add Files button to locate the raw data. If the data has been divided into several files that is, hourly or daily files, you are free to add them all.
The files added here do not need to be in GPB format. The program will attempt to automatically detect the receiver type and convert any raw data files that may be added here. However, should the autodetect fail to correctly identify the data type, you will be forced to convert the files manually. See Section 8, on Page 221 for help.
File naming convention
SSSSSSSS_HHHHHH_hh_iiii
Where:
SSSSSSSS Station ID (8 characters)
HHHHHHNumber of hours since 1980 (6 characters)
hhNumber of hours in the file (2 characters)
|
iiii |
Data interval (4 characters) |
|
|
|
|
|
|
|
|
|
|
|
|
|
|
|
|
|
GrafNav / GrafNet 8.10 User Guide Rev 4 |
201 |