

274 Chapter 8 Objects and Classes
|
|
|
|
|
|
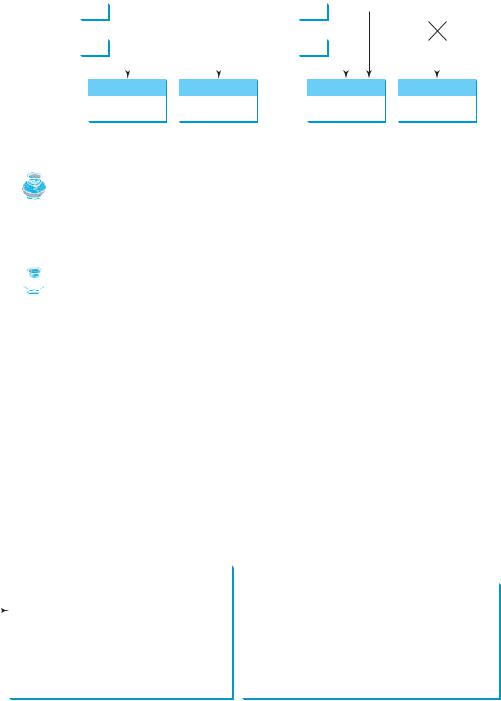
Object type assignment c1 = c2 |
|
|
|||||||||||
Before: |
|
|
|
|
After: |
|
|
||||||||||||
|
|
|
|
|
|
|
|
c1 |
|
|
|
|
|
|
|
|
|
||
c1 |
|
|
|
|
|
|
|
|
|
|
|
|
|
|
|
|
|
|
|
|
|
|
|
|
|
|
|
|
|
|
|
|
|
|
|
||||
|
|
|
|
|
|
|
|
c2 |
|
|
|
|
|
|
|
|
|
||
c2 |
|
|
|
|
|
|
|
|
|
|
|
|
|
|
|
|
|
|
|
|
|
|
|
|
|
|
|
|
|
|
|
|
|||||||
|
|
|
|
|
|
|
|
|
|
|
|
|
|
|
|
|
|
|
|
|
|
|
c2: Circle |
|
|
c1: Circle |
|
|
|
c2: Circle |
c1: Circle |
||||||||
|
|
|
|
|
|
|
|
|
|
|
|
|
|
||||||
|
|
|
radius = 9 |
|
|
radius = 5 |
|
|
|
radius = 9 |
|
radius = 5 |
|||||||
|
|
|
|
|
|
|
|
|
|
|
|
|
|
|
|
|
|
|
|
FIGURE 8.8 Reference variable c2 is copied to variable c1.
|
Note |
|
As shown in Figure 8.8, after the assignment statement c1 = c2, c1 points to the same object |
|
referenced by c2. The object previously referenced by c1 is no longer useful and therefore is now |
garbage |
known as garbage. Garbage occupies memory space. The Java runtime system detects garbage |
garbage collection |
and automatically reclaims the space it occupies. This process is called garbage collection. |
 Tip
Tip
If you know that an object is no longer needed, you can explicitly assign null to a reference variable for the object. The JVM will automatically collect the space if the object is not referenced by any reference variable.
|
|
|
|
8.6 |
Using Classes from the Java Library |
|||
|
|
|
|
Listing 8.1 defined the Circle1 class and created objects from the class. You will frequently |
||||
|
|
|
|
use the classes in the Java library to develop programs. This section gives some examples of |
||||
|
|
|
|
the classes in the Java library. |
|
|
|
|
|
|
|
|
8.6.1 |
The Date Class |
|
|
|
|
|
|
|
In Listing 2.8, ShowCurrentTime.java, you learned how to obtain the current time using |
||||
|
|
|
|
System.currentTimeMillis(). You used the division and remainder operators to extract |
||||
|
|
|
|
current second, minute, and hour. Java provides a system-independent encapsulation of date |
||||
java.util.Date class |
and time in the java.util.Date class, as shown in Figure 8.9. |
|||||||
|
|
|
|
|
|
|
|
|
|
|
|
|
|
java.util.Date |
|
|
|
The + sign indicates |
|
+Date() |
|
Constructs a Date object for the current time. |
|
|||
+Date(elapseTime: long) |
|
|
|
|||||
public modifier |
|
|
|
Constructs a Date object for a given time in |
|
|||
|
||||||||
|
|
|
|
|
|
|
milliseconds elapsed since January 1, 1970, GMT. |
|
|
|
|
|
+toString(): String |
|
Returns a string representing the date and time. |
|
|
|
|
|
|
+getTime(): long |
|
Returns the number of milliseconds since January 1, |
|
|
|
|
|
|
|
|
|
1970, GMT. |
|
|
|
|
|
+setTime(elapseTime: long): void |
|
Sets a new elapse time in the object. |
|
|
|
|
|
|
|
|
|
|
|
FIGURE 8.9 A Date object represents a specific date and time.
You can use the no-arg constructor in the Date class to create an instance for the current date and time, its getTime() method to return the elapsed time since January 1, 1970, GMT, and its toString method to return the date and time as a string. For example, the following code
 Note
Note276Chapter 8 Objects and Classes
8.6.3Displaying GUI Components
 Pedagogical Note
Graphical user interface (GUI) components are good examples for teaching OOP. Simple GUI examples are introduced for this purpose. The full introduction to GUI programming begins with Chapter 12, “GUI Basics.”
When you develop programs to create graphical user interfaces, you will use Java classes such as JFrame, JButton, JRadioButton, JComboBox, and JList to create frames, buttons, radio buttons, combo boxes, lists, and so on. Listing 8.5 is an example that creates two windows using the JFrame class. The output of the program is shown in Figure 8.11.
FIGURE 8.11 The program creates two windows using the JFrame class.
LISTING 8.5 TestFrame.java
|
1 |
import javax.swing.JFrame; |
|||
|
2 |
|
|
|
|
|
3 |
public class TestFrame { |
|||
|
4 |
public static void main(String[] args) { |
|||
create an object |
5 |
|
JFrame frame1 = new JFrame(); |
|
|
invoke a method |
6 |
|
frame1.setTitle("Window 1"); |
||
|
7 |
|
frame1.setSize(200, 150); |
||
|
8 |
|
frame1.setLocation(200, 100); |
||
|
9 |
|
frame1.setDefaultCloseOperation(JFrame.EXIT_ON_CLOSE); |
||
|
10 |
|
frame1.setVisible(true); |
||
|
11 |
|
|
|
|
create an object |
12 |
|
JFrame frame2 = new JFrame(); |
|
|
invoke a method |
13 |
|
frame2.setTitle("Window 2"); |
||
|
14 |
|
frame2.setSize(200, 150); |
||
|
15 |
|
frame2.setLocation(410, 100); |
||
|
16 |
|
frame2.setDefaultCloseOperation(JFrame.EXIT_ON_CLOSE); |
||
|
17 |
|
frame2.setVisible(true); |
||
|
18 |
} |
|
|
|
|
19 |
} |
|
|
|
This program creates two objects of the JFrame class (lines 5, 12) and then uses the methods setTitle, setSize, setLocation, setDefaultCloseOperation, and setVisible to set the properties of the objects. The setTitle method sets a title for the window (lines 6, 13). The setSize method sets the window’s width and height (lines 7, 14). The setLocation method specifies the location of the window’s upper-left corner (lines 8, 15). The setDefaultCloseOperation method terminates the program when the frame is closed (lines 9, 16). The setVisible method displays the window.
You can add graphical user interface components, such as buttons, labels, text fields, check boxes, and combo boxes to the window. The components are defined using classes. Listing 8.6 gives an example of creating a graphical user interface, as shown in Figure 8.1.
