12.5 Layout Managers 411
12.5 Layout Managers
In many other window systems, the user-interface components are arranged by using hardcoded pixel measurements. For example, put a button at location (10, 10) in the window. Using hard-coded pixel measurements, the user interface might look fine on one system but be unusable on another. Java’s layout managers provide a level of abstraction that automatically maps your user interface on all window systems.
The Java GUI components are placed in containers, where they are arranged by the container’s layout manager. In the preceding program, you did not specify where to place the OK button in the frame, but Java knows where to place it, because the layout manager works behind the scenes to place components in the correct locations. A layout manager is created using a layout manager class.
Layout managers are set in containers using the setLayout(aLayoutManager) method. For example, you can use the following statements to create an instance of XLayout and set it in a container:
LayoutManager layoutManager = new XLayout(); container.setLayout(layoutManager);
This section introduces three basic layout managers: FlowLayout, GridLayout, and BorderLayout.
12.5.1FlowLayout
FlowLayout is the simplest layout manager. The components are arranged in the container from left to right in the order in which they were added. When one row is filled, a new row is started. You can specify the way the components are aligned by using one of three constants: FlowLayout.RIGHT, FlowLayout.CENTER, or FlowLayout.LEFT. You can also specify the gap between components in pixels. The class diagram for FlowLayout is shown in Figure 12.4.
The get and set methods for these data fields are provided in the class, but omitted in the UML diagram for brevity.
Video Note
Use FlowLayout
FIGURE 12.4 FlowLayout lays out components row by row.
Listing 12.3 gives a program that demonstrates flow layout. The program adds three labels and text fields into the frame with a FlowLayout manager, as shown in Figure 12.5.
LISTING 12.3 ShowFlowLayout.java
1 import javax.swing.JLabel;
2 import javax.swing.JTextField;
3 import javax.swing.JFrame;
412 Chapter 12 |
GUI Basics |
|
4 |
import java.awt.FlowLayout; |
|
5 |
|
|
|
|
|
extends JFrame |
6 |
public class ShowFlowLayout |
extends JFrame |
{ |
|
7 |
public ShowFlowLayout() { |
|
8 |
// Set FlowLayout, aligned left with horizontal gap 10 |
|
9 |
// and vertical gap 20 between components |
set layout |
10 |
setLayout( |
new FlowLayout(FlowLayout.LEFT, 10, 20) |
); |
|
11 |
|
|
|
|
|
|
12 |
// Add labels and text fields to the frame |
add label |
13 |
add(new JLabel("First Name")); |
add text field |
14 |
add(new JTextField(8)); |
|
15 |
add(new JLabel("MI")); |
|
16 |
add(new JTextField(1)); |
|
17 |
add(new JLabel("Last Name")); |
|
18 |
add(new JTextField(8)); |
|
19 |
} |
|
|
|
|
|
20 |
|
|
|
|
|
|
21 |
/** Main method */ |
|
22 |
public static void main(String[] args) { |
|
23 |
ShowFlowLayout frame = new ShowFlowLayout(); |
|
24 |
frame.setTitle("ShowFlowLayout"); |
|
25 |
frame.setSize(200, 200); |
create frame |
26 |
frame.setLocationRelativeTo(null); // Center the frame |
|
27 |
frame.setDefaultCloseOperation(JFrame.EXIT_ON_CLOSE); |
set visible |
28 |
frame.setVisible(true); |
|
29 |
} |
|
|
|
|
|
30 |
} |
|
|
|
|
FIGURE 12.5 The components are added by the FlowLayout manager to fill in the rows in the container one after another.
This example creates a program using a style different from the programs in the preceding section, where frames were created using the JFrame class. This example creates a class named ShowFlowLayout that extends the JFrame class (line 6). The main method in this program creates an instance of ShowFlowLayout (line 23). The constructor of ShowFlowLayout constructs and places the components in the frame. This is the preferred style of creating GUI applications—for three reasons:
■Creating a GUI application means creating a frame, so it is natural to define a frame to extend JFrame.
■The frame may be further extended to add new components or functions.
■The class can be easily reused. For example, you can create multiple frames by creating multiple instances of the class.
Using one style consistently makes programs easy to read. From now on, most of the GUI main classes will extend the JFrame class. The constructor of the main class constructs the user interface. The main method creates an instance of the main class and then displays the frame.
12.5 Layout Managers 413
In this example, the FlowLayout manager is used to place components in a frame. If you resize the frame, the components are automatically rearranged to fit. In Figure 12.5(a), the first row has three components, but in Figure 12.5(a), the first row has four components, because the width has been increased.
If you replace the setLayout statement (line 10) with setLayout(new FlowLayout- (FlowLayout.RIGHT, 0, 0)), all the rows of buttons will be right aligned with no gaps.
An anonymous FlowLayout object was created in the statement (line 10):
setLayout(new FlowLayout(FlowLayout.LEFT, 10, 20));
which is equivalent to:
FlowLayout layout = new FlowLayout(FlowLayout.LEFT, 10, 20); setLayout(layout);
This code creates an explicit reference to the object layout of the FlowLayout class. The explicit reference is not necessary, because the object is not directly referenced in the
ShowFlowLayout class.
Suppose you add the same button into the frame ten times; will ten buttons appear in the frame? No, a GUI component such as a button can be added into only one container and only once in a container. Adding a button into a container multiple times is the same as adding it once.
 Caution
Do not forget to put the new operator before a layout manager class when setting a layout style— for example, setLayout(new FlowLayout()).
 Note
Note
The constructor ShowFlowLayout() does not explicitly invoke the constructor JFrame(), but the constructor JFrame() is invoked implicitly. See §11.3.2, “Constructor Chaining.”
12.5.2GridLayout
The GridLayout manager arranges components in a grid (matrix) formation. The components are placed in the grid from left to right, starting with the first row, then the second, and so on, in the order in which they are added. The class diagram for GridLayout is shown in Figure 12.6.
The get and set methods for these data fields are provided in the class, but omitted in the UML diagram for brevity.
java.awt.GridLayout
-rows: int -columns: int
-hgap: int
-vgap: int
+GridLayout()
+GridLayout(rows: int, columns: int)
+GridLayout(rows: int, columns: int, hgap: int, vgap: int)
FIGURE 12.6 GridLayout lays out components in equal-sized cells on a grid.
414 Chapter 12 GUI Basics
You can specify the number of rows and columns in the grid. The basic rule is as follows:
■ The number of rows or the number of columns can be zero, but not both. If one is zero and the other is nonzero, the nonzero dimension is fixed, while the zero dimension is determined dynamically by the layout manager. For example, if you specify zero rows and three columns for a grid that has ten components, GridLayout creates three fixed columns of four rows, with the last row containing one component. If you specify three rows and zero columns for a grid that has ten components, GridLayout creates three fixed rows of four columns, with the last row containing two components.
■ If both the number of rows and the number of columns are nonzero, the number of rows is the dominating parameter; that is, the number of rows is fixed, and the layout manager dynamically calculates the number of columns. For example, if you specify three rows and three columns for a grid that has ten components, GridLayout creates three fixed rows of four columns, with the last row containing two components.
Listing 12.4 gives a program that demonstrates grid layout. The program is similar to the one in Listing 12.3. It adds three labels and three text fields to the frame of GridLayout instead of FlowLayout, as shown in Figure 12.7.
LISTING 12.4 ShowGridLayout.java
|
1 |
import javax.swing.JLabel; |
|
2 |
import javax.swing.JTextField; |
|
3 |
import javax.swing.JFrame; |
|
4 |
import java.awt.GridLayout; |
|
5 |
|
|
6 |
public class ShowGridLayout extends JFrame { |
|
7 |
public ShowGridLayout() { |
|
8 |
// Set GridLayout, 3 rows, 2 columns, and gaps 5 between |
|
9 |
// components horizontally and vertically |
set layout |
10 |
setLayout(new GridLayout(3, 2, 5, 5)); |
|
11 |
|
|
12 |
// Add labels and text fields to the frame |
add label |
13 |
add(new JLabel("First Name")); |
add text field |
14 |
add(new JTextField(8)); |
|
15 |
add(new JLabel("MI")); |
|
16 |
add(new JTextField(1)); |
|
17 |
add(new JLabel("Last Name")); |
|
18 |
add(new JTextField(8)); |
|
19 |
} |
|
20 |
|
|
21 |
/** Main method */ |
|
22 |
public static void main(String[] args) { |
|
23 |
ShowGridLayout frame = new ShowGridLayout(); |
|
24 |
frame.setTitle("ShowGridLayout"); |
|
25 |
frame.setSize(200, 125); |
create a frame |
26 |
frame.setLocationRelativeTo(null); // Center the frame |
|
27 |
frame.setDefaultCloseOperation(JFrame.EXIT_ON_CLOSE); |
set visible |
28 |
frame.setVisible(true); |
|
29 |
} |
|
30 |
} |
If you resize the frame, the layout of the buttons remains unchanged (i.e., the number of rows and columns does not change, and the gaps don’t change either).
All components are given equal size in the container of GridLayout.
12.5 Layout Managers 415
FIGURE 12.7 The GridLayout manager divides the container into grids; then the components are added to fill in the cells row by row.
Replacing the setLayout statement (line 10) with setLayout(new GridLayout(3, 10)) would still yield three rows and two columns. The columns parameter is ignored because the rows parameter is nonzero. The actual number of columns is calculated by the layout manager.
What would happen if the setLayout statement (line 10) were replaced with setLayout(new GridLayout(4, 2)) or with setLayout(new GridLayout(2, 2))? Please try it yourself.
 Note
Note
In FlowLayout and GridLayout, the order in which the components are added to the container is important. It determines the location of the components in the container.
12.5.3BorderLayout
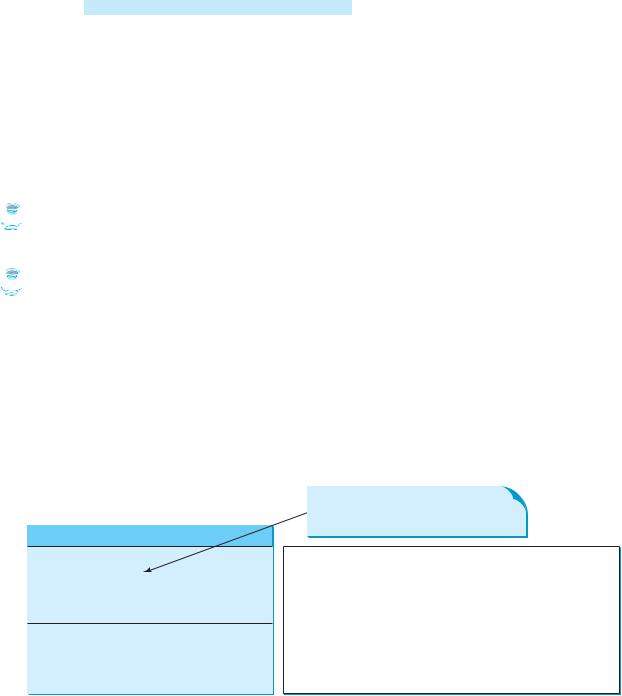
The BorderLayout manager divides a container into five areas: East, South, West, North, and Center. Components are added to a BorderLayout by using add(Component, index), where index is a constant BorderLayout.EAST, BorderLayout.SOUTH, BorderLayout.WEST, BorderLayout.NORTH, or BorderLayout.CENTER. The class diagram for BorderLayout is shown in Figure 12.8.
|
The get and set methods for these data |
|
fields are provided in the class, but |
java.awt.BorderLayout |
omitted in the UML diagram for brevity. |
|
|
|
-hgap: int |
The horizontal gap of this layout manager (default: 0). |
-vgap: int |
The vertical gap of this layout manager (default: 0). |
|
|
+BorderLayout() |
Creates a default BorderLayout manager. |
+BorderLayout(hgap: int, vgap: int) |
Creates a BorderLayout manager with a specified number of |
|
horizontal gap, and vertical gap. |
|
|
FIGURE 12.8 BorderLayout lays out components in five areas.
The components are laid out according to their preferred sizes and their placement in the container. The North and South components can stretch horizontally; the East and West components can stretch vertically; the Center component can stretch both horizontally and vertically to fill any empty space.
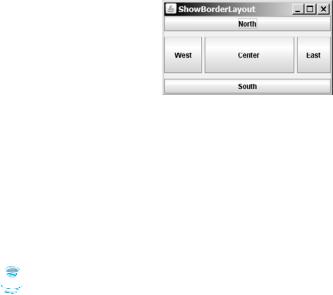
Listing 12.5 gives a program that demonstrates border layout. The program adds five buttons labeled East, South, West, North, and Center into the frame with a BorderLayout manager, as shown in Figure 12.9.
416 Chapter 12 |
GUI Basics |
|
LISTING 12.5 ShowBorderLayout.java |
|
1 |
import javax.swing.JButton; |
|
2 |
import javax.swing.JFrame; |
|
3 |
import java.awt.BorderLayout; |
|
4 |
|
|
|
|
|
5 |
public class ShowBorderLayout extends JFrame |
{ |
|
6 |
public ShowBorderLayout() { |
|
7 |
// Set BorderLayout with horizontal gap 5 and vertical gap 10 |
set layout |
8 |
setLayout( |
new BorderLayout(5, 10) |
); |
|
|
9 |
|
|
|
|
|
10 |
// Add buttons to the frame |
add buttons |
11 |
add(new JButton("East"), BorderLayout.EAST); |
|
12 |
add(new JButton("South"), BorderLayout.SOUTH); |
|
13 |
add(new JButton("West"), BorderLayout.WEST); |
|
14 |
add(new JButton("North"), BorderLayout.NORTH); |
|
15 |
add(new JButton("Center"), BorderLayout.CENTER); |
|
16 |
} |
|
|
|
|
17 |
|
|
|
|
|
18 |
/** Main method */ |
|
19 |
public static void main(String[] args) { |
|
20 |
ShowBorderLayout frame = new ShowBorderLayout(); |
|
21 |
frame.setTitle("ShowBorderLayout"); |
|
22 |
frame.setSize(300, 200); |
create a frame |
23 |
frame.setLocationRelativeTo(null); // Center the frame |
|
24 |
frame.setDefaultCloseOperation(JFrame.EXIT_ON_CLOSE); |
set visible |
25 |
frame.setVisible(true); |
|
26 |
} |
|
|
|
|
27 |
} |
|
|
|
FIGURE 12.9 BorderLayout divides the container into five areas, each of which can hold a component.
The buttons are added to the frame (lines 11–15). Note that the add method for BorderLayout is different from the one for FlowLayout and GridLayout. With BorderLayout you specify where to put the components.
It is unnecessary to place components to occupy all the areas. If you remove the East button from the program and rerun it, you will see that the center stretches rightward to occupy the East area.
 Note
Note
BorderLayout interprets the absence of an index specification as BorderLayout.CENTER.
For example, add(component) is the same as add(Component, BorderLayout.CEN-
TER). If you add two components into a container of BorderLayout, as follows,
container.add(component1);
container.add(component2);
only the last component is displayed.


