


Chapter 11: Putting Your Wireless Home Network to Work 211
Files: You can set up particular folders or just a specific file to share across your network. Note: File storage schemes on devices are hierarchical: If you share a folder, all files and folders within that folder will be shared. If you want to share only one file, select just that file or share a folder with only the one file in it.
Enabling file sharing on
Windows 95/98/Me
Luckily for you, file sharing is easy. But to share files in Windows 95/98/Me, you first must enable sharing on your PC.
After you set up sharing, your computer will need to reboot, so we recommend that you close any and all other applications before following these steps.
To enable file sharing on your Windows 95/98/Me PC, do this:
1.Choose Start Settings Control Panel and then double-click the
Network icon.
2.On the Configuration tab of the Network dialog box, click the File and Print Sharing button.
3.In the File and Print Sharing dialog box that appears, select the I Want to Be Able to Give Others Access to My Files check box and then click OK twice.
If you want to share a printer from this machine, you could also select the I Want to Be Able to Give Other Access to My Printers check box.
4.Click OK in the dialog box that asks to restart your computer.
Your computer reboots, and your files are now ready for sharing.
Sharing a document or folder on Windows 95/98/Me
You don’t need to share your entire C: drive in order to share just one file. We recommend that you create a shared folder where you put all the files that you want to share. Because you’re opening just this one shared folder to the network, the rest of your documents are protected.
212 Part IV: Using a Wireless Network
You can never be too protected
The number of ways that someone can get on your network multiplies with each new technology that you add to your network. We note in Chapter 10 that wireless local area networks (LANs) seep out of your home and make it easy for others to log in and sniff around. If someone does manage to break into your network, the most obvious places to snoop around and do damage are the shared resources. Sharing your C: drive (which is usually your main hard drive), your Windows directory, or your My Documents directory makes it easier for people to get into your machine and do something you’d rather they not.
You see, sharing will broadcast to the rest of the network the fact that something is shared,
telling everyone who’s got access, your computer’s name on the network, and how to find it. Sharing can broadcast that availability across firewalls, proxies, and servers. Certain types of viruses and less-than-friendly hackers look for these specific areas (like your shared C: drive) in broadcast messages and follow them back to your machine.
If you’re going to share these parts of your system on your network, run a personal firewall on your machines for an added layer of security, or it will likely be compromised at some point. Get virus software. Protect your machine, and limit your exposure to risk. (And by all means be sure to follow our advice in Chapter 10 for securing your wireless network.)
To share a document on your now sharing-enabled Windows PC (whether it’s running 95/98/Me), follow these steps:
1.Set up a space to share from.
In Windows, you do this at the folder level. If, like most of us, you use the My Documents folder to store and organize your files, either create or use an existing folder inside My Documents to share your files with others.
2.Right-click the folder that contains the document that you want to share and then choose Sharing from the shortcut menu that appears.
If you want to share full disk drives, choose the entire drive here, not just a folder.
3.On the Sharing tab of the Properties dialog box, click Shared As.
4.Identify the shared folder on the network by using the active folder name or entering a different name in the Share Name text box.
If you have a mixed network that has older Mac or Windows 95/98/Me/NT computers on it, keep your folder names to just eight characters with no spaces. Eight-character names are the standard form, compatible with those platforms, and if you want to effectively share without problems you will not have a choice — keep those names short.
Chapter 11: Putting Your Wireless Home Network to Work 213
To provide a longer description of the folder, enter a comment in the Comment box. (We recommend that you do this because some shared documents and devices sometime have non-intuitive names.)
5.Windows 95/98/Me will allow everyone full access to any share you set up by default.
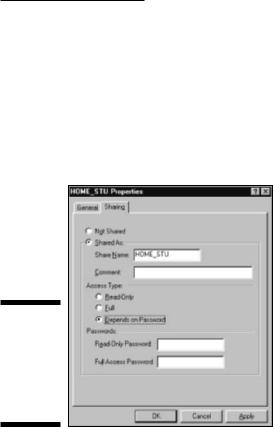
If you want to protect your shared folder, you have the option to set up an Access Type (see Figure 11-4), which allows read-only access or full control based on the password, or passwords, that you set on the folder.
Figure 11-4:
The dialog box where you configure your shared folder.
Enabling sharing on Windows 2000/XP
In Windows 2000/XP, sharing is enabled by default on each network connection on your machine. If you have a wired network card and a wireless card, you can have sharing enabled On on one card and Off on the other. This is very helpful if you only want to share files on one of the networks that you connect to. For example, if you want to share files when connected to your home wireless network but turn off sharing when you plug your laptop in at work, turn sharing On for your wireless card and Off for your wired Ethernet card. When you first install a new network card, or wireless network card for our purposes, the default is to have sharing turned On.
To enable sharing on a Windows 2000/XP machine, follow these steps, which are quite similar to those in the preceding section:
1.Choose Start Settings Network and Dial-up Connections.
2.Right-click the icon of the network connection over which you wish to enable File and Printer Sharing and then choose Properties from the pop-up menu that appears.

214 Part IV: Using a Wireless Network
3.On the General tab for network cards and on the Network tab for dialup connections, you select the check box for File and Printer Sharing for Microsoft Networks.
This enables your PC to share files and also printers. Use Windows Explorer to find and move shared files.
When you right-click any folder or file and then select Sharing from the pop-up menu that appears, you can control the sharing of that file.
Setting permissions
In Windows 95/98/Me, you set file-sharing permissions on a folder-by-folder basis; see the earlier section “Sharing a document or folder on Windows 95/98/Me.”
In Windows 2000/XP, controlling the sharing of files is a bit more complex because of the enhanced security that comes with those operating systems. To share folders and drives, you must be logged on as a member of the Server Operators, Administrators, Power Users, or Users groups. Throughout the rest of this section, we describe these user types and then show you how to add users to your 2000/XP network.
User types
The Server Operators group is really only used on large networks that incorporate Microsoft’s Active Directory technology; if you’re trying to set up your office computer at home, you might run into this (but it’s not very likely). The groups that you need to concern yourself with are the Administrators, Power Users, and Users groups:
Administrators are system gods. Anyone set up as an administrator can do anything they like — no restrictions.
Power Users can’t do as much as administrators, but they can do a lot — as long as what they’re doing doesn’t change any of the files that make Windows operate. In other words, Power Users can add and remove software, users, hardware, and so on to a system as long as their actions don’t affect any files keeping the system running the way that it’s running.
Users are just that: Users simply use what the system has to offer and aren’t able to do anything else. The Users group provides the most secure environment in which to run programs, and it’s by far the best way to give access to your resources without compromising the security of your computer and network.

Chapter 11: Putting Your Wireless Home Network to Work 215
How do you know what kind of access you have? Unfortunately, that’s not an easy thing to find out unless you’re an administrator. If you know that you’re not an administrator, the only way to find out what you can do is by trying to do it. If you don’t have the proper access to do something, you will get a warning message telling you exactly that — sometimes the message might tell you what access you need to have in order to do what you want.
Adding users
For others to get access to what you have shared, you need to give them permission. You do that by giving them a logon on your computer and assigning them to a group — essentially adding them to the network as a user. The group is then given certain rights within the folder that you have shared; every user in the group has access only to what the group has access to. For more details on this process, we strongly recommend that you use the Windows Help file to discover how to set up new users and groups on your system.
In Windows 2000/XP, creating users and adding them to groups is best done by using the administrator logon. If you’re using an office computer and you’re not the administrator or a member of the Power Users group, you won’t be able to create users. Talk to your system administrator to get permission and help setting up your machine.
We’re guessing that you are the administrator of your home-networked computer (it’s your network, right?), and so you do have access to the administrator logon. Thus, you can set up new users by logging onto the machine as administrator. Like the hierarchical folder permissions, user permissions are hierarchal as well. If you’re a Power User, you can only create users who have less access than yourself. By using the administrator logon, you can create any type of user account that you might need.
Unless you’re very comfortable with the security settings of Windows 2000/XP, you should never give new user accounts more access than the Users group provides. (For a description of user types, see the preceding section.) Keep in mind that by creating these accounts, you’re also creating a logon that can be used to turn on and access your computer directly. For the purposes of sharing files and peripherals, the standard Users group provides all the access that any individual on the network would normally need.
To add users to your network, follow these steps:
1.Choose Start Settings Control Panel and double-click the Users and
Passwords icon.
This brings up the Users and Passwords dialog box.
2.Click the Add button to launch the New User Wizard and add users to your machine.