


Chapter 9: Setting Up Internet Sharing 167
Obtaining an IP Address Automatically
For the computers in your home network to communicate effectively with one another, whether connected to the network by wire or wirelessly, all computers must have IP (network) addresses on the same subnet — the network address equivalent of having house addresses in the same Zip code or having phone numbers in the same area code. For example, the local IP addresses 192.168.0.1 and 192.168.0.55 are on the same subnet, but the IP addresses 192.168.0.1 and 192.168.1.55 are not. Note that the number after the second dot (referred to by computer geeks as the third octet) must be the same for the address to be in the same subnet. In addition, all must have the same subnet mask, which is typically 255.255.255.0.
A subnet (or subnetwork) is simply a portion of a network (like your home wireless network) that has been portioned off and grouped together as a single unit. When you use a wireless Internet gateway, all your computers are placed into the same subnet. The single IP address assigned to your modem can provide Internet access to all the computers on the subnet. The actual numbers used to identify the subnet are the subnet mask. As we mention previously, you’ll typically use 255.255.255.0 as your subnet mask. The important thing is to ensure that all the computers and devices connected to your wireless home network also have that same subnet mask assigned to them — otherwise, they won’t connect to the Internet. Most of the time, you don’t have to do anything here because your computer should have this subnet mask set up by default.
You can manually assign the IP address of each device connected to the network, but (luckily) you usually don’t have to worry about using this feature. For some applications, such as gaming or videoconferencing — and for some non-computer devices on your network such as game consoles — you might have to enter a static IP address into your router’s configuration. In the majority of cases, however — that is, for most normal PC Internet connections — the DHCP server built into cable/DSL routers and wireless Internet gateways takes care of IP address assignments for you.
One of the most common errors when setting up a home network comes from using a router providing DHCP and NAT and combining it with a wireless access point that also provides DHCP and NAT. If you’re using two devices rather than a combined one, you need to be sure that you only enable the DHCP and NAT services on the router that’s connected to the modem device. The AP should have an option when it’s configured to be set up as a bridge device. This turns off its services and allows the device to be a wireless conduit to the network created by the DHCP and NAT services of the Internet gateway. Failing to do this can result in a segmented home network in which the wired devices cannot share with the wireless devices, or the wireless devices won’t be able to share with anything but themselves and will be unable to access the Internet through your ISP.
168 Part III: Installing a Wireless Network
Suppose that you install a network adapter (refer to Chapter 7), launch your Web browser, and try to reach the Internet. If you then have problems (assuming that everything else is connected and other computers on the network can successfully access the Internet), perhaps the IP address wasn’t properly assigned to the adapter. Before you start panicking, try shutting down and restarting the computer. Often, restarting the computer will cause the network adapter to properly obtain an IP address from the network’s DHCP server. If you still can’t reach the Internet, follow the instructions in this section to configure the network adapter to automatically obtain an IP address. (Also check out Chapter 18, where we cover some basic troubleshooting techniques for home wireless networks.)
Configuring a device on the network (wired or wireless) to automatically obtain an IP address from a DHCP server is very easy. Throughout the rest of this section, we outline the steps necessary for automatically obtaining an IP address from a DHCP server for various operating systems: Windows 9x/2000/XP and Mac OS X. After you complete the applicable procedure, the DHCP server leases a local IP address to the device that you are configuring, enabling it to communicate with other IP devices on the network.
Sometimes you have to restart your computer to successfully achieve the desired result.
When a DHCP server leases an IP address, the server will not assign that IP address to another device until the lease runs out or the device that is leasing the address releases it. Each time when you restart your computer — or on a periodic basis if you leave your computer on all the time — the DHCP server will renew the lease, allowing the computer to keep the IP address that it has been given.
Domain Name System (DNS) servers
When the DHCP server assigns an IP address, it also specifies the IP addresses for Domain Name System (DNS) servers and for a default gateway. Domain names are text-based names that represent one or more registered IP addresses used on the Internet. When you type a Uniform Resource Locator (URL) in your Web browser, DNS servers translate the text-based domain names in the URL into the equivalent IP addresses. You don’t have to know the IP addresses, just the domain names. The DNS
server addresses will be supplied by your ISP’s DHCP server and will be passed on by your home network’s DHCP server to each workstation. The default gateway takes care of sending network traffic to devices that have IP addresses outside the local subnet. The wireless Internet gateway device or the cable/DSL router that you installed in your wireless network is the default gateway for each of the computers on your network.
Chapter 9: Setting Up Internet Sharing 169
Windows 9x
If your computer is running the Windows 9x (95, 98, 98 SE, or Me) operating system, the steps in this section are for you. To instruct the network adapter to obtain its IP address automatically from a DHCP server, follow these steps:
1.Choose Start Settings Control Panel.
2.Double-click the Network icon in the Control Panel.
The Network dialog box appears.
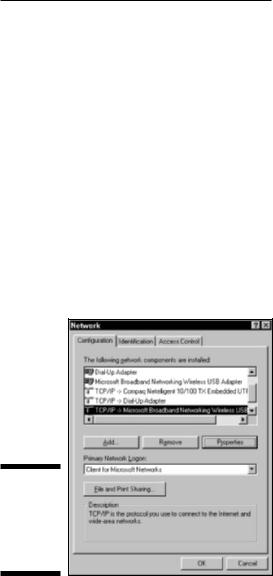
3.In the Configuration tab, highlight the TCP/IP item for the network adapter that you want to configure and then click the Properties button.
For example, Figure 9-2 shows the Network dialog box in Windows 9x with the TCP/IP item for Microsoft Broadband Networking Wireless USB Adapter selected.
Figure 9-2:
The Network dialog box in Windows 9x.
The TCP/IP Properties dialog box appears, as shown in Figure 9-3.
4.On the IP Address tab, select the Obtain an IP Address Automatically radio button and then click OK.
You’re returned to the Network dialog box.
5.Click OK again to return to the Control Panel.
6.Close the Control Panel.
Depending on your version of Windows, you might be prompted to insert the Windows CD in the CD drive.
170 Part III: Installing a Wireless Network
Figure 9-3:
The TCP/IP Properties dialog box in Windows 9x.
7.Insert the Windows CD and then click OK.
Windows copies the needed files to your computer’s hard drive and then has to restart the computer before the change takes affect. When the computer restarts, Windows will lease an IP address from your network’s DHCP server.
Windows 2000
If the computer is running the Widows 2000 operating system, follow these steps to set the network adapter to obtain its IP address automatically from a DHCP server:
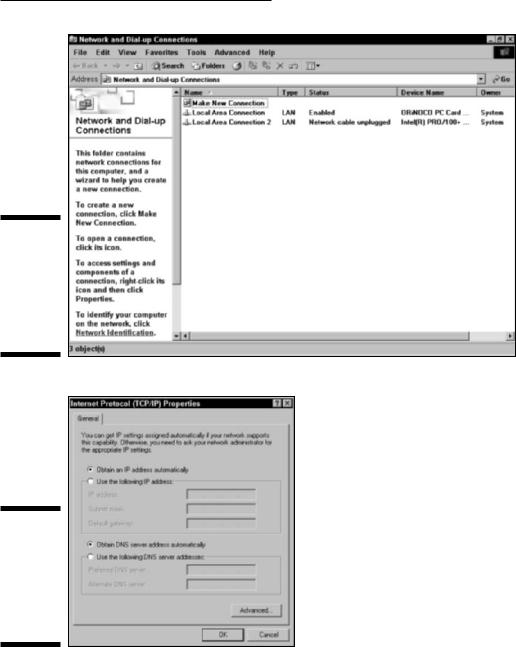
1.Choose Start Settings Network and Dial-up Connections.
The Network and Dial-up Connections window appears, as shown in Figure 9-4.
2.Highlight the Local Area Connection item for the network adapter that you want to configure.
In Figure 9-4, the wireless network interface adapter is listed as ORiNOCO PC Card.
3.Choose File Properties.
The Local Area Connection Properties dialog box appears.
4.Highlight the Internet Protocol (TCP/IP) option and then click the Properties button.
The Internet Protocol (TCP/IP) Properties dialog box appears, as shown in Figure 9-5.
Chapter 9: Setting Up Internet Sharing 171
Figure 9-4:
The
Network
and Dial-up
Connections
window in
Windows
2000.
Figure 9-5:
The Internet Protocol (TCP/IP)
Properties dialog box in Windows 2000.
5.On the General tab, select both the Obtain an IP Address Automatically and the Obtain DNS Server Address Automatically radio buttons.