
- •About the Authors
- •Dedication
- •Contents at a Glance
- •Table of Contents
- •Introduction
- •About This Book
- •System Requirements
- •How This Book Is Organized
- •Part I: Wireless Networking Fundamentals
- •Part II: Making Plans
- •Part III: Installing a Wireless Network
- •Part IV: Using a Wireless Network
- •Part V: The Part of Tens
- •Icons Used in This Book
- •Where to Go from Here
- •Nothing but Net(work): Why You Need (Or Want) One
- •File sharing
- •Printer and peripheral sharing
- •Internet connection sharing
- •Home arcades and wireless to go
- •Wired versus Wireless
- •Installing wired home networks
- •Installing wireless home networks
- •Picking a Wireless Standard
- •Planning Your Wireless Home Network
- •Workstations and servers
- •Network infrastructure
- •Network interface adapters
- •Get the (Access) Point?
- •Industry Standards
- •Who or What Is Bluetooth?
- •Wi-Fi versus Bluetooth
- •Piconets, Masters, and Slaves
- •Wirelessly synching your PDAs
- •Wireless printing and data transfer
- •Integrating HPNA and HomePlug with Your Wireless Home Network
- •Home Phoning (ET Got It Backward!)
- •Network Power(line)!
- •Deciding What Is Connected to the Network
- •Counting network devices
- •Choosing wired or wireless
- •Choosing a wireless technology
- •Choosing an access point
- •Deciding where to install the AP
- •Adding printers
- •Adding entertainment and more
- •Connecting to the Internet
- •Budgeting for Your Wireless Network
- •Pricing access points
- •Pricing wireless network adapters
- •A sample budget
- •Planning Security
- •Selecting Access Points
- •Certification and Standards Support
- •Compatibility and Form Factor
- •DHCP servers
- •Gateways, NAT, and cable/DSL routers
- •Switches
- •Print servers
- •Operational Features
- •Security
- •Range and Coverage Issues
- •Manageability
- •Web-based configuration
- •Software programming
- •Telnetting to your device
- •Upgradeable firmware
- •Price
- •Warranties
- •Customer and Technical Support
- •Before Getting Started, Get Prepared
- •Setting Up the Access Point
- •Preparing to install a wireless AP
- •Installing the AP
- •Configuring AP parameters
- •Changing the AP Configuration
- •Installing device drivers and client software
- •PC Cards and mini-PCI cards
- •Compact Flash cards
- •PCI and ISA cards
- •USB adapters
- •Modifying Wireless Network Adapters
- •Synchronizing and Internet Access
- •Wireless Zero Configuration with XP
- •Easy installation
- •Automatic network connections
- •Tracking Your Network’s Performance
- •Apple AirPort Hardware
- •Pick an AirPort Card, any card
- •Apple AirPort Software Updates
- •AirPort 2.0 software
- •AirPort 2.0.4 software
- •AirPort 2.0.5 software
- •AirPort 2.1.1 software
- •OS 9 Wireless Networks
- •Installing AirPort software on Mac OS 9
- •Upgrading AirPort Base Station firmware on OS 9
- •OS X Wireless Networks
- •Installing the AirPort software on OS X
- •Upgrading AirPort Base Station firmware on OS X
- •Adding another computer to your AirPort network on OS X
- •Connection sharing
- •Routers and gateways
- •Sharing dialup Internet connections
- •Obtaining an IP Address Automatically
- •Windows 9x
- •Windows 2000
- •Windows XP
- •Setting Up Internet Connection Sharing
- •Windows 98 SE and Windows Me
- •Windows 2000
- •Windows XP
- •Mac OS X v. 10.2 (Jaguar)
- •Assessing the Risks
- •General Internet security
- •Airlink security
- •How about a bit more about WEP?
- •What’s wrong with WEP?
- •Clamping Down on Your Wireless Home Network’s Security
- •Getting rid of the defaults
- •Enabling WEP
- •Closing your network
- •Looking into the Crystal Ball
- •Waiting for WPA
- •The future: 802.11i
- •A Networking Review
- •Basic networking terminology
- •Setting up a workgroup
- •Will You Be My Neighbor?
- •Sharing a document or folder on Windows 95/98/Me
- •Enabling sharing on Windows 2000/XP
- •Setting permissions
- •Accessing shared files
- •Be Economical: Share Those Peripherals
- •Setting up a print server
- •Sharing other peripherals
- •PC Gaming Hardware Requirements
- •Networking Requirements for PC Gaming
- •Console online gaming services and equipment
- •Console wireless networking equipment
- •Dealing with Router Configurations
- •Getting an IP address
- •Dealing with port forwarding
- •Setting Up a Demilitarized Zone (DMZ)
- •Wireless Home Entertainment Gear
- •Expanding Your Home Entertainment Center with Wireless Adapters
- •The Home Media Player
- •The Home Theater PC
- •Internet Content for Your Media Players and HTPCs
- •Making a Connection to Your Car
- •Your car’s path to wireless enlightenment
- •Synching your car stereo with home
- •Getting online with your own car PC
- •Picking wireless gear for your car
- •Using your PDA as a remote control
- •Whole home 802.11-based IR coverage
- •See me, feel me, hear me, touch me
- •Discovering Bluetooth Basics
- •Bluetooth Mobile Phones
- •Bluetooth PDAs
- •Other Bluetooth Devices
- •Printers
- •Digital cameras
- •Keyboards and meeses (that’s plural for mouse!)
- •Bluetooth adapters
- •Discovering Public Hot Spots
- •Freenets and open access points
- •For-pay services
- •Using T-Mobile Hot Spots
- •Using Wayport Hot Spots
- •Using Boingo Hot Spots
- •Tools for Finding Hot Spots
- •Netstumbler.com
- •Boingo
- •Check the Obvious
- •Move the Access Point
- •Move the Antenna(s)
- •Change Channels
- •Check for Dual-Band Interference
- •Check for New Obstacles
- •Install Another Antenna
- •Add a Signal Booster
- •Add a Repeater or Bridge
- •Check Your Cordless Phone Frequencies
- •Your Bath
- •Your Car
- •Your Exercise Gear
- •Your Home Appliances
- •Your Musical Instruments
- •Your Pets
- •Your Phones
- •Your Robots
- •Your Wearing Apparel
- •CNET.com
- •802.11 Planet
- •Broadband Wireless Exchange Magazine
- •80211b.weblogger.com
- •PC Magazine
- •Electronic House Magazine
- •Home Automation Magazine
- •Practically Networked
- •ExtremeTech.com
- •Network World
- •Other Cool Sites
- •Index

180 Part III: Installing a Wireless Network
Windows XP
To set up Internet connection sharing in Windows XP:
1.Choose Start Control Panel.
2.Double-click the Network Connections icon in the Control Panel to display the Network Connections window.
3.Highlight the Network Connection item for the network device that you want to use to connect to the Internet and then choose File Properties.
The Local Area Connection Properties dialog box appears.
4.On the Advanced tab, select the Allow Other Network Users to Connect through This Computer’s Internet Connection check box, as shown in Figure 9-12.
By default, the Allow Other Network Users to Control or Disable the Shared Internet Connection check box is selected. Unless you want other users on the network to be able to enable and disable the shared connection, clear this check box. For dialup modems, you can also cause the modem to dial automatically when another computer on the network attempts to access the Internet.
Using the same process as above on your dialup networking connection, select the Establish a Dial-up Connection Whenever a Computer on My Network Attempts to Access the Internet check box. Then click OK. See Figure 9-12.
You’re returned to the Network Connections window.
Figure 9-12:
Enable
Internet connection sharing in Windows XP.

Chapter 9: Setting Up Internet Sharing 181
5.Close the Network Connections window.
When you complete these steps, this Windows XP PC is now both a DHCP server and a NAT server, equivalent to a broadband router. You might need to restart any PC or AP that is connected to the PC for the IP addresses to be reassigned.
To remove Internet connection sharing, display the Advanced tab of the
Local Area Connection Properties dialog box and clear Allow Other Network
Users To Connect through This Computer’s Internet Connection check box.
Mac OS X v. 10.2 (Jaguar)
To set up Internet connection sharing in Mac OS X v. 10.2 or later:
1.From the Apple menu, click System Preferences to display the System Preferences pane.
2.Click the Sharing icon in the System Preferences panel to display the Sharing panel.
If you don’t see the Sharing icon, click the Show All button on top of the System Preferences pane, and it will appear.
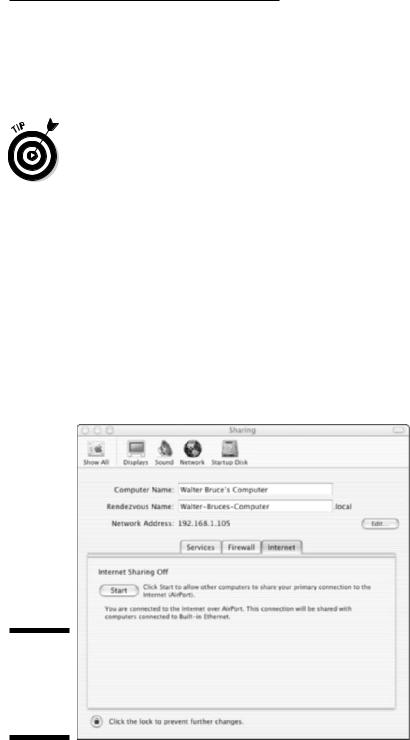
3.Click the Internet tab, as shown in Figure 9-13.
Figure 9-13:
The Internet
tab in the
Sharing
pane of
Mac OS X.

182 Part III: Installing a Wireless Network
Mac OS X senses which adapter is currently connected to the Internet and offers an option to share that connection with other computers on your local network.
4.Click the Start button to start sharing.
5.Close the Sharing panel and the System Preferences panel.
After you complete these steps, this Mac OS X computer is now both a DHCP server and a NAT server, equivalent to a broadband router. You might need to restart any computer or AP that is connected to the PC for the IP addresses to be reassigned.
To remove Internet connection sharing, display the Internet tab of the Sharing pane in System Preferences and click the Stop button.
The host PC has to be turned on for the other computers sharing its connection to be able to access the Internet.

Chapter 10
Securing Your Wireless Home
Network
In This Chapter
Worrying about wireless home network security
Understanding Wired Equivalent Privacy (WEP)
Getting security on your network
Checking out future security enhancements
If you read the news — well, at least if you read the same networking news sources that we do — you’ve probably seen and heard a thing or two (or a hundred) about wireless local area network (LAN) security. In fact, you really don’t need to read specialized industry news to hear about this. Many major
newspapers and media outlets — The New York Times, the San Jose Mercury News, and USA Today, among others — have run feature articles documenting the insecurity of wireless LANs. Most of these stories have focused on wardrivers, those folks who park in the lot in front of an office building,
pull out their laptops, and easily get onto corporate networks.
In this chapter, we talk a bit about these security threats and how they might affect you and your wireless home network. We also (being the helpful types that we are) give you some good advice on how you can make your wireless home network more secure. And finally, we talk about some new solutions that are being developed by the wireless LAN industry to beef up wireless LAN security.
The advice that we give in this section applies equally to your wireless network, whether it uses 802.11b, a, or g. We’re not going to be specific to any particular 802.11 technology in this chapter because the steps that you take to batten down the hatches on your network are virtually identical, regardless of which version of 802.11 you choose. (If you’ve missed our discussion on 802.11 basics, jump back to Chapter 2.)