


144 Part III: Installing a Wireless Network
OS 9 Wireless Networks
When Apple released the first AirPort wireless network concurrently with the release of the first iBook, the most current Apple operating system software was Mac OS 8.6. Apple has since updated the original Mac OS to version 9.2 (9.2.2 at the time of this writing). All Apple computers that are AirPort ready can be upgraded to Mac OS 9.2, although it might not be a free upgrade. This section of the chapter covers configuring your AirPort Card in Mac OS 9.2 but doesn’t cover earlier versions of this operating system. If your computer runs Mac OS X (which isn’t an update of the original Mac OS; it’s a completely new operating system), see the “OS X Wireless Networks” section later in this chapter.
Although you still might be able to find an original (Graphite) AirPort Base Station to purchase, the most current and full-featured model is the dualEthernet port (Snow) AirPort Base Station with AirPort 2.0 (or higher) software. Nonetheless, AirPort 2.0 software will install and configure the Graphite or Snow AirPort Base Stations. The major differences between the two versions are the second Ethernet port and 128-bit encryption of the Snow Base Station. And don’t forget that the new AirPort Extreme Base Station that can transmit data at 54 Mbps and comes with a built-in print server.
AirPort 2.1.1 is the most current version of the AirPort software at the writing of this book, but it won’t install under OS 9.2. Consequently, the following discussion describes the steps and shows screen images that relate to AirPort 2.0.4, which is the last version that will install and set up an AirPort Base Station on OS 9.
If you have access to a computer that has OS X installed, consider using that computer to configure your AirPort Base Station. The AOL compatibility feature of AirPort 2.0.4 software and later versions of the AirPort software can be added and configured only from OS X.
Even though a CD containing AirPort software is distributed with both the Base Station and the AirPort Card, check out the Apple Web site www.info. apple/support/downloads.html to make sure that you have the latest version of the AirPort software before setting up your AirPort network.
To set up an AirPort Base Station using the AirPort 2.0.4 software, you must have the Base Station itself as well as the following:
An AirPort-ready computer with an AirPort Card, or a PowerBook G3 with either a Lucent WaveLAN or an ORiNOCO PC Card
Mac OS v. 9.2.1 or later
Chapter 8: Setting Up a Wireless Mac Network 145
When you run the AirPort software installation, you first install (or upgrade) software on your computer and then upgrade the firmware that’s built into the AirPort Base Station. Finally, you configure the Base Station. The sections that follow take you through the process step by step.
Installing AirPort software on Mac OS 9
To install AirPort software on your computer, follow these steps:
1.Close all open applications.
The installation process will cause the computer to restart, and you certainly don’t want to lose any of your work.
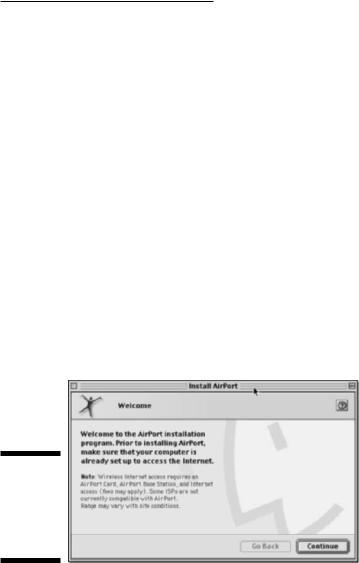
2.If you’re installing the software from a CD-ROM, insert the CD-ROM and double-click the Install Mac OS 9 file.
Alternatively, you can download the most current version of the software from the Apple Web site (www.info.apple/support/downloads.html) and then double-click the Apple SW Install file.
The Welcome window appears, as shown in Figure 8-1.
Figure 8-1:
The AirPort
2.0.4 Install
AirPort
Welcome
screen.
3.Click the Continue button to display the Select Destination window, choose the drive where you want the software to be installed from the Destination Disk list, and then click the Select button to display the Software License Agreement.
4.Read the license agreement; if you agree, click the Continue button and then click the Agree button to display the About AirPort window.

146 Part III: Installing a Wireless Network
5.After reading and/or printing the contents of the About AirPort window, click the Continue button to display the Install/Remove Software window.
6.In the Install/Remove Software window, click the Start button to display a warning screen that the software installation will restart your computer, which requires it to first quit all applications that are running.
You can click the Stop button to abort the installation program and return to any application that you accidentally left open so that you can save your work and close it down yourself. You’ll just have to start the AirPort software installation again when you’re ready.
7.After you click the Continue button, the installer closes all running applications and then copies the AirPort software to your computer’s drive.
A message displays that the installation process is finished.
8.Click the Restart button to restart your computer.
Upgrading AirPort Base Station firmware on OS 9
This section explains how to upgrade the firmware of a new AirPort Base Station. Upgrading the firmware on your AirPort Base Station through a direct Ethernet cable connection is the easiest route. Use an Ethernet cable (either a straight-through cable or a cross-over cable; the Base Station automatically detects the type of cable that you’re using) to connect your computer’s Ethernet port to the Base Station’s LAN port.
To make sure that your computer can recognize the AirPort Base Station in order to upgrade its firmware, execute the following steps:
1.Open the Control Panels menu by clicking the Apple menu icon (Ú) in the upper-left corner of your screen and then selecting Control Panels.
2.Choose TCP/IP to display the TCP/IP control panel.
3.Choose Ethernet from the Connect Via pop-up menu and then choose Using DHCP Server from the Configure pop-up menu.
These settings will cause your computer to request an Internet Protocol (IP) address from the AirPort Base Station that will enable your computer and the Base Station to communicate.
Chapter 8: Setting Up a Wireless Mac Network 147
4.Close the control panel; if prompted to save changes, click the Save button.
5.To check whether TCP/IP is properly configured, repeat Steps 1 and 2.
The IP address should now be listed as 10.0.1.2 with subnet mask 255.255.255.0 and router address 10.0.1.1. If you don’t see these numbers, check that the AirPort Base Station is turned on and that the Ethernet cable is plugged in securely on both ends. Then go through these steps again.
To upgrade the firmware of a new AirPort Base Station that you’re setting up for the first time, follow these steps:
1.Double-click the desktop icon for the hard disk on which you installed the AirPort software.
The AirPort folder is located in the Apple Extras folder, which can be found in the Applications folder.
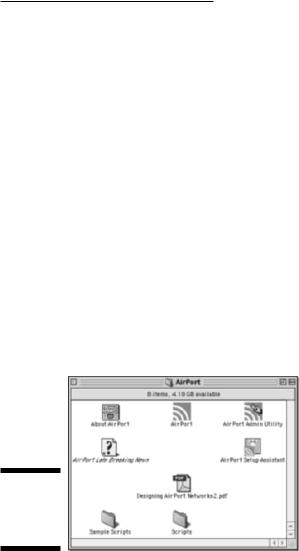
2.When the hard disk’s folder opens, open the Applications (Mac OS 9) folder, the Apple Extras folder, and the AirPort folder, in that order.
The open AirPort folder is shown in Figure 8-2.
Figure 8-2:
The AirPort
2.0.4AirPort folder.
3.Double-click the AirPort Admin Utility icon to display the Select Base Station window, as shown in Figure 8-3.
You should see Base Station in the Name list. This is the factory-sup- plied name for your AirPort Base Station. It should have the IP address 10.0.1.1.
4.Click Base Station to highlight it and then click the Configure button.
A message pops up requesting a password.

148 Part III: Installing a Wireless Network
Figure 8-3:
The AirPort
2.0.4Select Base
Station window.
5.Enter public as the password and then click OK.
If the firmware installed in the Base Station is older than the firmware that was supplied with your updated software, you see a message prompting you that a newer version of the Base Station software is available.
•In this message window, click the Upload button to install the newer software.
•If a message pops up stating that uploading the software will cause the wireless network to be disconnected, click OK.
The new firmware is copied to the Base Station, and a message box displays showing progress.
6.When the Select Base Station window returns, close it (click the X in the upper-right corner).
7.Disconnect the Ethernet cable between your computer and the Base Station.
Configuring the AirPort Base
Station on OS 9
After you’re sure that your AirPort Base Station has the most current firmware, the easiest way to set it up for use in your wireless home network is to use the AirPort Setup Assistant. The AirPort Setup Assistant reads the Internet settings from your computer and transfers them to the Base Station so that you can access the Internet over your wireless network. To use the AirPort Setup Assistant, follow these steps:
Chapter 8: Setting Up a Wireless Mac Network 149
1.Before running the AirPort Setup Assistant, set up your computer to connect to the Internet by dialup modem or by broadband (cable or DSL) modem.
Your ISP will provide instructions for getting connected.
•If you connect to the Internet by dialup modem: Connect the telephone line to the phone line port on the Base Station.
•If you connect to the Internet by DSL or cable modem: Use an Ethernet cable to connect the modem to the Base Station’s WAN port.
2.Double-click the desktop icon for the hard disk on which you installed the AirPort software.
3.When the hard disk’s folder opens, open the Applications (Mac OS 9) folder, the Apple Extras folder, and the AirPort folder, in that order.
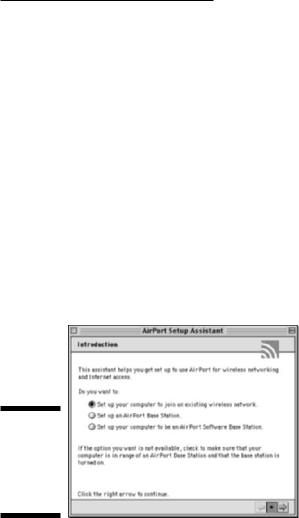
4.In the AirPort folder, double-click the AirPort Setup Assistant icon to display the AirPort Setup Assistant pane, shown in Figure 8-4.
Figure 8-4:
The OS 9
AirPort
Setup
Assistant
window.
5.Select the Set Up an AirPort Base Station radio button and then click the right arrow in the lower-right corner of the window to display the Internet Choice panel.
The Internet Choice panel asks whether your computer is set up to access the Internet.
6.To copy the Internet settings — such as the logon ID and password to connect to a dialup ISP or to a DSL account — from your computer to the Base Station, click Yes.
150 Part III: Installing a Wireless Network
The Setup Assistant displays the PPPoE panel. Most DSL service providers use Point-to-Point Protocol over Ethernet (PPPoE).
•If your service provider uses PPPoE: Click the Yes button.
•If your DSL provider doesn’t use PPPoE, or if you connect to the Internet via a dialup connection or by cable modem: Click the No button.
If your computer is in range of only your one wireless network, the Setup Assistant will automatically configure your AirPort Card to select that network. However, if you happen to be in range of more than one wireless network, you’ll be asked to select your network from a list. Your network will have the name assigned at the factory, similar to Apple Network xxxxxx where xxxxxx is a hexadecimal number assigned by
the software.
7.Click the right arrow at the lower-right corner of the window to display the Internet Access panel.
8.In the Internet Access panel, select the Internet settings to use to configure your Base Station.
•In most cases, you should use the default setting that permits the Base Station to assign an IP address to each computer on the wireless network through its DHCP server’s software. Just leave the setting as it is.
•If your service has assigned a specific IP address to your system, click the Details button and enter the settings manually in the panel that pops up as directed by your ISP.
9.Click the right arrow at the lower-right corner of the window to display Network Name and Password panel.
10.In the Network Name and Password panel, enter the name and password that you want to use for your wireless network.
11.Click the right arrow to display the Base Station Password panel.
The Base Station Password panel gives you the options to use the network password as your Base Station password or to assign a different password for changing the settings on your Base Station.
•If you’re the only person who will be entering the password:
Using the same password both places is probably easiest.
•If you plan to share the network password with other users:
Assign a different password to the Base Station so that only you can change the Base Station’s settings.
12.Click the right arrow to display the Conclusion panel.
The Conclusion panel informs you that the Setup Assistant is ready to set up your Base Station.

Chapter 8: Setting Up a Wireless Mac Network 151
13.Click the Go Ahead button to proceed.
After the AirPort Setup Assistant downloads the new settings to the Base Station, it displays a message that it’s waiting for the Base Station to restart. As soon as the Base Station restarts, it displays a panel announcing that it’s finished and that it’s ready to connect to the Internet.
14.Click the Connect Now button.
The Setup Assistant closes itself, launches Internet Explorer, and connects to the browser’s default home page. You’re in!
Adding a computer to your
AirPort network on OS 9
When you set up your AirPort Base Station by following the directions in the “Configuring the AirPort Base Station on OS 9” section of this chapter, you also set up the AirPort Card in the computer that you used to configure the Base Station. However, you still need to configure the AirPort Cards in the other Mac computers in your house. Follow these steps:
1.Double-click the desktop icon for the hard disk on which you installed the AirPort software.
2.When the hard disk’s folder opens, open the Applications (Mac OS 9) folder, the Apple Extras folder, and the AirPort folder, in that order.
3.In the AirPort folder, double-click the AirPort Setup Assistant icon to display the AirPort Setup Assistant window (refer to Figure 8-4).
4.Select the Set Up Your Computer to Join an Existing Wireless Network radio button and then click the right arrow in the lower-right corner of the window to display the Select an AirPort Network panel.
If your AirPort Base Station is the only wireless network within range, its network name will be displayed to the right of the AirPort Networks Available heading.
If you live close enough to a neighbor who also has a wireless network, you might see the network name of your neighbor’s network.
a.To replace your neighbor’s network name with your own, click the double arrow to the right of the network name and then select your network name from the pop-up list that appears.
b.Click the right arrow in the lower-right corner of the window to go to the next panel.