

190 Part III: Installing a Wireless Network
systems called Virtual Private Networks (VPNs), which encrypt all data leaving the PC (not just wireless data) with very strong encryption. You might even have a VPN system on that work laptop that you bring home with you every night. VPN is great, and as long as your router supports VPN tunneling, you should be able to connect to the office network from your home LAN using your VPN client. But VPN technology is not anywhere close to being cheap, simple, and user-friendly enough to be something that we’d ever recommend that you install in your house to secure your wireless LAN.
Clamping Down on Your Wireless Home Network’s Security
Well, enough of the theory and background. Time to get down to business. In this section, we discuss some of the key steps that you should take to secure your wireless network from intruders. None of these steps are difficult, will drive you crazy, or make your network hard to use. All that’s really required is the motivation to spend a few extra minutes (after you’ve got everything up and working) battening down the hatches and getting ready for sea. (Can you tell that Pat used to be in the Navy?)
The key steps in securing your wireless network, as we see them, are the following:
1.Change all the default values on your network.
2.Enable WEP.
3.Close your network to outsiders (if your access point supports this).
Hundreds of different access points and network adapters are available on the market. Each has its own unique configuration software. (At least each vendor does; and often, different models from the same vendor have different configuration systems.) You need to RTFM (Read the Fine Manual!). We’re going to give you some generic advice on what to do here, but you really, really, really need to pick up the manual and read it before you do this to your network. Every vendor has slightly different terminology and different ways of doing things. If you mess up, you might temporarily lose wireless access to your access point. (You should still be able to plug a computer in with an Ethernet cable to gain access to the configuration system.) You might even have to reset your access point and start over from scratch. So follow the vendor’s directions (as painful at that may be — there’s a reason why people buy For Dummies books). We tell you the main steps that you need to take to secure your network; your manual will give you the exact line-by-line directions on how to implement these steps on your equipment.

Chapter 10: Securing Your Wireless Home Network 191
WEP key length: Do the math
If you’re being picky, you might notice that WEP keys aren’t really as long as their names say that they are. The first 24 bits of the key are actually something called an initialization vector, and the remaining bits comprise the key itself. Therefore, 128-bit keys are really only 104 bits long, and 64-bit keys are really only 40 bits long. So when you enter a 128-bit key (and you do the
math), you’ll see that there are only 26 alphanumeric characters (or digits) for you to enter in the key (4 bits per digit × 26 = 104 bits). This isn’t something that you really need to know because everyone adds the 24 initialization vector bits to the WEP key length number, but just in case you were curious. . . .
Most access points also have some wired connections available — Ethernet ports that you can use to connect your computer to the access point. You can almost always use this wired connection to run the access point configuration software. When you’re setting up security, we recommend making a wired connection and doing all your access point configuration in this manner. That way, you can avoid accidentally blocking yourself from the access point when your settings begin to take effect.
Getting rid of the defaults
It’s incredibly common to go to a Web site like Netstumbler.com, look at the results of someone’s Wi-Fi reconnoitering trip around their neighborhood, and see dozens of access points with the same exact Service Set Identifier (SSID, or network name; see Chapter 2). And it’s usually Linksys because Linksys is the most popular vendor out there. Many folks bring home an access point, plug it in, turn it on, and then do nothing. They leave everything as it was set up from the factory. They don’t change any of the default settings.
Well, if you want people to be able to find your access point, there’s
nothing better (short of a sign on the front door; check out our discussion of warchalking — the practice of leaving marks on sidewalks to point out open APs — in Chapter 16) than leaving your default SSID broadcasting out there for the world to see. In some cities, you could probably drive all the way across town with a laptop set to Linksys as an SSID and stay connected the entire time. (We don’t mean to just pick on Linksys here. You could probably do the same thing with an SSID set to default, D-Link’s default, or any of the top vendor’s default settings.)

192 Part III: Installing a Wireless Network
When you begin your security crusade, the first thing that you should do is to change all the defaults on your access point. At a minimum, you should change the following:
Your default SSID
Your default administrative password
You want to change this password because if you don’t, someone who gains access to your network can guess at your password and end up changing all the settings in your access point without you knowing. Heck, if they wanted to teach you a security lesson — the tough love approach, we guess — they could even block you out of the network until you reset the access point.
These default passwords are well known and well publicized. Just look on the Web page of your vendor, and we bet that you’ll find a copy of the user’s guide for your access point available for download. Anyone who wants to know them does know them.
When you change the default SSID on your access point to one of your own making, you’ll also need to change the SSID setting of any computers (or other devices) that you want to connect to your LAN. To do this, follow the steps that we discuss in this part’s earlier chapters.
This tip really falls under the category of Internet security (rather than airlink security), but here goes: Make sure that you turn off the Allow/Enable Remote Management function (it might not be called this exactly but something like that). This function is designed to allow people to connect to your access point over the Internet (if they know your IP address) and do any or all the configuration stuff from a distant location. If you need this turned on (perhaps you have a home office, and your IT gal wants to be able to configure your access point remotely), you’ll know it. Otherwise, it’s just a security flaw waiting to happen, particularly if you haven’t changed your default password. Luckily, most access points have this set to Off by default, but take the time to make sure that
yours does.
Enabling WEP
After you eliminate the security threats caused by leaving all the defaults in place (see the preceding section), it’s time to get some encryption going. Get your WEP on, as the kids say.
We’ve already warned you once, but we’ll do it again, just for kicks: Every access point has its own system for setting up WEP, and you need to follow those directions. We can only give generic advice because we have no idea which access point you’re using.
Chapter 10: Securing Your Wireless Home Network 193
To enable WEP on your wireless network, we suggest that you perform the following generic steps:
1.Open your access point’s configuration screen.
2.Go to the Wireless, Security, or Encryption tab or section.
We’re being purposely vague here; bear with us.
3.Select the radio button or check box labeled Enable WEP or Enable Encryption or Configure WEP.
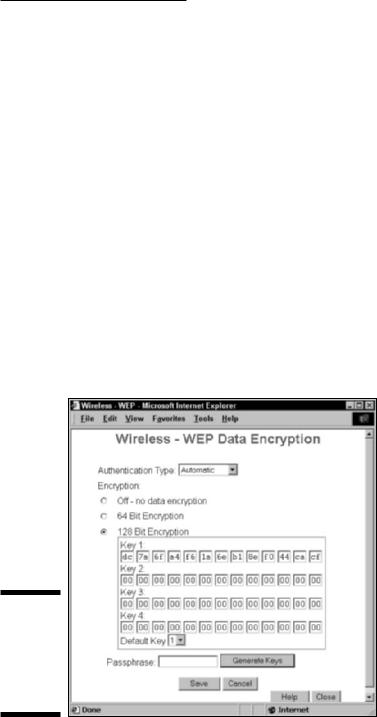
You should see a menu similar to the one shown in Figure 10-1. (This is for a Siemens SpeedStream access point/router.)
4.Select the check box or the pull-down menu to the appropriate WEP key length for your network.
We recommend 128-bit keys if all the gear on your network can support it. (See the earlier section, “How about a bit more about WEP?,” for the lowdown on WEP keys.)
5.Create your own key if you prefer (we prefer to let the program create one for us):
a.Type a pass phrase into the Passphrase text box.
b.Click the Generate Keys button.
Figure 10-1:
Setting up
WEP on
aSpeedStream access point.

194 Part III: Installing a Wireless Network
Remember the pass phrase. Write it down somewhere, and put it some place where you won’t accidentally throw it away or forget where you put it. Danny likes to tape his pass phrase note to the box that his Wi-Fi gear came in so he’ll always be able to track it down.
Whether you created your own key or let the program do it for you, a key should now have magically appeared in the key text box. Note: Some systems allow you to set more than one key (usually up to four keys), such as the system in Figure 10-1. In this case, use Key 1 and set this as your default key by using the pull-down menu.
Remember this key! Write it down. You’ll need it again when you configure your computers to connect to this access point.
Some access point’s configuration software won’t necessarily show you the WEP key that you’ve generated — just the pass phrase that you’ve used to generate it. You’ll need to dig around in the manual and menus to find a command to display the WEP key itself. (For example, Apple’s AirPort software shows just the pass phrase; you need to find the Network Equivalent Password in the Airport Admin Utility to display the WEP key — in OS X, this is in the Base Station Menu.)
The built-in wireless LAN client software on Windows XP numbers its four keys from 0–3 instead of 1–4. So if you’re using Key 1 on your access point, select Key 0 in Windows XP.
6.Click OK to close the WEP configuration window.
You’re done turning on WEP. Congratulations.
Can we repeat ourselves again? Will you indulge us? The preceding steps are very generic. Yours might vary slightly (or in rare cases, significantly). Read your user’s guide. It will tell you what to do.
Some access points will make you go through the extra step of requiring all users to use WEP to connect to the access point. Look for a check box or pull-down menu on your configuration screen with this option. If you don’t do this, computers without your network’s WEP key might still be able to connect to your access point.
After you configure WEP on the access point, you must go to each computer on your network, get into the network adapter’s client software (as we describe in Chapters 7 and 8), turn on WEP, and enter either the pass phrase or the WEP key. Typically you’ll find an Enable Security dialog box containing a check box to turn on security and one to four text boxes for entering the key. Simply select the check box to enable WEP, enter your key in the appropriate text box, and then click OK. Figure 10-2 shows this dialog box for a Proxim ORiNOCO PC Card network adapter; the dialog box that you see is likely to be similar.