


126 Part III: Installing a Wireless Network
The general guidelines for installing a USB wireless NIC are as follows:
1.Insert the CD that accompanied the USB adapter into the CD-ROM drive.
If the CD’s AutoRun feature doesn’t cause the setup program to start, use the Run command from the Start button (in Windows) or open Windows Explorer to run the Setup.exe program on the CD.
2.Install the wireless station (client) software.
During the installation of the wireless station software, you might be asked to indicate whether you want the USB wireless adapter to be set to infrastructure (access point) mode or to ad hoc (peer-to-peer) mode. Choose infrastructure mode to cause the wireless network adapter to use the AP to communicate with other network devices. You might also be asked for the SSID (network name) and to indicate whether you will use WEP encryption.
3.After the wireless station software is installed, restart the computer.
4.After the computer restarts, attach the USB adapter to one of the computer’s USB ports by running a USB cable from the network adapter to the USB port.
Windows should recognize that you have installed new hardware and will automatically search the hard disk for the driver. When Windows finds the driver, it will enable the driver for the adapter. That’s it — you’re all finished.
Modifying Wireless Network Adapters
Some occasions might warrant modifying one or more of the adapters’ parameters. For example, you might need to change the adapter’s WEP key or SSID to match changes that you have made to the AP. The wireless network adapter’s manufacturer has provided utility software for this purpose. For example, Figure 7-3 shows the ORiNOCO (www.proxim.com) Client Manager program that you can use to select a different wireless network SSID or to change the WEP key. (For more about SSIDs and WEP keys, see the step lists in the first section of this chapter.)
Figure 7-3:
The
ORiNOCO
Client
Manager.

Chapter 7: Setting Up Your Windows PCs for Wireless Networking 127
If you use Windows XP, however, you can use the operating system’s utilities to change settings in your wireless network interface adapter. Windows XP is the first Windows OS that has support for wireless networking built in. We talk about this built-in support in the later section “Windows XP’s Wireless Zero Configuration.”
Synchronizing and Internet Access
To get your Pocket PC to synchronize with your PC through the wireless adapter — and to enable wireless access to the Internet — follow these general steps:
1.On the Pocket PC, choose Start Settings Connections Network
Adapters. Then select the wireless network adapter from the list of installed adapters on the Network Adapters screen and click Properties.
A screen similar to what’s shown in Figure 7-4 appears. Click the
IP Address tab. Marking the default setting (the Use Server-Assigned IP Address radio button) is easiest. The DHCP server on your network that assigns the IP addresses for all the other devices on the network will also assign the IP address for your Pocket PC.
Figure 7-4:
Assigning an IP address for your Pocket PC.
2. Determine the IP address of the PC with which the Pocket PC will synchronize.
•If your PC runs Windows 95/98/SE/Me, choose Start Run, type winipcfg, and then click OK to display the IP Configuration window. Select the PC’s network adapter from the drop-down list. Copy down the IP address for the PC’s network adapter and then close the IP Configuration window.
128 Part III: Installing a Wireless Network
•If your PC runs Windows 2000/XP, choose Start (All) Programs Accessories Command Prompt. In the command prompt window that appears, type ipconfig, and then press Enter. Copy the IP address for the PC’s network adapter and then close the command prompt window.
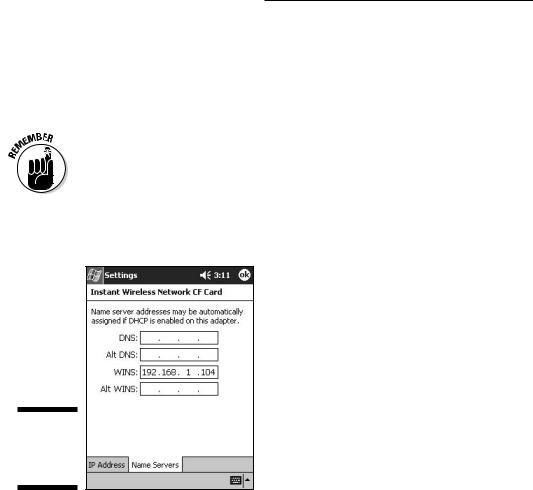
3.On the Pocket PC, go to the Name Servers tab of the wireless network
adapter’s Properties screen.
You accessed the Properties screen in Step 1; it should still be visible on the Pocket PC.
4.In the WINS text box, enter the PC’s IP address that you copied in Step 4.
Figure 7-5 shows the Name Servers tab with WINS address filled in.
Figure 7-5:
Supplying
a WINS
address.
You should now be able to wirelessly synchronize the Pocket PC with the PC. And if your wireless network is connected to the Internet, you should be able to wirelessly access the Internet on your Pocket PC. To check for the functionality of these two features, proceed to Steps 5 and 6.
5.While the Pocket PC is not in its cradle, choose Start ActiveSync and then click the Sync button (on the ActiveSync screen that appears).
You should see the ActiveSync pop-up window on the PC and a message on the Pocket PC telling you that the two computers are synchronizing.
6Launch Internet Explorer and browse the Internet to find out whether you have wireless access to the Internet.