


76 Part II: Making Plans
The RF doughnut
The shape of the radio signal that will be transmitted to the rooms in your home is determined by the type of antenna that you’ve attached to the AP. The standard antenna on any AP is an omnidirectional antenna, which broadcasts its signal in a spherical shape. The signal pattern that radiates from a typical omnidirectional dipole antenna is shaped like a fat doughnut with a tiny hole in the middle. The hole is directly above and below the antenna.
The signal goes from the antenna to the floor above and the floor below, as well as to the floor on which the AP is located. If your house has multiple floors, try the second floor first. Most AP manufacturers claim a range of 100 feet indoors (at 11 Mbps for IEEE 802.11b or at 54 Mbps for IEEE 802.11a and IEEE 802.11g). To be conservative, assume a range of 60 feet laterally and one floor above or below the AP. Keep in mind that the signal at the edges of the “doughnut” and on the floors below or above the AP will be weaker than the signal nearer the center and on the same floor as the AP.
Because of this signal pattern, you should try to place the AP as close to the very center of your house as is practically possible. Use a drawing of your house plan to locate the center of the house. This spot will be your first trial AP location.
Draw a circle with a 60-foot radius on your house plan, using the trial AP location as the center of the circle. If your entire house falls inside the circle, one AP will probably do the job. Conversely, if some portion of the house is outside the circle, coverage might be weaker in that area. You’ll need to experiment to determine whether you get an adequate signal there.
If you determine that one AP will not cover your house, you need to decide how best to place two APs (or even three, as necessary). The design of your house will determine the best placement. For a one-level design, start at one end of the house and determine the best location for a 60-foot radius circle that will cover all the way to the walls. The center of this circle is the location of the first AP. Then move toward the other end of the house, drawing 60-foot radius circles until the house is covered. The center of each circle will be a trial location of an AP. If possible, don’t leave any area in the house uncovered. And especially don’t forget your garage; before long, you’ll be synchronizing your wireless network with your car, including sending digital movies and MP3 files. (See Chapter 14 for more about connecting to your car.)
You might want to consider reading Chapter 18 on troubleshooting before you finish your planning. There are some good tips in that chapter about setting up and tweaking your network.
Adding printers
In addition to your computer(s), you might also want to connect your printer(s) to the network. Next to sharing an Internet connection, printer sharing is perhaps the biggest cost-savings reason for building a network of
Chapter 4: Planning a Wireless Home Network 77
home computers. Rather than buying a printer for every PC, everyone in the house can share one printer. Or maybe you have one color ink jet printer and one black-and-white laser printer. If both printers are connected to the network, all computers on the network can potentially print to either printer. Or perhaps you just want to sit by the pool with your wireless laptop and still be able to print to the printer up in your bedroom; it’s easy with a networkattached printer.
You can also share other peripherals, such as network-aware scanners and fax machines. Leading manufacturers of digital imaging equipment (like Hewlett-Packard) offer feature-rich, multiple-function peripherals that combine an ink jet or laser printer with a scanner, copier, telephone, answering machine, and fax machine all-in-one device. If you want to share such a device over your network, make sure that you buy one that comes with network server software.
Here are two ways to share printers over a wired or wireless network:
Connect to a computer: The easiest and cheapest way to connect a printer to the network is to connect a printer to one of the computers on the network. Windows enables you to share any printer connected to any Windows computer on the network. (For more on this, read Chapter 11.) The computer to which the printer is connected has to be running for any other computers on the network to use the printer. Similarly, if you’re using Apple computers, any computer connected to the network can print to a printer that’s connected to one of the computers on the network.
Print server: Another way to add a printer is through a print server. Several hardware manufacturers produce print server devices that enable you to connect one or more printers directly to the network. Some of these devices connect via a network cable, and others are wireless. Many high-end printers even have print server options that install inside the printer cabinet. For home use, standalone network print servers are a bit pricey. Surprisingly, some manufacturers bundle a print server with their cable/DSL router at little or no additional cost. If you shop around, you can probably find a wireless AP, cable/DSL router, and print server bundled in one device for less than the cost of some standalone print servers.
You should be able to get your home network printer connections for free. Obviously, it won’t cost anything to connect a printer to a computer that’s already connected to the network. Several manufacturers also include a print server for free with other network devices. If you don’t need one of those devices, just connect the printer that you want to share to one of the computers on your home network.
78 Part II: Making Plans
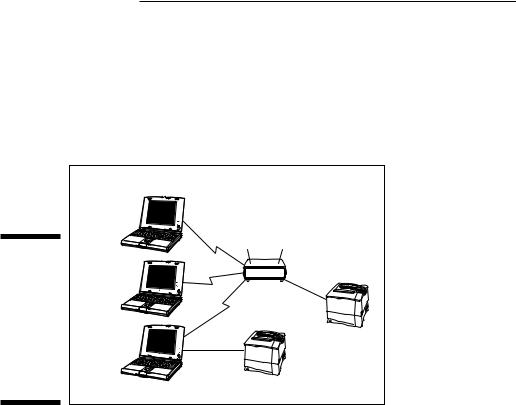
Figure 4-3 depicts a home network with one printer connected to one of the PCs on the network and another printer connected to a wireless Internet gateway, which is a device that bundles a wireless AP and a cable/DSL router into a single unit. In this case, the wireless Internet gateway also has a connection for a printer and acts as a print server. Read through Chapters 1 and 5 for more information about these devices, what they do, and how to choose between them.
|
Wireless |
|
|
Internet |
|
|
gateway |
|
|
& printer |
|
Figure 4-3: |
server |
|
|
||
A wireless |
Wireless |
|
home |
||
PCs |
||
network |
||
|
||
with |
|
|
wireless |
Printer |
|
Internet |
||
|
||
gateway |
|
|
and bundled |
Printer |
|
print server. |
Connecting your printer to the wireless Internet gateway device is advantageous because a print server permits the printer to stand alone on the network, untethered from any specific computer. When you want to print to a printer that’s connected directly to a computer on the network, that computer must be present and turned on; and, in many cases, you must have a user account and appropriate permission to access the shared printer. A print server makes its printers always available to any computer on the network — even from poolside.
Adding entertainment and more
When you’re planning your wireless network, don’t forget to plan to add a few gadgets for fun and relaxation. The wildly popular video-game consoles from Sony, Microsoft, and Nintendo all offer network connectivity and Internet connectively as well. Don’t forget to consult with the gamers in your household when planning where you will need network coverage in your home. And don’t forget to take a look at Chapter 12 for the skinny about connecting your favorite console to your wireless network, as well as info on network-based, multi-user PC gaming.