

C#
ADD COMPONENTS FROM THE TOOLBOX
After you create a new Visual C# program in the MDE window, you can add functionality to the skeleton of your program in two ways: programmatically or by
using the Toolbox. The Toolbox contains a variety of components so you can add them to your program and modify them.
Toolbox components can include design-time controls, HTML code fragments, text files, and .NET components. The Toolbox places these components into different groups. For example, Web form components appear in the Web Forms group.
The type of C# program you create determines the components the Toolbox displays. For example, if you create a Windows application that has a form, then the
Toolbox will display the Windows Forms component group that contains all the form components, such as a check box and a button.
The Toolbox always contains two groups: General and Clipboard Ring. The General group contains components that apply to any object. You can cut or copy components to the Clipboard Ring and then paste those components from the Clipboard Ring to another object such as a button from one form to another.
You can open a new group in the Toolbox and copy objects from a program into that group or from another group. You can also add components from Visual Studio .NET or another location on your computer or network.
ADD COMPONENTS FROM THE TOOLBOX
 Toolbox
Form1
Type Here
Form1.cs |
Form1.cs |
|
|
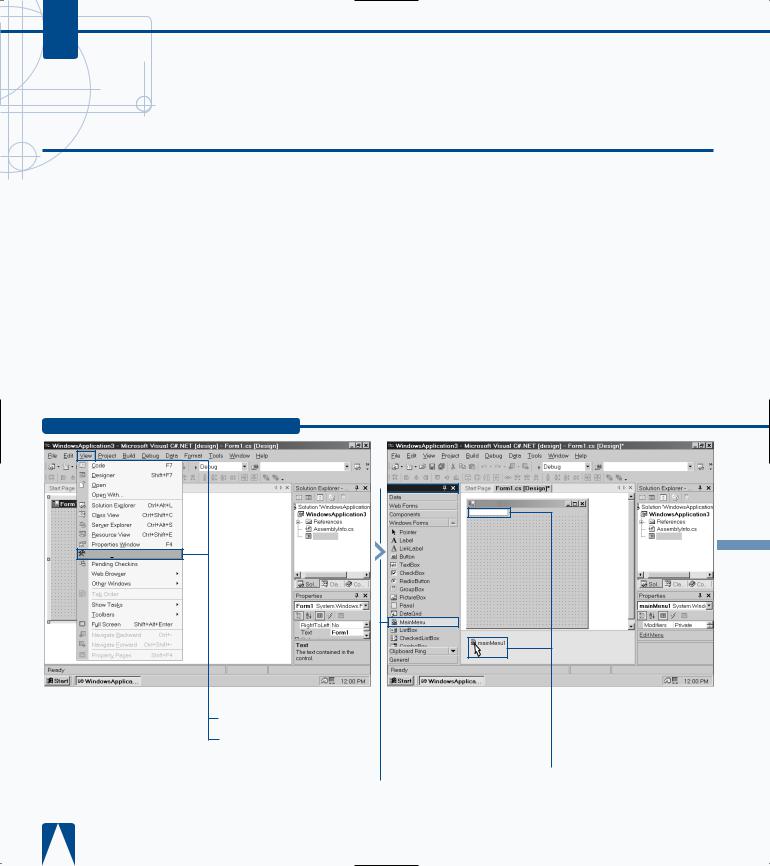
■ The Toolbox window |
|
ˇ Move the cursor over the |
|||
|
|
|
|||||
. |
appears displaying the |
upper-left corner of the form |
|||||
Windows Forms |
and click. |
||||||
|
|||||||
|
component list. |
|
|
■ The MainMenu |
|||
|
|
|
› Click to select the |
|
|||
|
|
|
component appears at the top |
||||
|
|
|
|||||
|
MainMenu form component. |
of the form. |
|||||

EXPLORING THE C# INTERFACE 2
You can delete any component from the Toolbox by right-clicking the component and then clicking Delete in the pop-up menu that appears. The only component you cannot delete is the Pointer component in the General group.
You can quickly cut, copy, and paste Toolbox objects by pressing the following keyboard combinations: Ctrl+X to cut, Ctrl+C to copy, and Ctrl+V to paste. When you access the Clipboard Ring, you can press Ctrl+Shift+V to move to the next item in the clipboard until you arrive at the object you want to cut, copy, or paste.
You can display all group tabs in the Toolbox window by right-clicking anywhere in the Toolbox window and selecting Show All Tabs from the popup menu that appears.
If you want to view only the object icons and not their descriptions, right-click anywhere in the Toolbox window and then select List View in the pop-up menu. Return to the list view by rightclicking in the Toolbox window and then selecting the List View option in the pop-up menu.
You can also rearrange group tabs in the Toolbox window and objects within a group by clicking and dragging the group tab or object to a new location in the window.
 Toolbox
Form1.cs
Customize Toolbox. . .
|
Á Right-click the |
|
‡ Click to select Customize |
|
|
||
Toolbox window. |
Toolbox from the pop-up |
||
|
|
menu that appears. |
|
:-)VideoSoft FlexArray Control
■ The Customize Toolbox window appears.
° Add a COM component to the Windows Forms component list by clicking the check box beside VideoSoft FlexArray Control.
· Click OK.
■ The vsFlexArrayCtrl COM control appears at the bottom of the Windows Forms list.
23

C#
ADD A TASK TO THE TASK LIST
During program construction, you probably write down errors and tasks on a piece of paper or on sticky notes. The Task List in the MDE eliminates the
need for paper notes by letting you enter tasks that you need to complete within the MDE for easy reference.
If Visual Studio .NET encounters an error in a program, it automatically adds the problem to the task list for your information. If you want to add any other tasks to your list, you can log the task by identifying the task to complete, what program the task applies to, and the line you must apply the task to, if any.
You can also identify which tasks have been completed or not, and what priority each task will take. The Task List window presents the tasks in table form for easy viewing. After you populate your task list, you can sort it by different criteria. For example, you can sort the list so the highpriority tasks appear at the top of the Task List window.
You can also view certain tasks that you may be concentrating on. For example, if you have finished your program and you need only to add comments, you can have the Task View window display only the comment tasks.
ADD A TASK TO THE TASK LIST
Form1.cs |
Form1.cs |
Task List
|
|
|
|
|
|
|
|
|
|
|
|
|
|
|
|
|
|
|
|
|
View Show |
■ The Task List window |
|
||||
All. |
appears at the bottom of the |
|
||||
|
parent window. |
|
||||
|
|
‹ Click the first line in the |
|
|||
|
|
|
||||
|
task list table. |
|||||
|
■ The first task highlights and |
|||||
|
the blinking cursor appears in |
|||||
|
the description field. |
|||||
› Type the task description in the Description column field and then press Enter.
ˇ Set the priority for the task by clicking the exclamation box beside the new task entry.

EXPLORING THE C# INTERFACE 2
When you have a large number of tasks, the Task List window lets you show tasks of a certain type so you can see only the tasks you want. You can show tasks by right-clicking a task and then clicking Show Tasks from the pop-up menu that appears. The default selection is All (that shows all tasks), but you can also view comment tasks, tasks that report build errors, user-inspired tasks, shortcut tasks, tasks in the current file, checked tasks (that is, completed), and unchecked tasks.
If you have used any word-processing program recently, you know about the benefit of having red squiggly underlines that appear under misspelled words so you can correct the misspellings quickly. Visual Studio .NET uses the same approach for code errors so you can fix those errors quickly; Microsoft calls this feature IntelliSense.
If you make a coding mistake, such as adding a matching brace, then the MDE window
automatically adds the error to the Task List with a red squiggly icon next to it that identifies that there is a coding problem to fix.
Task List - 1 task
High
Á Click to select the task priority (low, normal, or high) from the drop-down menu.
Form1.cs |
Form1.cs |
Task List - 1 task
Create form
|
|
|
|
|
‡ To mark the task as |
■ A strikethrough line |
|
|
|||
completed, click the check |
appears through the task |
||
box beside the task. |
description that denotes that |
||
|
|
|
the task has been completed. |
25