

- •maranGraphics
- •CREDITS
- •ACKNOWLEDGMENTS
- •ABOUT THE AUTHORS
- •AUTHORS’ ACKNOWLEDGMENTS
- •TABLE OF CONTENTS
- •HOW TO USE THIS BOOK
- •INTRODUCTION TO C#
- •START VISUAL STUDIO .NET
- •OPEN A NEW C# PROJECT
- •OPEN A C# WEB PROJECT
- •SET JSCRIPT .NET AS THE DEFAULT SCRIPT LANGUAGE
- •EXPLORE THE CLASS VIEW WINDOW
- •VIEW THE CONTENTS WINDOW
- •GET HELP USING THE INDEX WINDOW
- •SEARCH FOR HELP
- •ADD COMPONENTS FROM THE TOOLBOX
- •ADD A TASK TO THE TASK LIST
- •CHANGE FORM PROPERTIES IN THE PROPERTIES WINDOW
- •ADD A CUSTOM TOOLBAR
- •DELETE A TOOLBAR
- •CHANGE THE VISUAL STUDIO ENVIRONMENT
- •MANAGE OPEN WINDOWS
- •OPEN A PROJECT
- •VIEW THE MAIN METHOD
- •COMBINE PROGRAM TYPES
- •ADD REFERENCE TYPES
- •ADD OPERATORS
- •INSERT ATTRIBUTES
- •ENTER CLASSES
- •ADD COMMENTS TO CODE
- •WRITE YOUR FIRST PROGRAM
- •ENTER XML DOCUMENTATION
- •ACCESS DOCUMENTATION
- •LOG A BUG REPORT
- •VIEW INFORMATION ABOUT C# BUILDING BLOCKS
- •PROGRAM CLASSES
- •ADD A CLASS
- •EMPLOY CLASS INHERITANCE
- •PROGRAM INSTANCE CONSTRUCTORS
- •INSERT DESTRUCTORS
- •PROGRAM STRUCTS
- •DISPLAY HEAP AND STACK INFORMATION
- •FIND TYPE INFORMATION
- •PROGRAM CONSTANT EXPRESSIONS
- •SPECIFY VALUE TYPES
- •PROGRAM NUMERIC TYPES
- •PROGRAM THE BOOLEAN TYPE
- •DECLARE REFERENCE TYPES
- •ENTER REFERENCE TYPE DECLARATIONS
- •CONVERT VALUE TYPES TO REFERENCE TYPES
- •PROGRAM POINTER TYPES
- •INSERT THE VOID TYPE
- •ADD INTERFACE PROPERTIES
- •ADD AN INTERFACE INDEX
- •VIEW INFORMATION ABOUT METHODS
- •ADD A METHOD
- •ADD STATIC METHODS
- •INCLUDE NON-STATIC METHODS
- •ENTER DELEGATES
- •PROGRAM EVENTS
- •ADD AN EVENT-HANDLING METHOD
- •VIEW INFORMATION ABOUT ARRAYS
- •ENTER SINGLE-DIMENSIONAL ARRAYS
- •ADD MULTIDIMENSIONAL ARRAYS
- •PROGRAM ARRAY-OF-ARRAYS
- •ITERATE THROUGH ARRAY ELEMENTS
- •SORT ARRAYS
- •SEARCH ARRAYS
- •IMPLEMENT A COLLECTIONS CLASS
- •PROGRAM STRUCTS
- •ADD AN INDEXER
- •INCLUDE ENUMERATIONS
- •CREATE STRING LITERALS AND VARIABLES
- •ASSIGN VALUES TO STRINGS
- •CONCATENATE STRINGS
- •COMPARE STRINGS
- •SEARCH FOR SUBSTRINGS
- •REPLACE CHARACTERS
- •EXTRACT SUBSTRINGS
- •CHANGE THE CHARACTER CASE
- •TRIM SPACES
- •REMOVE CHARACTERS
- •SPLIT A STRING
- •JOIN STRINGS
- •PAD STRINGS
- •VIEW INFORMATION ABOUT PROPERTIES
- •COMPARE PROPERTIES AND INDEXERS
- •PROGRAM PROPERTY ACCESSORS
- •DECLARE ABSTRACT PROPERTIES
- •INCLUDE PROPERTIES ON INTERFACES
- •VIEW INFORMATION ABOUT WINDOWS FORMS
- •ADD A WINDOWS FORM IN THE WINDOWS FORM DESIGNER
- •SET THE FORM TYPE
- •CHOOSE THE STARTUP WINDOWS FORM
- •CREATE A MODAL FORM
- •LAYOUT A FORM
- •SET A FORM LOCATION
- •CHANGE FORM PROPERTIES
- •CREATE A TRANSPARENT FORM
- •AN INTRODUCTION TO WEB FORMS AND CONTROLS
- •CREATE AN ASP.NET WEB SITE
- •CREATE A WEB FORM
- •ADD SERVER CONTROLS TO A WEB FORM
- •READ AND CHANGE PROPERTIES FROM OBJECTS ON A WEB FORM
- •USING SERVER-SIDE COMPONENTS ON WEB FORMS
- •INTRODUCING DATA ACCESS WITH ADO.NET
- •DISPLAY DATA WITH THE DATAGRID CONTROL
- •CONFIGURE THE DATAGRID CONTROL
- •INSERT DATA INTO A SQL DATABASE
- •UPDATE DATA FROM A SQL DATABASE
- •DELETE DATA FROM A SQL DATABASE
- •EXECUTE A STORED PROCEDURE IN A SQL DATABASE
- •READ XML FROM A FILE
- •SAVE XML TO A FILE
- •QUERY XML WITH XPATH
- •APPLY XSL TO XML
- •INTRODUCTION TO DISTRIBUTED APPLICATIONS
- •CREATE AN APPLICATION WITH PRIVATE ASSEMBLIES
- •CREATE AN APPLICATION WITH SHARED ASSEMBLIES
- •VERSION A SHARED ASSEMBLY
- •CONFIGURE A CLIENT FOR A VERSIONED ASSEMBLY
- •CREATE A WEB SERVICE
- •USING A WEB SERVICE
- •INTRODUCTION TO EXCEPTION HANDLING
- •THROWING AN EXCEPTION
- •HANDLING EXCEPTIONS WITH THE CATCH BLOCK
- •USING THE FINALLY BLOCK
- •WRITE ERRORS TO THE APPLICATION LOG
- •BASIC EXAMPLES
- •WHAT’S ON THE CD-ROM
- •USING THE E-VERSION OF THIS BOOK
- •INDEX
- •Symbols & Numbers
C#
CREATE AN APPLICATION WITH PRIVATE ASSEMBLIES
ou can share code within your application by putting it Yinto classes within private assemblies. Organizing your
code with assemblies promotes reuse of code within your application so that you do not have to write the same code in several places. To update code, change it in only one place.
When you create applications on the .NET platform, you need to choose between creating components in private or shared assemblies. Creating components in private assemblies provides the simplest deployment strategy, which consists of just copying your application files to the destination where the application is to run. You did not have the capability of Xcopy deployment with Windows development before .NET.
The classes inside your private assemblies can contain public members that your client applications can access. These members include public properties, methods, and events. With properties, you can use get and set (read and write) to control what access the client has (read, write, or read/write). The properties that you implement with get and sets use protected members of the class to store property states, thereby enabling you to validate before setting or getting a property. Also, if you remove either of the get or the set, you can make a Write-only or Read-only property respectively.
To create a private component, you first start with a Class Library project in the Visual C# Projects templates list. A Class Library Application template is similar to the Console Applications template, except that the class file is scoped as Public and contains a constructor.
CREATE AN ASSEMBLY
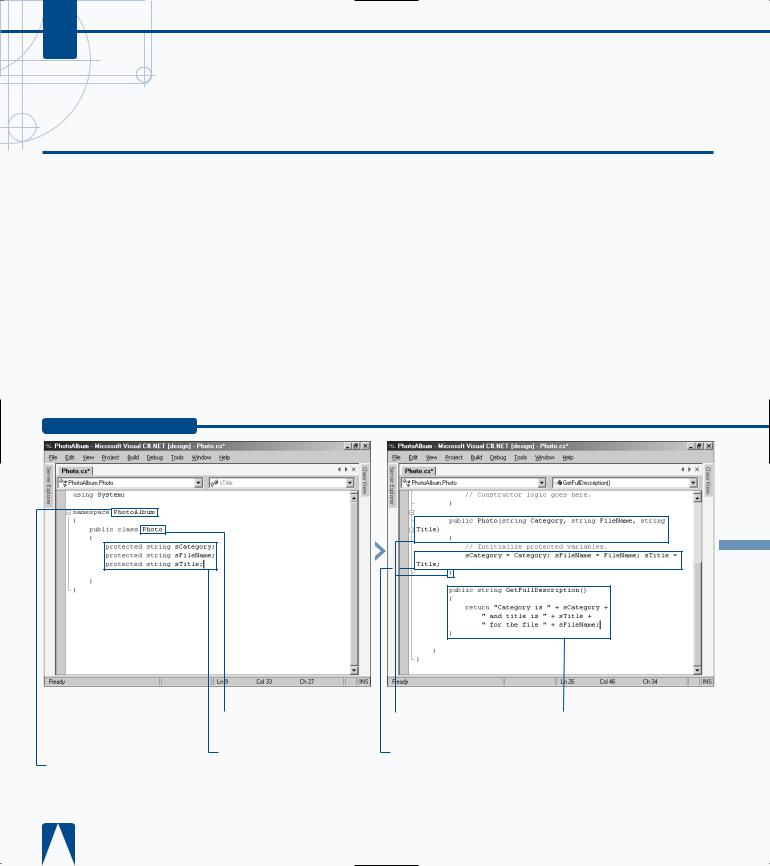
‹ Rename the class name to Photo.
› Declare protected string variables for the category, filename, and title of the file.
ˇ Save the file.
Á Add a public function Photo for constructor logic.
‡ Initialize the protected variables.
° Add a public function that returns the full description including the category, title, and filename formatted as a string.
CREATING AND DEPLOYING DISTRIBUTED APPLICATIONS 14
You can simplify your code by using public fields for properties on your objects. Although public fields do come at a cost, you do not have any control over read/write access of the property, and validation can not be done before the property is replaced.
Example:
using System;
namespace PhotoAlbum
{
public class Photo_ex{ public Photo(){
// Constructor logic goes here.
}
public string GetFullDescription() { return "Catergory is " + Category +
"and title is " + Title +
"for the file " + FileName;
}
public string Category; public string FileName; public string Title;
}}
|
|
|
|
|
|
|
|
|
|
|
|
|
|
|
|
|
|
|
|
|
|
|
|
|
|
|
|
|
|
|
|
|
|
|
|
|
|
|
|
|
|
|
|
|
|
|
|
|
|
|
|
|
|
|
|
|
|
|
|
|
|
|
|
|
|
|
|
|
|
|
|
|
|
|
|
|
|
|
|
|
|
|
|
|
|
|
|
|
|
|
|
|
|
|
|
|
|
|
|
|
|
|
|
|
|
|
|
|
|
|
|
|
|
|
|
|
||
|
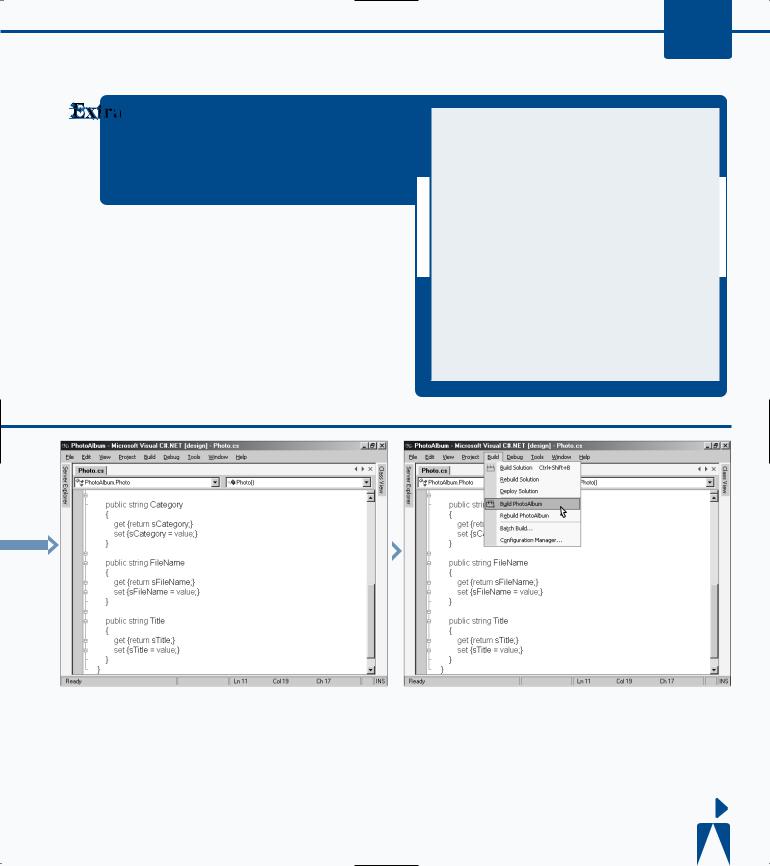
· Create a public |
— Repeat steps 10 and 11 |
|
± Click Build Build |
■ The server component is |
|||||||||||
|
|
|||||||||||||||
|
property for the Category. |
for the filename and title. |
PhotoAlbum. |
built. |
||||||||||||
|
‚ Create the get and set |
|
|
|
|
|
|
|
|
|
||||||
|
|
|
|
|
|
|
|
|
|
|||||||
|
functions for the property. |
|
|
|
|
|
|
|
|
|
||||||
|
|
|
|
|
|
|
|
|
|
|
|
|
|
|
|
|
|
|
|
|
|
|
|
|
|
|
|
|
|
|
|
CONTINUED |
|
|
|
|
|
|
|
|
|
|
|
|
|
|
|
|
|
|
255
C#
CREATE AN APPLICATION WITH PRIVATE ASSEMBLIES
ou can create applications rapidly by creating clients Yapplications that use your existing assemblies.
applications. Building applications with components has been proven effective in the development community. After creating your component, you can leverage that component in a client application.
In the case of private components, you need to include the component as part of the client application. Private Assemblies is not the same concept as components with COM, in the sense that the component is not shared with other applications. You will see, however, that sharing code across applications is possible (see page 260). The benefit you get from private assemblies that was also provided with
COM is having the ability to distribute the application into separate projects, enabling a team to work on separate parts of the application and later piece it together in a build of the application.
A private assembly can be used by any client application type: Console, Windows, or ASP.NET Web application. After you create the project, you set a reference to the component DLL, which has the assembly information built in. Next you reference the component’s namespace with the using statement. Then in code, you programmatically create an instance of the component and use its functionality.
CREATE A CLIENT
|
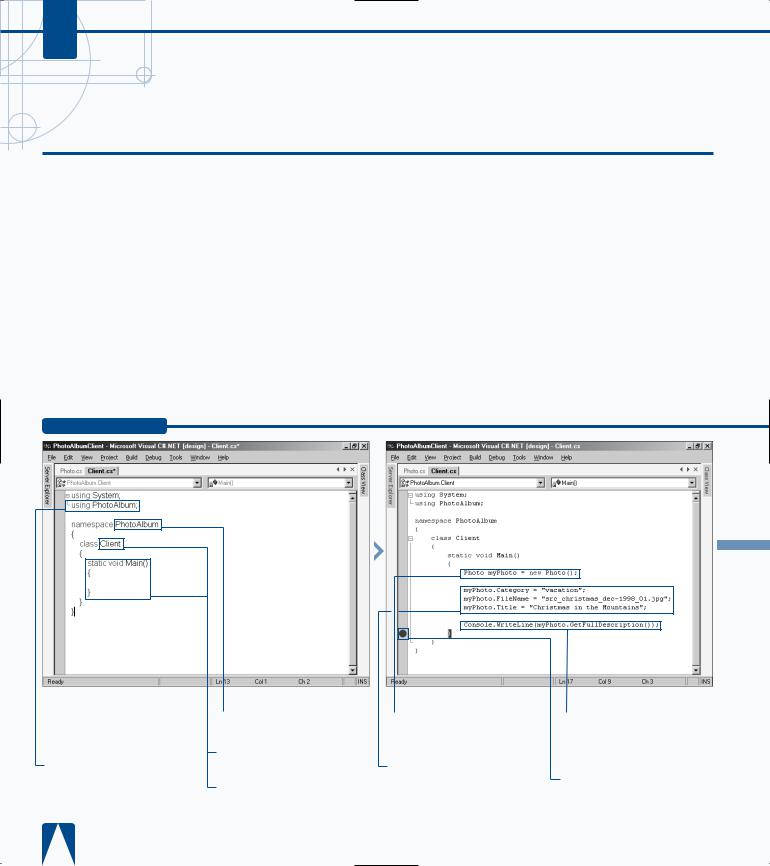
‹ Rename the namespace |
‡ Create a new variable of |
· Call the |
|
to PhotoAlbum. |
the type of object you want |
GetFullDescription |
|
› Rename the class to |
to create. |
method to output the photo’s |
|
° Set the category, filename, |
properties to the console. |
|
|
Client. |
||
|
‚ Set a debug stop. |
||
the |
ˇ Add the Main function. |
and title for the Photo. |
|
. |
Á Save the file. |
|
— Click Project Add |
|
|
||
|
|
Reference. |
|
|
|
|
CREATING AND DEPLOYING DISTRIBUTED APPLICATIONS 14
You can use collections to work with a group of the same classes. Collections are a common OOP approach to creating applications. The following code can be added to the project created in the numbered steps below to build a collection of photos. Add a new class to the project, call the class Photos.cs and then recompile.
Example:
namespace PhotoAlbum {
using System; using System.Collections; public class Photos : IEnumerable {
private ArrayList phtList; public Photos()
{phtList = new ArrayList(); } public void Add(Photo pht)
{phtList.Add(pht); }
public void Remove(int phtRemove)
{phtList.RemoveAt(phtRemove); } public int Count
{get{ return phtList.Count;} } public IEnumerator GetEnumerator()
{return phtList.GetEnumerator(); }
} }
PhotoAlbum.dll
■ The Add Reference dialog box appears.
± Click Browse.
¡ Click  to select the bin\Debug directory for the server component created.
|
|
|
|
|
|
|
|
|
|
|
|
|
|
|
|
|
|
|
|
|
|
|
|
|
|
|
|
|
|
|
|
|
|
|
|
|
|
|
|
™ Click the component. |
|
■ A message appears showing |
|||||||
|
|||||||||
|
£ Click Open. |
|
the properties set for the file. |
||||||
|
|
|
|
||||||
¢ Click OK. |
|
|
|
||||||
∞ Press F5 to save, build, and run the console application.
CONTINUED
257
C#
CREATE AN APPLICATION WITH PRIVATE ASSEMBLIES
fter creating your application with private assemblies, Ayou can use Xcopy deployment to install the
assembly. With private assemblies, you do not need to register components that the application uses. The components are discovered during the JIT compiling of the components. The issues with the Registry and DLL Hell go away. When using private assemblies for your component, the components deploy to the application directory by default and become visible only to the containing application. Because the components are discovered during JIT compiling, you can make updates on the components by just copying over the existing assemblies without unregistering and re-registering.
The process of deploying an application that only uses private assemblies is very simple. Just copy the client application and its dependencies from the output directory, which by default VS .NET builds to the bin\debug directory, and paste it to the destination client. In the case of the sample task below, you have one EXE file and one DLL to copy, and you deploy to another location on your PC’s hard drive. You can modify the directions given and deploy to another PC’s hard drive. In some cases, you can utilize a config file to help with locating dependencies. Because the dependent DLL is in the same directory as the client EXE, you do not need a config file.
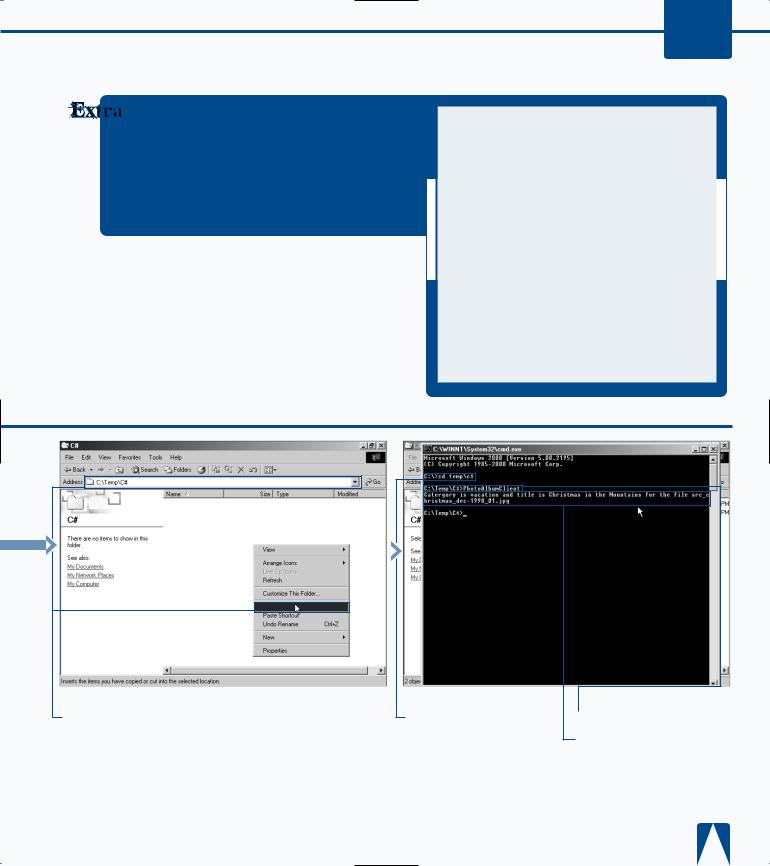
DEPLOY AN APPLICATION
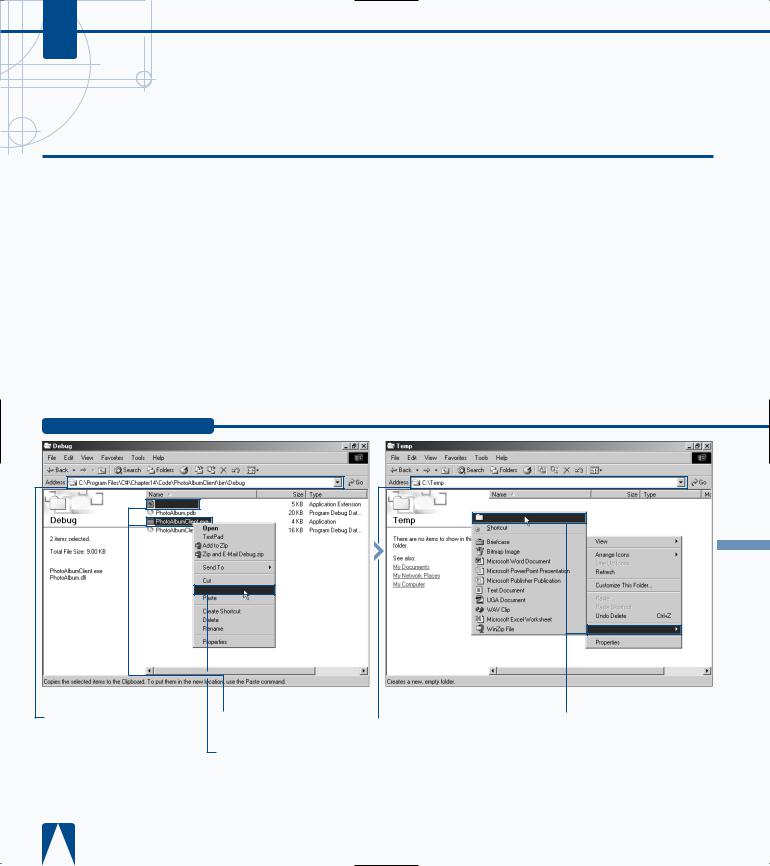
¤ Click the server and the client.
‹ Right-click the file and click Copy.
Folder
New
|
› Browse to a directory to |
ˇ Right-click the directory |
|
||
|
deploy the application. |
window and click New |
|
|
Folder. |
|
|
Á Rename the folder |
|
|
to an appropriate name. |
CREATING AND DEPLOYING DISTRIBUTED APPLICATIONS 14
Configuration files can provide paths that specify directories where the runtime should search for assemblies. See the <probing> element for an example of a redirection path. You can also redirect one assembly version to another by using the <bindingRedirect> element. The following example demonstrates how you can redirect to a newer version.
Example:
<configuration>
<runtime>
<assemblyBinding xmlns="urn: schemas-microsoft-com:asm.v1">
probing privatePath= "bin;binother\sub_bin "/>
<dependentAssembly>
<assemblyIdentity name= "yourAssembly"
publickeytoken=
"23ab4ba49e0a69a1"
culture=”en-us” />
<bindingRedirect oldVersion= "1.0.0.0"
newVersion="2.0.0.0"/>
</dependentAssembly>
/assemblyBinding>
</runtime>
</configuration>
Paste
‡ Paste the files to the newly created folder.
° Open the command prompt and use the cd command to get to the deployment directory.
· Run the client application.
■ A message appears showing the properties set for the file.
259