

- •maranGraphics
- •CREDITS
- •ACKNOWLEDGMENTS
- •ABOUT THE AUTHORS
- •AUTHORS’ ACKNOWLEDGMENTS
- •TABLE OF CONTENTS
- •HOW TO USE THIS BOOK
- •INTRODUCTION TO C#
- •START VISUAL STUDIO .NET
- •OPEN A NEW C# PROJECT
- •OPEN A C# WEB PROJECT
- •SET JSCRIPT .NET AS THE DEFAULT SCRIPT LANGUAGE
- •EXPLORE THE CLASS VIEW WINDOW
- •VIEW THE CONTENTS WINDOW
- •GET HELP USING THE INDEX WINDOW
- •SEARCH FOR HELP
- •ADD COMPONENTS FROM THE TOOLBOX
- •ADD A TASK TO THE TASK LIST
- •CHANGE FORM PROPERTIES IN THE PROPERTIES WINDOW
- •ADD A CUSTOM TOOLBAR
- •DELETE A TOOLBAR
- •CHANGE THE VISUAL STUDIO ENVIRONMENT
- •MANAGE OPEN WINDOWS
- •OPEN A PROJECT
- •VIEW THE MAIN METHOD
- •COMBINE PROGRAM TYPES
- •ADD REFERENCE TYPES
- •ADD OPERATORS
- •INSERT ATTRIBUTES
- •ENTER CLASSES
- •ADD COMMENTS TO CODE
- •WRITE YOUR FIRST PROGRAM
- •ENTER XML DOCUMENTATION
- •ACCESS DOCUMENTATION
- •LOG A BUG REPORT
- •VIEW INFORMATION ABOUT C# BUILDING BLOCKS
- •PROGRAM CLASSES
- •ADD A CLASS
- •EMPLOY CLASS INHERITANCE
- •PROGRAM INSTANCE CONSTRUCTORS
- •INSERT DESTRUCTORS
- •PROGRAM STRUCTS
- •DISPLAY HEAP AND STACK INFORMATION
- •FIND TYPE INFORMATION
- •PROGRAM CONSTANT EXPRESSIONS
- •SPECIFY VALUE TYPES
- •PROGRAM NUMERIC TYPES
- •PROGRAM THE BOOLEAN TYPE
- •DECLARE REFERENCE TYPES
- •ENTER REFERENCE TYPE DECLARATIONS
- •CONVERT VALUE TYPES TO REFERENCE TYPES
- •PROGRAM POINTER TYPES
- •INSERT THE VOID TYPE
- •ADD INTERFACE PROPERTIES
- •ADD AN INTERFACE INDEX
- •VIEW INFORMATION ABOUT METHODS
- •ADD A METHOD
- •ADD STATIC METHODS
- •INCLUDE NON-STATIC METHODS
- •ENTER DELEGATES
- •PROGRAM EVENTS
- •ADD AN EVENT-HANDLING METHOD
- •VIEW INFORMATION ABOUT ARRAYS
- •ENTER SINGLE-DIMENSIONAL ARRAYS
- •ADD MULTIDIMENSIONAL ARRAYS
- •PROGRAM ARRAY-OF-ARRAYS
- •ITERATE THROUGH ARRAY ELEMENTS
- •SORT ARRAYS
- •SEARCH ARRAYS
- •IMPLEMENT A COLLECTIONS CLASS
- •PROGRAM STRUCTS
- •ADD AN INDEXER
- •INCLUDE ENUMERATIONS
- •CREATE STRING LITERALS AND VARIABLES
- •ASSIGN VALUES TO STRINGS
- •CONCATENATE STRINGS
- •COMPARE STRINGS
- •SEARCH FOR SUBSTRINGS
- •REPLACE CHARACTERS
- •EXTRACT SUBSTRINGS
- •CHANGE THE CHARACTER CASE
- •TRIM SPACES
- •REMOVE CHARACTERS
- •SPLIT A STRING
- •JOIN STRINGS
- •PAD STRINGS
- •VIEW INFORMATION ABOUT PROPERTIES
- •COMPARE PROPERTIES AND INDEXERS
- •PROGRAM PROPERTY ACCESSORS
- •DECLARE ABSTRACT PROPERTIES
- •INCLUDE PROPERTIES ON INTERFACES
- •VIEW INFORMATION ABOUT WINDOWS FORMS
- •ADD A WINDOWS FORM IN THE WINDOWS FORM DESIGNER
- •SET THE FORM TYPE
- •CHOOSE THE STARTUP WINDOWS FORM
- •CREATE A MODAL FORM
- •LAYOUT A FORM
- •SET A FORM LOCATION
- •CHANGE FORM PROPERTIES
- •CREATE A TRANSPARENT FORM
- •AN INTRODUCTION TO WEB FORMS AND CONTROLS
- •CREATE AN ASP.NET WEB SITE
- •CREATE A WEB FORM
- •ADD SERVER CONTROLS TO A WEB FORM
- •READ AND CHANGE PROPERTIES FROM OBJECTS ON A WEB FORM
- •USING SERVER-SIDE COMPONENTS ON WEB FORMS
- •INTRODUCING DATA ACCESS WITH ADO.NET
- •DISPLAY DATA WITH THE DATAGRID CONTROL
- •CONFIGURE THE DATAGRID CONTROL
- •INSERT DATA INTO A SQL DATABASE
- •UPDATE DATA FROM A SQL DATABASE
- •DELETE DATA FROM A SQL DATABASE
- •EXECUTE A STORED PROCEDURE IN A SQL DATABASE
- •READ XML FROM A FILE
- •SAVE XML TO A FILE
- •QUERY XML WITH XPATH
- •APPLY XSL TO XML
- •INTRODUCTION TO DISTRIBUTED APPLICATIONS
- •CREATE AN APPLICATION WITH PRIVATE ASSEMBLIES
- •CREATE AN APPLICATION WITH SHARED ASSEMBLIES
- •VERSION A SHARED ASSEMBLY
- •CONFIGURE A CLIENT FOR A VERSIONED ASSEMBLY
- •CREATE A WEB SERVICE
- •USING A WEB SERVICE
- •INTRODUCTION TO EXCEPTION HANDLING
- •THROWING AN EXCEPTION
- •HANDLING EXCEPTIONS WITH THE CATCH BLOCK
- •USING THE FINALLY BLOCK
- •WRITE ERRORS TO THE APPLICATION LOG
- •BASIC EXAMPLES
- •WHAT’S ON THE CD-ROM
- •USING THE E-VERSION OF THIS BOOK
- •INDEX
- •Symbols & Numbers
C#
SET A FORM LOCATION
As you design your form in the Windows Form Designer, one important consideration is where a form can appear either on the screen or, in the case
of an MDI form, where child forms appear within parent forms. You can set the location of the form by using the Properties window. C# uses two properties for setting the form location: Location and StartPosition.
The Location property specifies the location of the upperleft corner of the form in terms of the x pixel and y pixel. For example, if you have a form location with the x and y pixels at 10, 10, then the top left corner of the form will appear 10 pixels from the left and 10 pixels from the top of the screen, respectively.
When you open a new Windows application in C#, the StartPosition setting is at WindowsDefaultLocation, which computes the best location for the form based on the video resolution the user has.
You can change the StartPosition to four other locations including the center of the screen, in the center of the parent window, within the bounds specified by the version of Windows the user is running, or you can set the location manually. You must set StartPosition to Manual so you can set the actual location in the Location property.
SET A FORM LOCATION
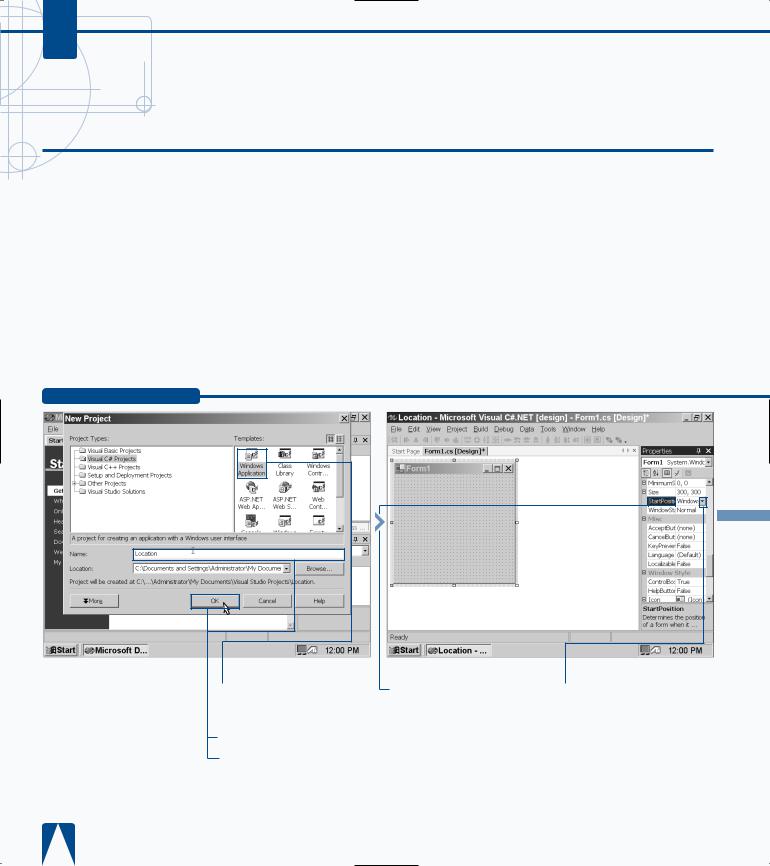
‹ Click the Windows Application icon in the Templates pane.
› Type a name for the file.
ˇ Click OK.
Á Click the StartPosition entry in the Properties window.
‡ Click  beside the StartPosition entry (WindowsDefault Location).
You can position your form in code if it is more convenient for you to do so. You position your form in code by entering the this.Location argument that includes the built-in Point structure. The Point structure identifies the x and y values of the upper corner of your form. Type the following code within the public class
Form:System.Windows.Forms.Form class.
TYPE THIS:
private void InitializeComponent()
{
this.components = new System.ComponentModel.Container() this.Size = new System.Drawing.Size(100,100); this.Text = "MyForm";
this.Location = new System.Drawing.Point(15,15);
}
BUILDING FORMS 10
RESULT:
The upper-left corner of the form is placed at 15 pixels from the left and 15 pixels from the top of the screen, respectively.
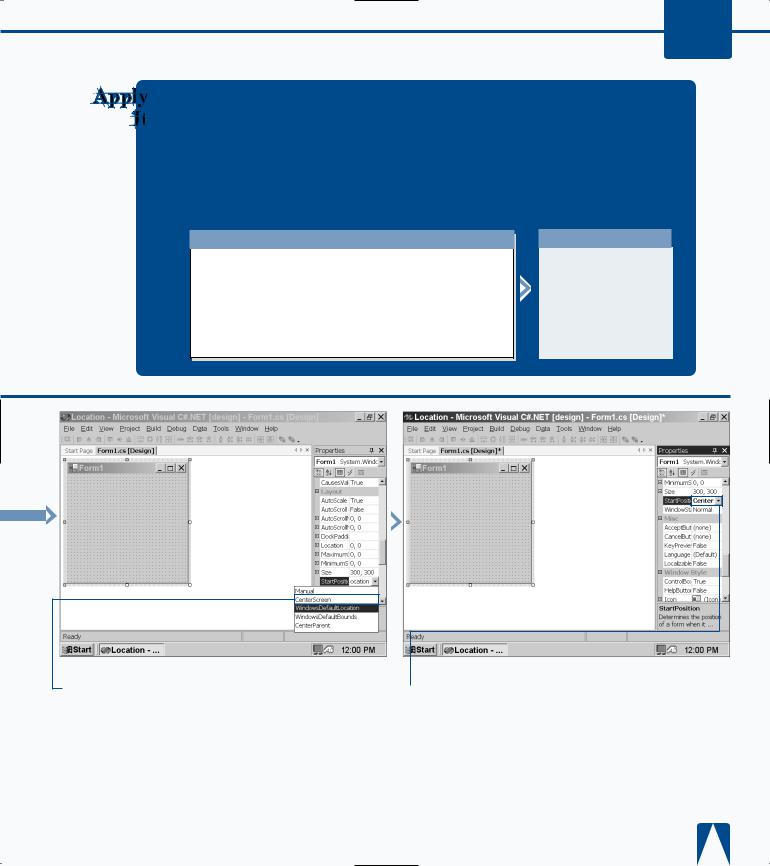
° Click to select CenterScreen from the drop-down list.
■ The StartPosition property now displays CenterScreen for its value.
211

C#
CHANGE FORM PROPERTIES
When you create a new form, the Properties window contains a list of properties in a table that you can use to change the form properties.
Changing form properties let you customize the form to your liking.
If you add a control or other feature to a form and click that control or feature, then the Properties window will display the properties for that control or feature. The Properties window displays all sorts of information that you can either change or view depending on the property.
The Properties window organizes the information into various categories, such as Appearance for different
appearance attributes such as background color. Those category names can open and close if you click the small expansion/retraction button to the left of the category name just as you do when you open directory information in Windows Explorer.
Some attributes contain expansion buttons that indicate that you can set attributes within that attribute. When you click the expansion button, the subattributes will appear in the table. When you click one of the attributes, you can select from a drop-down menu list or enter the value in the table. After you enter the value, the table will reflect your changes.
CHANGE FORM PROPERTIES
|
|
|
|
|
|
|
|
|
|
|
|
|
|
Click New Project. |
|
■ The New Project window |
|
|
|
|
|||
|
|
|
|
|
appears. |
|
|
|
|
|
‹ Click the Windows |
|
|
|
|
|
|
|
|
|
|
|
Application icon in the |
|
|
|
|
|
Templates pane. |
› Type a name for the file.
ˇ Click OK.
BUILDING FORMS 10
You can set the maximum and minimum sizes of your form so when the user shrinks or enlarges the form it will only shrink and enlarge to a certain size. For example, you may want the user to shrink a form only to the width of its widest text box. Type the following code with the public class Form:System.Windows.Forms.Form.
TYPE THIS:
private void InitializeComponent()
{
this.components = new System.ComponentModel.Container() this.Size = new System.Drawing.Size(100,100); this.Text = "MyForm";
this.MaximumSize = new System.Drawing.Size(400,400);
}
RESULT:
This code can maximize the form size to as high as 400 pixels wide by 400 pixels high.
Text
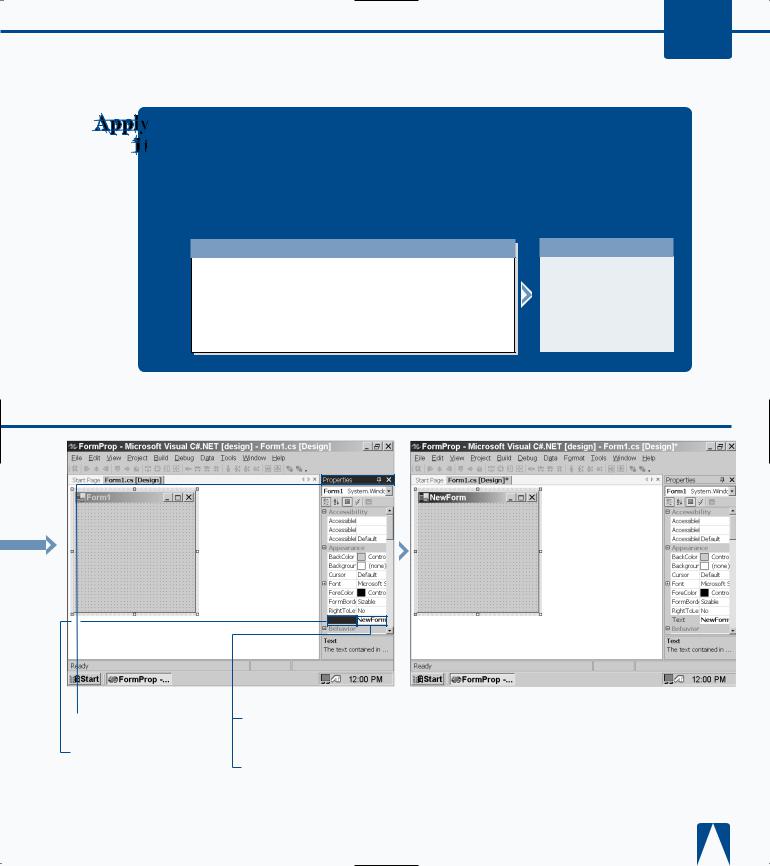
Á Click the Properties window.
‡ Scroll down the property list until you reach the Text field.
° Double-click the Form1 text to the right of the Text field.
· Type NewForm.
‚ Press Enter.
■ Your new form name appears in the form title bar.
213