

C#
MANAGE OPEN WINDOWS
The parent window is the area where you edit your program by either typing in code or editing forms. When you run your program, the changes you make in
the parent window will appear.
The parent window is comprised of several windows that appear within it. The parent window displays documents in one of two interface modes: the Tabs on documents mode, which is the default interface mode, and the Multiple Document Interface mode.
The Tabs on Documents mode presents document windows in tabbed panes within the parent window. When you click a different tab at the top of the window, the information for that tab appears in the parent window.
The Multiple Document Interface mode presents document windows one at a time in the parent window. You can switch between document windows through the menu bar much as you would if you switched between open documents in a Windows word-processing program.
The windows that appear around the parent window provide information that you need to work, but you can also hide these windows automatically. The window titles will appear as tabs at the edge of your screen, and the window that corresponds to each tab does not open until you move the mouse pointer over the tab.
MANAGE OPEN WINDOWS
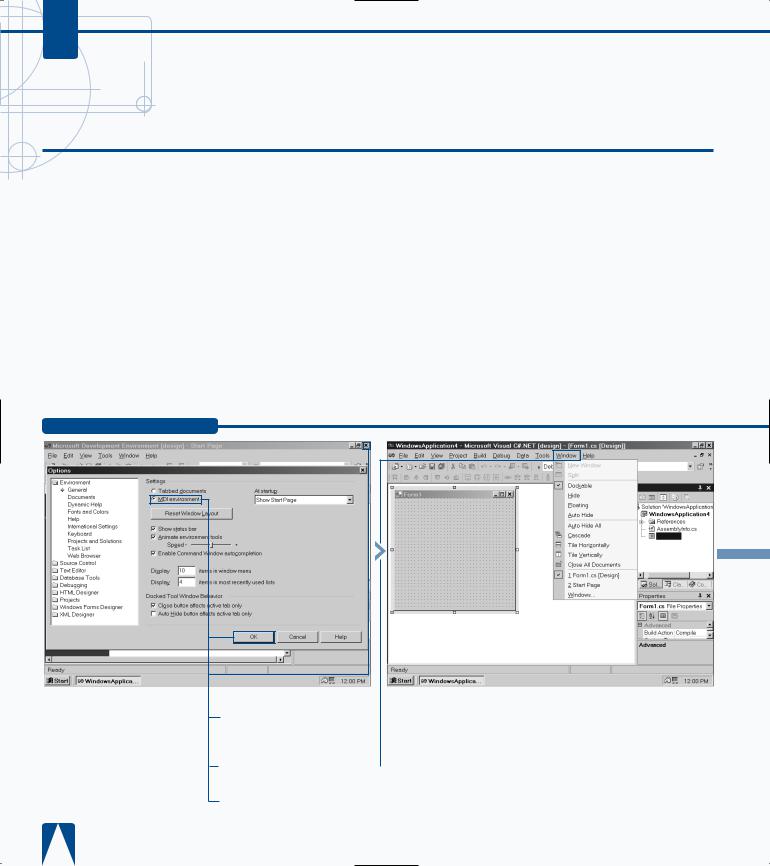
‹ Click the MDI environment radio button to select it.
› Click OK to close the Options dialog box.
ˇ Apply the MDI environment changes by closing Visual Studio .NET.
Solution Explorer - . . .
Form1.cs
Á Restart Visual Studio .NET |
|
|
|
|
|
|
|
||
■ The Form and VS Start Page |
||||
and open a new Windows |
window entries appear at the |
|||
application. |
bottom of the Window drop- |
|||
|
‡ Click Window. |
down menu. |
||
|
|
|
|
|

EXPLORING THE C# INTERFACE 2
One common error when you change between the Tabs on Documents and Multiple Document Interface modes is not saving your work before you close Visual Studio .NET. The remedy is to select File Save, if you have a project open, before you close Visual Studio .NET.
If you find it easier and faster to cycle through all the tabbed panes in the parent window using a keyboard rather than the mouse, all you need to do is hold down the Ctrl key and press the Tab key to move to the next tabbed pane. You can use this keyboard method in either the Tabs on Documents or Multiple Document Interface mode.
When you hide windows, the parent window resizes to the maximum space available. If you reopen a hidden window, the parent window does not resize. You can fix this by clicking the Auto Hide icon in the affected window again.
Solution Explorer - . . .
Form1.cs |
Form1.cs |
° Click the Auto Hide icon in the Solution Explorer title bar to change the appearance of the Solution Explorer window.
■ Tabs appear to the right of the Solution Explorer window. Moving the mouse pointer over each tab opens the associated window in place of the Solution Explorer window.
35

C#
OPEN A PROJECT
Visual Studio .NET places your C# program and related files, such as binary files, within a project. When you open a project, Visual Studio .NET opens all of the
project components so you can edit and run your C# programs. When you start Visual Studio .NET you can open an existing project in one of two ways: from the Start page or from the File menu option.
You can open a project file from any directory on your computer or your network. As with other Windows software programs, such as Microsoft Office, you can open files within commonly-used folders including the default My Projects folder and your Favorites folder.
You can also change your default directory within the MDE window so you can save and access files from that directory. When you change your default directory before you create your first C# program, you will save the time it takes to move all your programs to that new default directory.
The Look in field contains a directory tree so you can navigate throughout your computer and/or network file and directory structure. After you select the directory in the Look in field, the Open Project window displays the directory files.
OPEN A PROJECT
⁄ Click Start Programs
Microsoft Visual Studio .NET
7.0 Microsoft Visual
Studio .NET 7.0.
|
|
|
|
|
|
|
|
■ The Start Page appears. |
■ The Open Project window |
■ All the programs you |
|||
|
||||||
|
|
¤ Click the Open Project |
appears. |
worked on recently appear. |
||
|
|
|
‹ Click the History icon. |
|
||
|
button. |
|
|
|||
|
|
|||||
WORKING WITH VISUAL C# BASICS 3
If you install the Visual Studio .NET upgrade over an older version of Visual Studio with its directory structure, Visual Studio .NET will move your existing project files to the default Visual Studio Projects folder on your computer without affecting the files in any way. However, you should back up your files before you install Visual Studio .NET in case you run into any installation problems. Of course, you should also back up your project files to another media, such as a Zip drive or tape drive often in case of serious computer trouble.
When you open Visual Studio .NET, the VS Home Page displays a list of recently modified projects at the top of the page. The most recent project you worked on appears at the top of the list. You can open a project in the list by clicking the project title link in the list. If you are uncertain about when you last worked on a recent project, the list contains the date and time the project was saved.
MyFirstApplication.sln
|
|
|
|
|
› Click an application file |
|
ˇ Click Open. |
|
■ The program code appears |
|
||||
in the list. |
|
|
|
in the parent window. |
Note: If you leave your mouse pointer over the filename, the directory location of the file will appear in a pop-up box.
37