

- •maranGraphics
- •CREDITS
- •ACKNOWLEDGMENTS
- •ABOUT THE AUTHORS
- •AUTHORS’ ACKNOWLEDGMENTS
- •TABLE OF CONTENTS
- •HOW TO USE THIS BOOK
- •INTRODUCTION TO C#
- •START VISUAL STUDIO .NET
- •OPEN A NEW C# PROJECT
- •OPEN A C# WEB PROJECT
- •SET JSCRIPT .NET AS THE DEFAULT SCRIPT LANGUAGE
- •EXPLORE THE CLASS VIEW WINDOW
- •VIEW THE CONTENTS WINDOW
- •GET HELP USING THE INDEX WINDOW
- •SEARCH FOR HELP
- •ADD COMPONENTS FROM THE TOOLBOX
- •ADD A TASK TO THE TASK LIST
- •CHANGE FORM PROPERTIES IN THE PROPERTIES WINDOW
- •ADD A CUSTOM TOOLBAR
- •DELETE A TOOLBAR
- •CHANGE THE VISUAL STUDIO ENVIRONMENT
- •MANAGE OPEN WINDOWS
- •OPEN A PROJECT
- •VIEW THE MAIN METHOD
- •COMBINE PROGRAM TYPES
- •ADD REFERENCE TYPES
- •ADD OPERATORS
- •INSERT ATTRIBUTES
- •ENTER CLASSES
- •ADD COMMENTS TO CODE
- •WRITE YOUR FIRST PROGRAM
- •ENTER XML DOCUMENTATION
- •ACCESS DOCUMENTATION
- •LOG A BUG REPORT
- •VIEW INFORMATION ABOUT C# BUILDING BLOCKS
- •PROGRAM CLASSES
- •ADD A CLASS
- •EMPLOY CLASS INHERITANCE
- •PROGRAM INSTANCE CONSTRUCTORS
- •INSERT DESTRUCTORS
- •PROGRAM STRUCTS
- •DISPLAY HEAP AND STACK INFORMATION
- •FIND TYPE INFORMATION
- •PROGRAM CONSTANT EXPRESSIONS
- •SPECIFY VALUE TYPES
- •PROGRAM NUMERIC TYPES
- •PROGRAM THE BOOLEAN TYPE
- •DECLARE REFERENCE TYPES
- •ENTER REFERENCE TYPE DECLARATIONS
- •CONVERT VALUE TYPES TO REFERENCE TYPES
- •PROGRAM POINTER TYPES
- •INSERT THE VOID TYPE
- •ADD INTERFACE PROPERTIES
- •ADD AN INTERFACE INDEX
- •VIEW INFORMATION ABOUT METHODS
- •ADD A METHOD
- •ADD STATIC METHODS
- •INCLUDE NON-STATIC METHODS
- •ENTER DELEGATES
- •PROGRAM EVENTS
- •ADD AN EVENT-HANDLING METHOD
- •VIEW INFORMATION ABOUT ARRAYS
- •ENTER SINGLE-DIMENSIONAL ARRAYS
- •ADD MULTIDIMENSIONAL ARRAYS
- •PROGRAM ARRAY-OF-ARRAYS
- •ITERATE THROUGH ARRAY ELEMENTS
- •SORT ARRAYS
- •SEARCH ARRAYS
- •IMPLEMENT A COLLECTIONS CLASS
- •PROGRAM STRUCTS
- •ADD AN INDEXER
- •INCLUDE ENUMERATIONS
- •CREATE STRING LITERALS AND VARIABLES
- •ASSIGN VALUES TO STRINGS
- •CONCATENATE STRINGS
- •COMPARE STRINGS
- •SEARCH FOR SUBSTRINGS
- •REPLACE CHARACTERS
- •EXTRACT SUBSTRINGS
- •CHANGE THE CHARACTER CASE
- •TRIM SPACES
- •REMOVE CHARACTERS
- •SPLIT A STRING
- •JOIN STRINGS
- •PAD STRINGS
- •VIEW INFORMATION ABOUT PROPERTIES
- •COMPARE PROPERTIES AND INDEXERS
- •PROGRAM PROPERTY ACCESSORS
- •DECLARE ABSTRACT PROPERTIES
- •INCLUDE PROPERTIES ON INTERFACES
- •VIEW INFORMATION ABOUT WINDOWS FORMS
- •ADD A WINDOWS FORM IN THE WINDOWS FORM DESIGNER
- •SET THE FORM TYPE
- •CHOOSE THE STARTUP WINDOWS FORM
- •CREATE A MODAL FORM
- •LAYOUT A FORM
- •SET A FORM LOCATION
- •CHANGE FORM PROPERTIES
- •CREATE A TRANSPARENT FORM
- •AN INTRODUCTION TO WEB FORMS AND CONTROLS
- •CREATE AN ASP.NET WEB SITE
- •CREATE A WEB FORM
- •ADD SERVER CONTROLS TO A WEB FORM
- •READ AND CHANGE PROPERTIES FROM OBJECTS ON A WEB FORM
- •USING SERVER-SIDE COMPONENTS ON WEB FORMS
- •INTRODUCING DATA ACCESS WITH ADO.NET
- •DISPLAY DATA WITH THE DATAGRID CONTROL
- •CONFIGURE THE DATAGRID CONTROL
- •INSERT DATA INTO A SQL DATABASE
- •UPDATE DATA FROM A SQL DATABASE
- •DELETE DATA FROM A SQL DATABASE
- •EXECUTE A STORED PROCEDURE IN A SQL DATABASE
- •READ XML FROM A FILE
- •SAVE XML TO A FILE
- •QUERY XML WITH XPATH
- •APPLY XSL TO XML
- •INTRODUCTION TO DISTRIBUTED APPLICATIONS
- •CREATE AN APPLICATION WITH PRIVATE ASSEMBLIES
- •CREATE AN APPLICATION WITH SHARED ASSEMBLIES
- •VERSION A SHARED ASSEMBLY
- •CONFIGURE A CLIENT FOR A VERSIONED ASSEMBLY
- •CREATE A WEB SERVICE
- •USING A WEB SERVICE
- •INTRODUCTION TO EXCEPTION HANDLING
- •THROWING AN EXCEPTION
- •HANDLING EXCEPTIONS WITH THE CATCH BLOCK
- •USING THE FINALLY BLOCK
- •WRITE ERRORS TO THE APPLICATION LOG
- •BASIC EXAMPLES
- •WHAT’S ON THE CD-ROM
- •USING THE E-VERSION OF THIS BOOK
- •INDEX
- •Symbols & Numbers
C#
CREATE AN APPLICATION WITH SHARED ASSEMBLIES
ou can share your code across multiple applications by Yusing shared assemblies. Sharing components
across multiple applications is the model used in COM/COM+ applications today. Shared assemblies in .NET are the closest relative to the COM+ component. Creating and deploying a shared assembly takes a few more steps than doing the same for a private assembly. See page 254 for information about creating a simple private assembly.
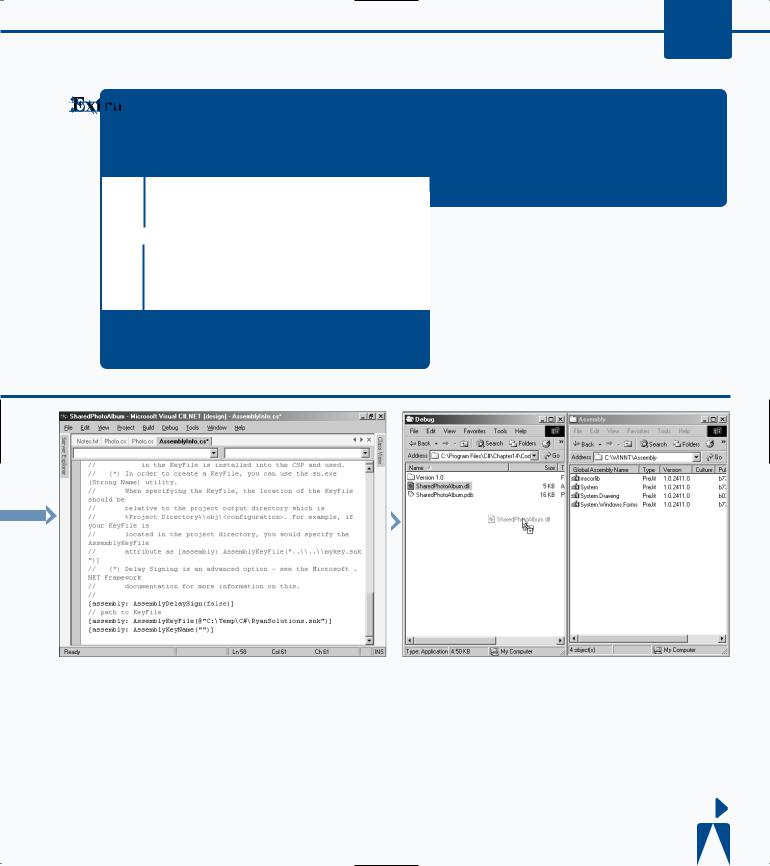
To create a shared assembly, first you assign a shared name, also known as a strong name. You assign a strong name through the creation of a key pair and update the
AssemblyInfo class with the key filename. The key filename assigns the path to the key in the AssemblyKeyFile assembly-level attribute that you find in the AssemblyInfo class. You can generate the key file with the strong name utility using the sn.exe tool.
After you complete the key assignment, you can compile the project. After compiling, you need to place the assembly into the GAC, or Global Assembly Cache. The easiest way to register an assembly into the GAC is to drag and drop the component into the global assembly directory C:\winnt\assembly, or your equivalent system path.
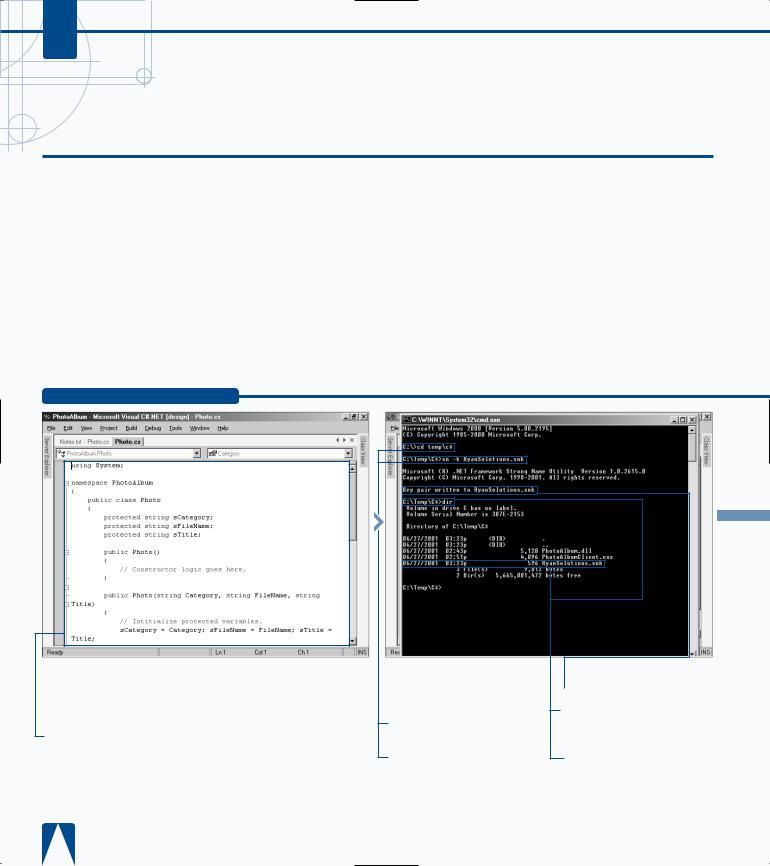
CREATE A SHARED ASSEMBLY
See page 254 for more about implementing
assembly.
Save the file.
› Open the command prompt.
ˇ Navigate to the deployment directory.
Á Type the sn command to create a key.
■ A key pair is created.
‡ Type the dir command to ensure that the file exists in the deployment directory.
■ The key file is listed.
CREATING AND DEPLOYING DISTRIBUTED APPLICATIONS 14
You can create and manage shared assemblies using the tools that the .NET framework provides. The Gacutil.exe file enables you to view and manipulate the contents of the GAC. You may not find it feasible to use the drag-and- drop method to register a component in the GAC when deploying an application to a remote machine. You can, however, use Gacutil.exe for deployment scripts as well as build scripts.
Sn.exe helps you create assemblies with strong names. Sn.exe provides options for key management, signature generation, and signature verification. If you have multiple keys that you want to group together into one store, you can use the –i switch to store them in a container, for example: sn -i myKeyPair.snk MyContainer.
Ildasm.exe takes a PE file that contains MSIL code and creates a text file suitable as input to the MSIL Assembler (Ilasm.exe).
A companion tool to the MSIL Assembler (Ilasm.exe), the MSIL Disassembler allows you to view the Manifest and the library’s types.
|
|
|
|
|
|
|
|
|
|
|
|
|
|
|
|
|
|
|
|
|
|
° Open the AssemblyInfo.cs |
· Press Ctrl+B to build |
||||
|
||||||
|
file for the project and update the |
the component. |
||||
|
AssemblyKeyFile. |
|
|
|||
|
|
|
|
|
|
|
|
|
|
|
|
|
|
|
|
|
|
|
|
|
|
|
|
|
|
|
|
|
|
|
|
|
|
|
|
|
|
|
|
|
|
|
|
|
|
|
|
|
|
|
|
|
|
|
|
|
|
|
|
‚ Open File Explorer and |
± With the two |
||||||||||
navigate to the directory |
windows side by side, drag |
||||||||||
where you built the |
SharedPhotoAlbum.dll |
||||||||||
component. |
to C:\WINNT\Assembly |
||||||||||
|
— Open another instance of |
directory. |
|||||||||
|
|
|
|
|
|
|
|
||||
File Explorer and navigate to |
■ The component is added |
||||||||||
the C:\WINNT\Assembly |
to the global assembly. |
||||||||||
directory. |
|
|
|
|
|
|
|
||||
|
|
|
|
|
|
|
|
|
|
|
|
|
|
|
|
|
|
|
|
|
CONTINUED |
|
|
|
|
|
|
|
|
|
|
|
|
|
|
261
C#
CREATE AN APPLICATION WITH SHARED ASSEMBLIES
ou can share common classes across multiple Yapplications by using shared assemblies with your
client applications. Building clients with shared assemblies is similar to building with private assemblies. You do not need a local copy of the assembly. The client applications use the GAC (Global Assembly Cache) to determine where to find the class they need for object creation. With VS .NET you can have an option for a local copy. In most cases, you do not need a local copy. To ensure that you do not get a local copy, you can go to the properties of the reference and set the Copy Local property to False.
To use a class that resides in a shared assembly, the component must exist in the GAC. You need to set a reference to the shared component. If the shared component does not appear in the reference list, you must browse to the shared component and select the assembly file.
After you register the shared component and compile your client application, you can test your client application.
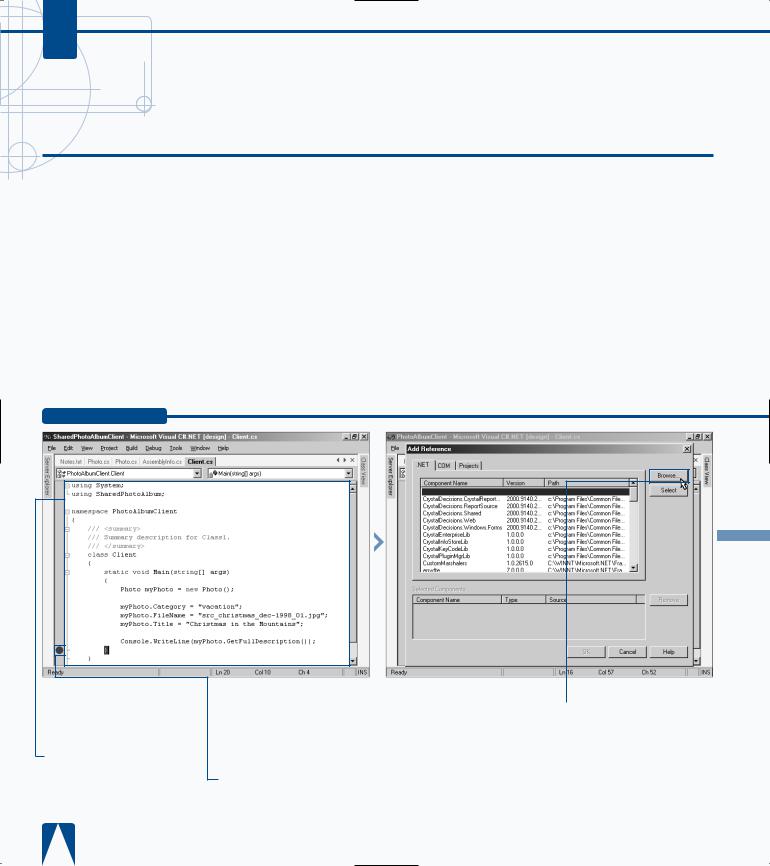
CREATE A CLIENT
Note: See page 254 for more information about implementing a client.
‹ Save the file.
› Set a debug stop.
ˇ Click Project Add Reference.
Accessibility |
1.0.0.0 |
C:\WINNT\Microsoft.NET\Fra... |
■ The Add Reference dialog |
Á Click Browse. |
box appears. |
|

CREATING AND DEPLOYING DISTRIBUTED APPLICATIONS 14
You can use the constructor of the class to set initial properties on an object, which is an alternative to setting properties individually after the component is created. To run the below example, replace the Client.cs file in the sample task with the following code and recompile. Note the use of the overloaded constructor.
TYPE THIS:
using System; using SharedPhotoAlbum; namespace PhotoAlbumClient {
class Client{
static void Main(string[] args){ Photo myPhoto = new Photo(
"Vacation", "src_christmas_dec-1998_01.jpg", "Christmas in the Mountains");
Console.WriteLine(myPhoto.GetFullDescription());
} } }
RESULT:
Category is Vacation and title is Christmas in the Mountains for the file src_christmas_dec-1998_01.jpg
■ The dialog box
‡ Click bin\Debug server
CONTINUED 


C#
CREATE AN APPLICATION WITH SHARED ASSEMBLIES
ou can deploy shared assemblies for code that is Yleveraged among several client applications. Shared
assemblies can also be updated after they are deployed.
The process of deploying an application that uses shared assemblies involves copying the client application and its dependencies to the destination client machine, and placing the shared components into the GAC. GAC registration can be done by dragging and dropping assemblies into the GAC directory in Windows Explorer C:\winnt\assembly. If you want to automate the registration, you will use the
Gacutil.exe utility.
DEPLOY AN APPLICATION
After the assembly is in the GAC, you can then run your client. If you need to update the shared components, all you need to do is copy over the existing component and the client application will use that copy of the component the next time it is called. If you have a new version of the component that is not compatible with the currently deployed component, you need to version it (see page 266).
In the application deployment described here, both components and client application reside on the same machine. Remoting components, on the other hand, is much more involved and requires the use of a proxy.
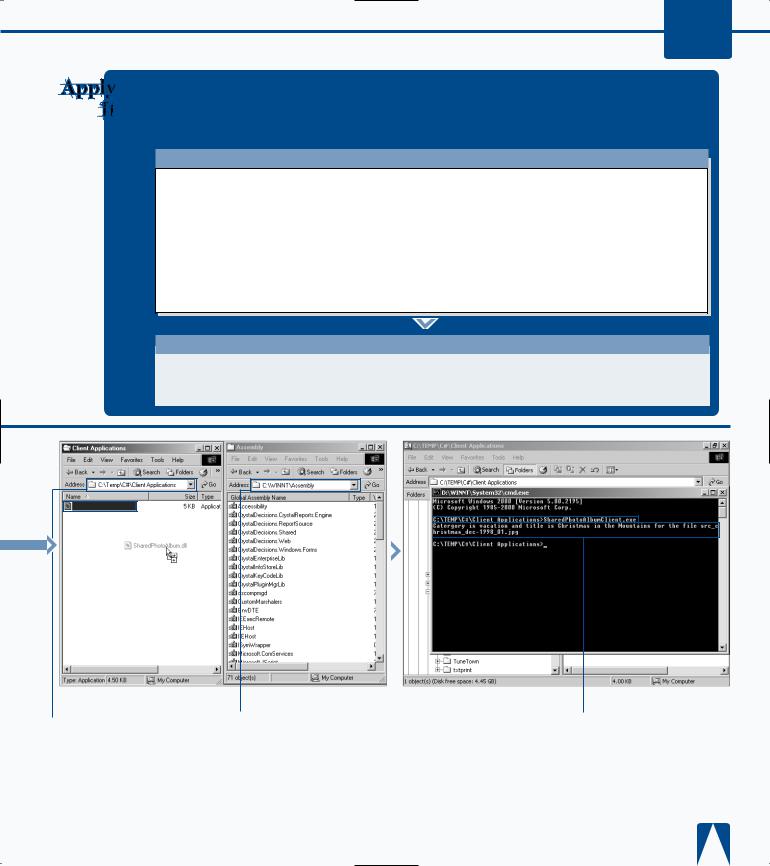
SharedPhotoAlbumClient.exe
‹ Open another instance of File Explorer and navigate to the directory where the
SharedPhotoAlbum client was built.
› Click the client application and drag to the appropriate directory.
ˇ Navigate to where you built the server component for the shared assembly.
SharedPhotoAlbum.dll
Á Click the server component and drag to the appropriate directory.
CREATING AND DEPLOYING DISTRIBUTED APPLICATIONS 14
You can consume C# assemblies with a VB client. Below is a sample
of a VB client application that uses the SharedPhotoAlbum component.
To test the code, you will need to create a new VB console application project. Make sure that you reference the SharedPhotoAlbum component.
TYPE THIS:
' Equivalent to the using Imports SharedPhotoAlbum Module VBPhotoAlbum
'Main entry point into the console application (make sure that this is
'set in the project properties as the startup object).
Sub Main()
' Creating instance of Component with the constuctor that initializes the properties.
Dim spaTest As New SharedPhotoAlbum.Photo("vacation", "src_christmas_dec-1998_01.jpg",
"Christmas in the Mountains")
Console.Write(spaTest.GetFullDescription())
End Sub
End Module
RESULT:
Category is Vacation and title is Christmas in the Mountains for the file src_christmas_dec1998_01.jpg
SharedPhotoAlbum.dll
|
|
|
|
|
|
|
|
|
|
|
|
|
|
|
|
|
|
|
|
|
|
|
|
|
|
|
|
|
|
|
|
|
|
|
|
|
|
|
|
|
‡ Navigate to the directory |
° Navigate with the other |
|
‚ Open the command |
|||||
|
|
||||||||
where you deployed the |
instance of File Explorer to |
prompt and go to the Client |
|||||||
server components. |
C:\WINNT\Assembly. |
Applications deployment |
|||||||
|
|
|
|
|
|
· Click and drag the |
directory. |
||
|
|
|
|
|
|
|
|
|
|
|
|
|
|
|
server component to |
|
|
|
|
|
|
|
|
|
C:\WINNT\Assembly. |
|
|
|
|
— Run SharedPhoto
AlbumClient.exe.
■ A message appears showing the properties set for the file.
265