

- •maranGraphics
- •CREDITS
- •ACKNOWLEDGMENTS
- •ABOUT THE AUTHORS
- •AUTHORS’ ACKNOWLEDGMENTS
- •TABLE OF CONTENTS
- •HOW TO USE THIS BOOK
- •INTRODUCTION TO C#
- •START VISUAL STUDIO .NET
- •OPEN A NEW C# PROJECT
- •OPEN A C# WEB PROJECT
- •SET JSCRIPT .NET AS THE DEFAULT SCRIPT LANGUAGE
- •EXPLORE THE CLASS VIEW WINDOW
- •VIEW THE CONTENTS WINDOW
- •GET HELP USING THE INDEX WINDOW
- •SEARCH FOR HELP
- •ADD COMPONENTS FROM THE TOOLBOX
- •ADD A TASK TO THE TASK LIST
- •CHANGE FORM PROPERTIES IN THE PROPERTIES WINDOW
- •ADD A CUSTOM TOOLBAR
- •DELETE A TOOLBAR
- •CHANGE THE VISUAL STUDIO ENVIRONMENT
- •MANAGE OPEN WINDOWS
- •OPEN A PROJECT
- •VIEW THE MAIN METHOD
- •COMBINE PROGRAM TYPES
- •ADD REFERENCE TYPES
- •ADD OPERATORS
- •INSERT ATTRIBUTES
- •ENTER CLASSES
- •ADD COMMENTS TO CODE
- •WRITE YOUR FIRST PROGRAM
- •ENTER XML DOCUMENTATION
- •ACCESS DOCUMENTATION
- •LOG A BUG REPORT
- •VIEW INFORMATION ABOUT C# BUILDING BLOCKS
- •PROGRAM CLASSES
- •ADD A CLASS
- •EMPLOY CLASS INHERITANCE
- •PROGRAM INSTANCE CONSTRUCTORS
- •INSERT DESTRUCTORS
- •PROGRAM STRUCTS
- •DISPLAY HEAP AND STACK INFORMATION
- •FIND TYPE INFORMATION
- •PROGRAM CONSTANT EXPRESSIONS
- •SPECIFY VALUE TYPES
- •PROGRAM NUMERIC TYPES
- •PROGRAM THE BOOLEAN TYPE
- •DECLARE REFERENCE TYPES
- •ENTER REFERENCE TYPE DECLARATIONS
- •CONVERT VALUE TYPES TO REFERENCE TYPES
- •PROGRAM POINTER TYPES
- •INSERT THE VOID TYPE
- •ADD INTERFACE PROPERTIES
- •ADD AN INTERFACE INDEX
- •VIEW INFORMATION ABOUT METHODS
- •ADD A METHOD
- •ADD STATIC METHODS
- •INCLUDE NON-STATIC METHODS
- •ENTER DELEGATES
- •PROGRAM EVENTS
- •ADD AN EVENT-HANDLING METHOD
- •VIEW INFORMATION ABOUT ARRAYS
- •ENTER SINGLE-DIMENSIONAL ARRAYS
- •ADD MULTIDIMENSIONAL ARRAYS
- •PROGRAM ARRAY-OF-ARRAYS
- •ITERATE THROUGH ARRAY ELEMENTS
- •SORT ARRAYS
- •SEARCH ARRAYS
- •IMPLEMENT A COLLECTIONS CLASS
- •PROGRAM STRUCTS
- •ADD AN INDEXER
- •INCLUDE ENUMERATIONS
- •CREATE STRING LITERALS AND VARIABLES
- •ASSIGN VALUES TO STRINGS
- •CONCATENATE STRINGS
- •COMPARE STRINGS
- •SEARCH FOR SUBSTRINGS
- •REPLACE CHARACTERS
- •EXTRACT SUBSTRINGS
- •CHANGE THE CHARACTER CASE
- •TRIM SPACES
- •REMOVE CHARACTERS
- •SPLIT A STRING
- •JOIN STRINGS
- •PAD STRINGS
- •VIEW INFORMATION ABOUT PROPERTIES
- •COMPARE PROPERTIES AND INDEXERS
- •PROGRAM PROPERTY ACCESSORS
- •DECLARE ABSTRACT PROPERTIES
- •INCLUDE PROPERTIES ON INTERFACES
- •VIEW INFORMATION ABOUT WINDOWS FORMS
- •ADD A WINDOWS FORM IN THE WINDOWS FORM DESIGNER
- •SET THE FORM TYPE
- •CHOOSE THE STARTUP WINDOWS FORM
- •CREATE A MODAL FORM
- •LAYOUT A FORM
- •SET A FORM LOCATION
- •CHANGE FORM PROPERTIES
- •CREATE A TRANSPARENT FORM
- •AN INTRODUCTION TO WEB FORMS AND CONTROLS
- •CREATE AN ASP.NET WEB SITE
- •CREATE A WEB FORM
- •ADD SERVER CONTROLS TO A WEB FORM
- •READ AND CHANGE PROPERTIES FROM OBJECTS ON A WEB FORM
- •USING SERVER-SIDE COMPONENTS ON WEB FORMS
- •INTRODUCING DATA ACCESS WITH ADO.NET
- •DISPLAY DATA WITH THE DATAGRID CONTROL
- •CONFIGURE THE DATAGRID CONTROL
- •INSERT DATA INTO A SQL DATABASE
- •UPDATE DATA FROM A SQL DATABASE
- •DELETE DATA FROM A SQL DATABASE
- •EXECUTE A STORED PROCEDURE IN A SQL DATABASE
- •READ XML FROM A FILE
- •SAVE XML TO A FILE
- •QUERY XML WITH XPATH
- •APPLY XSL TO XML
- •INTRODUCTION TO DISTRIBUTED APPLICATIONS
- •CREATE AN APPLICATION WITH PRIVATE ASSEMBLIES
- •CREATE AN APPLICATION WITH SHARED ASSEMBLIES
- •VERSION A SHARED ASSEMBLY
- •CONFIGURE A CLIENT FOR A VERSIONED ASSEMBLY
- •CREATE A WEB SERVICE
- •USING A WEB SERVICE
- •INTRODUCTION TO EXCEPTION HANDLING
- •THROWING AN EXCEPTION
- •HANDLING EXCEPTIONS WITH THE CATCH BLOCK
- •USING THE FINALLY BLOCK
- •WRITE ERRORS TO THE APPLICATION LOG
- •BASIC EXAMPLES
- •WHAT’S ON THE CD-ROM
- •USING THE E-VERSION OF THIS BOOK
- •INDEX
- •Symbols & Numbers
C#
READ AND CHANGE PROPERTIES FROM OBJECTS ON A WEB FORM
o make a Web Form interactive, you must take input Tfrom a user and send a custom response back to the
user based on their interaction. To create custom responses on Web Forms, you can write code that produces a response based on accessing the properties of the controls on your Web Form. To construct code that leverages object properties, you need an event handler. See page 224 for how to create event handlers. Inside that procedure, you have the ability to read and write to an object property that is in the scope of the event hander procedure.
Use of a property requires knowing the id of the tag that describes the control. For example, a server-side button
control’s tag may look like <asp:TextBox id= "txtFirstName" runat="server"></asp:TextBox>. For this server-side control, you must program with the id set to "txtFirstName". To write to a property on this control, you create an expression with the form object.property = value;. For example, you can set a value for what displays in the text box with the expression txtFirstName.Value = "Donna";.
To read a property from a control, you use the form string sFirstName = txtFirstName.Value;. Note, however, that sFirstName is a variable that holds the value of the Value property of the TextBox control.
READ AND CHANGE PROPERTIES FROM OBJECTS ON A WEB FORM
|
|
|
|
ImageUrl attribute |
|
|
|
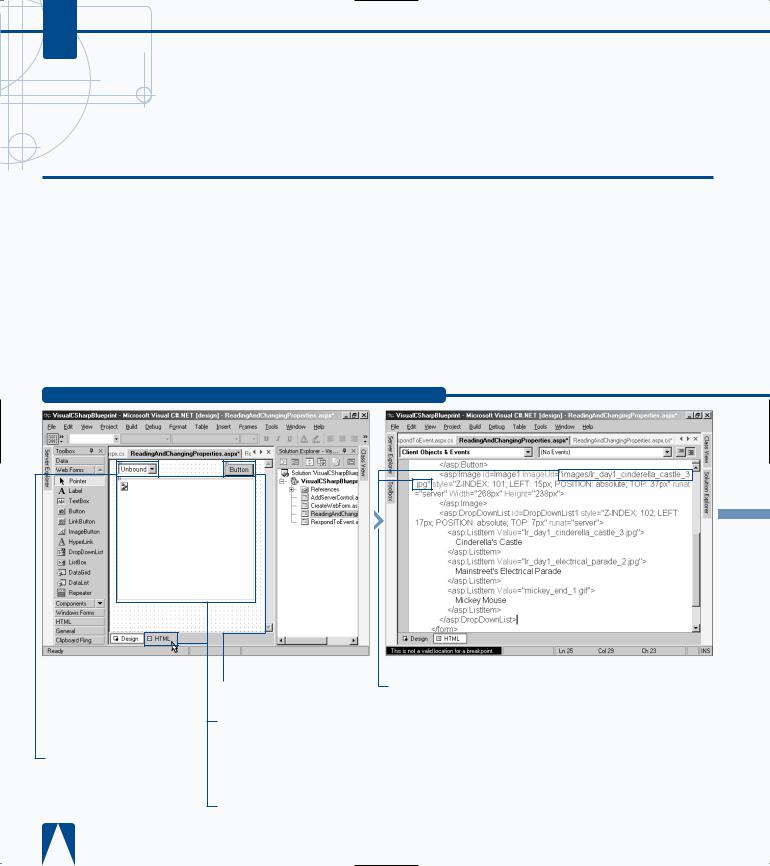
‡ Add several <ListItem> |
|||
control and set |
tags to add options for the |
||
equal to the |
DropDownList control. |
||
want to initially |
° In Design view, double- |
||
|
|||
|
click the Button control. |
||
need to copy the from the CD-ROM
directory.
PROGRAMMING WEB APPLICATIONS 11
You can read properties on one control to determine what the value on another control should be. This code reads the Checked property on a radio button to determine what the SelectionMode property should be on a calendar Web server control. To get the full code sample, see the companion CD-ROM.
TYPE THIS:
<SCRIPT LANGUAGE="C#" RUNAT="Server">
void SubmitBtn_Click(Object Sender, EventArgs e)
{
if (Day.Checked) {
calPhoto.SelectionMode = CalendarSelectionMode.Day;} else if (DayWeek.Checked) {
calPhoto.SelectionMode = CalendarSelectionMode.DayWeek; } else if (DayWeekMonth.Checked) {
calPhoto.SelectionMode = CalendarSelectionMode.DayWeekMonth; } else if (None.Checked) {
calPhoto.SelectionMode = CalendarSelectionMode.None; }
}
</SCRIPT>
RESULT:
A calendar control that you can change the selection mode with, making the desired selection and resubmitting the page.
■ The Click event handler for the button is created for you.
· Set the ImageUrl property for image control to the selected item’s value in the drop-down list box.
Note: Server.MapPath is used here to translate the physical path to the images directory (for example, c:\inetpub\wwwroot\VisualCSharp Blueprint\images\).
‚ Build and browse the Web page.
■ The preview page opens displaying the initial image.
— Click to select another image from the drop-down list.
± Click the button.
■ The preview page appears with the selected image.
227
C#
USING SERVER-SIDE COMPONENTS ON WEB FORMS
ever-side components can provide solutions to Scommon programing problems that are needed to enable your ASP.NET applications. If you do not
leverage the server-side components, you will either write your own custom server-side components or buy a thirdparty component.
Server-side components enable you to extend the capabilities of ASP.NET Web Forms to utilize any services that run on the .NET platform. These services can include asynchronous messaging (System.Messaging), file sytem I/O and browsing (System.IO), using and creating XML documents (System.XML), accessing data (System.Data), and troubleshooting your application (System.Diagnostics). This list only gives a few
USING SERVER-SIDE COMPONENTS ON WEB FORMS
capabilities of the .NET Framework Class Library, which contains hundreds of classes.
To leverage a server-side component that is part of the .NET Framework, you need to access the namespace that contains the .NET Framework class. For example, the Framework class that allows file access is Sytem.IO. To programmatically access this, you place the following at the top of the code-behind page: using System.IO;. After you import this namespace, you can create objects from classes that are part of this namespace. For example, you can create a DirectoryInfo object with the code
DirectoryInfo dir = new DirectoryInfo("."); and retrieve a list of all files in a specified directory using the GetFiles method.
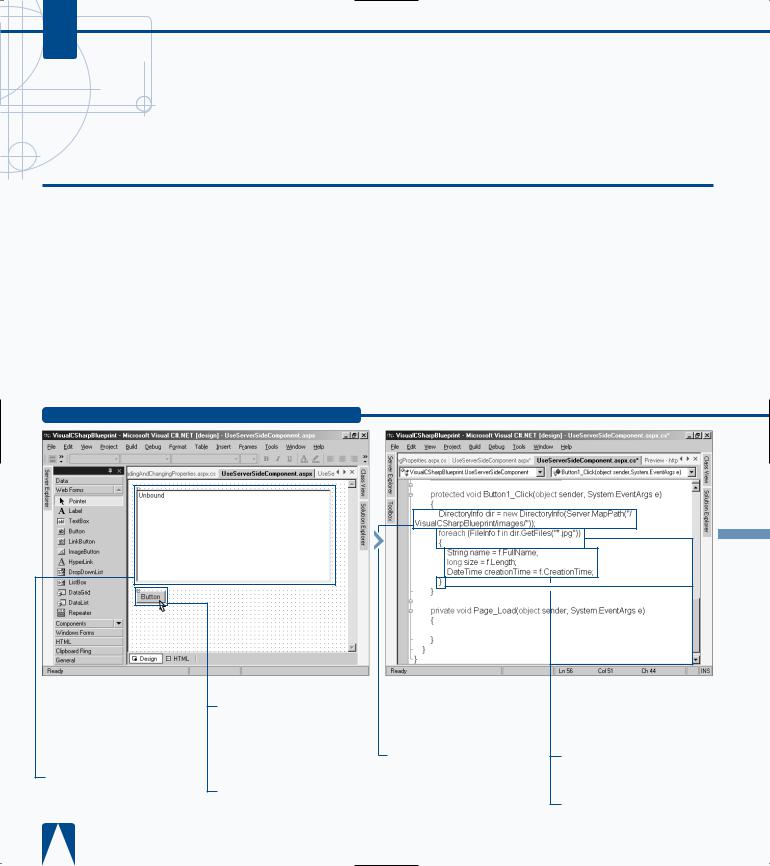
■ The Click event handler for the button is created for you.
ˇ Create a variable of
DirectoryInfo type and initialize it with the location of the images directory.
Note: You may need to copy the images directory from the CD-ROM to the working directory.
Á Use a foreach loop to loop through all of the JPEG files.
‡ Read the name, size, and creation time properties of the file into variables.
PROGRAMMING WEB APPLICATIONS 11
You can use the HTTPRequest object from ASP.NET’s Framework to get to information from a user request.
TYPE THIS:
<%@ Page language="c#"%> <html>
<head>
</head>
<body>
<form method="post" runat="server"> <%
HttpRequest oRequest; oRequest = this.Request;
foreach (string sRequest in oRequest.ServerVariables)
{
Response.Write(sRequest + " = " + oRequest.ServerVariables[sRequest] + "<br>");
}
%>
</form>
</body>
</html>
RESULT:
A page lists all the details of the Server Variables in the
HTTPRequest object.
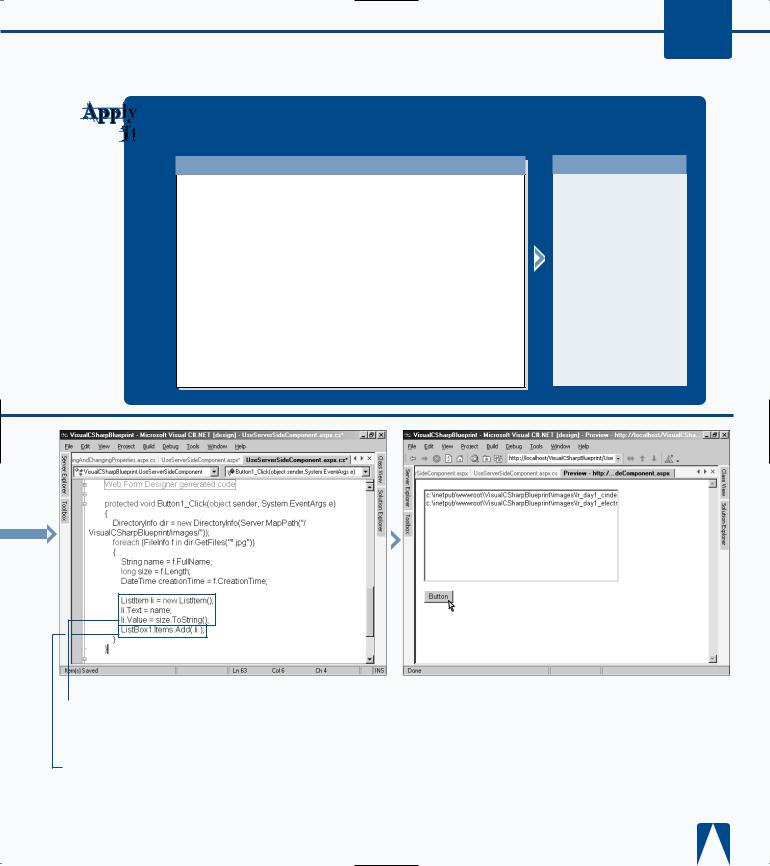
° Create a new list item variable and set the text and value properties with the properties of the file.
· Add the file to the ListBox.
‚ Build and browse the Web page.
Note: See page 220 for more information on building and browsing a Web page.
|
|
|
|
|
|
|
|
|
|
|
|
|
|
|
|
|
|
|
|
|
■ The preview page opens. |
|
|
|
|||
■ The JPEG filenames appear |
||||||
|
— Click the button. |
in the list box. |
||||
|
|
|
|
|||
229