


206 Part IV: Using a Wireless Network
The distinction between a workgroup and a domain can best be summed up in one word: security. Domains make managing, maintaining, and modifying security much simpler. In many cases, the domain controller — the server that controls the domain — can set up security on each device on the network remotely, and security can be managed in groups so that you don’t have to add every family member to every machine or device on the network. Of course, all this great management comes at a price. Servers tend to be expensive and require a much higher skill level to maintain. The initial setup of a domain can take a lot of planning and time to implement. We don’t take you through setting up your own domain because you can find more detailed books already written on the subject. If you do happen to choose some type of domain for networking, keep in mind that the security of your domain is only as strong as the security on each individual piece of equipment attached to your network — and that includes all your wireless devices.
On the other hand, setting up a workgroup is relatively simple. All that’s really required is to decide on the name of your workgroup. Many people use family names or something similar. Microsoft has a default of Workgroup MSHome for workgroups in Windows, for instance. Keep in mind that domain and workgroup names can only be 15 characters long and cannot contain any spaces or special characters.
To set up a workgroup in Windows 95/98/Me, you start by right-clicking the Network Neighborhood icon on your desktop or choosing Start Settings Control Panel and then double-clicking the Network icon. On the Identification tab of the Network dialog box that opens, enter the following:
A simple computer name of eight characters that describes the machine
The workgroup name of no more than 15 characters
A good computer description so others on the network will have an idea of what’s on this computer (such as Danny’s Office Machine)
To set up a workgroup in Windows 2000/XP, start by right-clicking the My Computer icon (in the upper-left of your desktop) or by choosing Start Settings Control Panel and then double-clicking the System icon. On the Network Identification tab of the System Properties window that opens, you can click the Network ID button to have a wizard walk you through the
process of setting up your networking options. A simpler method is to click the Properties button and just enter the computer name, description, and workgroup name (and a handy way to quickly check — and rename if necessary — workgroup names on the computers on your network.)
Will You Be My Neighbor?
“Hello! I’m here!” When a computer attached to a network is turned on, it broadcasts its name to every other device on the network and asks every

Chapter 11: Putting Your Wireless Home Network to Work 207
device to broadcast as well. If that computer is sharing something, such as a folder or a printer, the other devices can see it. By asking the other devices to broadcast, it can then see all of them. This process is repeated (on average) every 15 minutes in most networks with Windows computers attached to them.
The “Hello, I’m here” process is a great way to add devices to a network. Unfortunately, it’s not too great at detecting if a device falls off or is disconnected from that network. If a machine or shared device seems to be visible on your network but doesn’t respond when you try to access it, the problem might not be on your computer. Devices that get disconnected from your network don’t immediately appear to be disconnected on some of your other computers. They usually only get removed from the list of available networked computers if they fail to answer the every-15-minute “Hello” call from the other machines.
The Network Neighborhood (or My Network Places) icon is your ticket to the network and seeing what shared resources are available, like a printer. (The risk versus rewards of sharing these types of items just makes sense. The chances of a bad guy getting into your printer and printing out documents is really rather low — there’s not much reward for doing that.)
You can see what’s shared on your network by checking out your PC’s Network Neighborhood (or My Network Places).
Windows 95/98/Me: Double-click your Network Neighborhood icon (usually on your desktop), and you will see all the devices in your workgroup or domain. You will also see an item labeled Entire Network. Under this, you can see devices residing in other workgroups or domains that happen to be on the same physical network as the computer that you’re working from.
Windows 2000 and XP: Double-click the My Network Places icon (also usually found on your desktop) to see options such as Entire Network and Computers Near Me. Microsoft added a layer to the old Network Neighborhood icon and consolidated the devices in the same workgroup or domain to the Computers Near Me folder. The Entire Network folder still shows all the available devices on your physical network. The root of the My Network Places folder is now reserved for shortcuts to network resources that you tend to use on a regular basis.
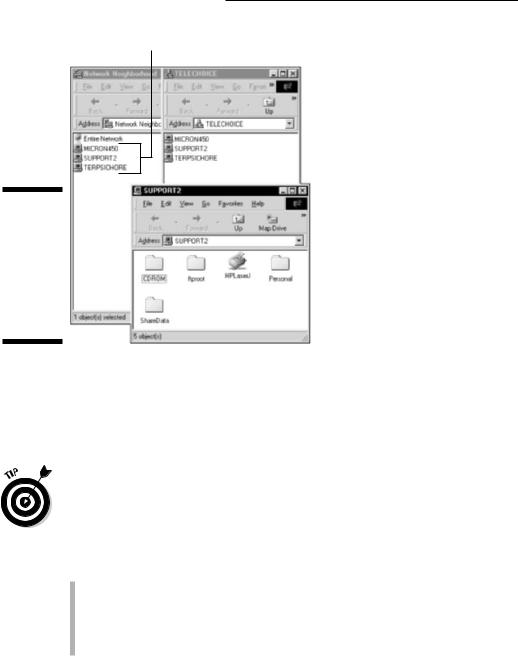
Looking at Network Neighborhood (see Figure 11-1) shows you all the computers on the network, including the PC that you’re using at that particular moment — if it happens to be set up for sharing. If a computer is networked but not turned on, you wouldn’t see it — only turned-on computers show up in Network Neighborhood. When you double-click a computer listed in Network Neighborhood, a new window pops up showing you what is shared on that computer or device.
208 Part IV: Using a Wireless Network
Networked computers
Figure 11-1:
See networked Windows 95/98/Me computers in Network Neighborhood.
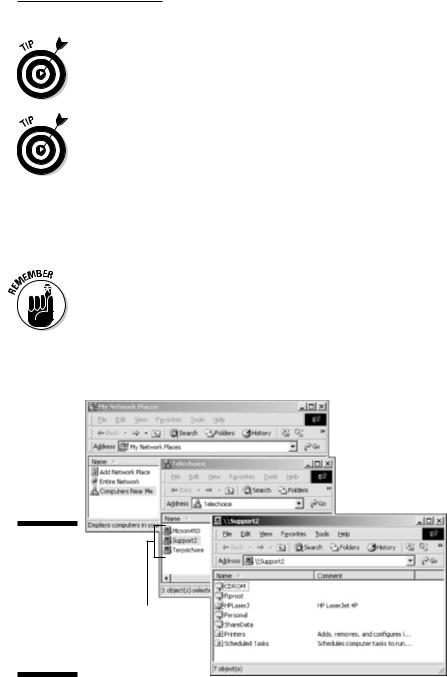
If you’re using Windows 2000 or XP, My Network Places (see Figure 11-2) serves a similar (but enhanced) purpose. My Network Places gives you access to your entire network resources and also enables you to add shortcuts to your favorite places. To check out everything that’s on your home network, click the Entire Network icon. This will show you your workgroup.
Regardless of the operating system, you’ll always see devices set up to share represented by small computer icons. If you double-click one of these icons, you can see any shared printers, folders, or other devices represented by appropriate icons. Sometimes you have to drill down (continue to doubleclick icons) a little bit to find all the shared items on your network.
In general, you’ll see two types of devices on your network:
Standalone network devices: These are computers, storage devices, gaming devices, and so on that have a network port and are on the network in their own right.
Attached devices: These are peripherals, drives, or other devices that are on the network because they’re attached to something else, like a PC.
Just double-click your workgroup to see all your home computers and other networked devices. Click any to see what you can share within them.
Chapter 11: Putting Your Wireless Home Network to Work 209
All this mouse clicking can be a pain. Save your wrist and create a shortcut to your shared resources by clicking the Add Network Place icon within My Network Places. Shortcuts are especially handy for people who have networked devices out on the Internet that they visit often, such as File Transfer Protocol (FTP) sites.
If you find a computer that you expect to be on the network but it’s not, make sure that its workgroup name is the same as the other machines — this is a common mistake. (See the earlier section “Setting up a workgroup.”)
We find using Windows Explorer to be the best way to visualize what’s on your computer and your network. You can get to Windows Explorer in all Windows operating systems the same two ways. Either right-click the Start button and select Explore, or choose Start Programs Windows Explorer. Figure 11-3 shows Windows Explorer looking at available network resources.
Just because you see a device in the Network Neighborhood or My Network Places doesn’t mean you can share with that device — where share means that you can view, use, copy, and otherwise work on files and resources on that device. The devices need to be set up for sharing for that to happen. (Think of it like your regular neighborhood, where you can see a lot of the houses, but you can’t go in some of them because they’re locked.) To set up sharing, see the next section.
Figure 11-2:
See networked Windows 2000/XP
computers Networked computers in My
Network
Places.
210 Part IV: Using a Wireless Network
Figure 11-3:
Use Windows Explorer to see network resources.
Sharing — I Can Do That!
File sharing is a basic feature of any home network. Whether sharing MP3 files on a computer with other devices (including your stereo as we discuss in Chapter 13) or giving access to financial files for mom and dad to access on each other’s computers, sharing files is a way to maintain one copy of something and not have a zillion versions all over the network.
You can share your whole computer, you might want to share only certain things (documents or folders), or you might want to share some stuff only in certain ways. Here’s an idea of what you can share in your network:
The whole computer: You can choose to make the whole computer or device accessible from the network. (We really don’t advise sharing your whole computer because it exposes all your PC to anyone who accesses your network.)
Specific internal drives: You can share a specific hard drive, such as one where all your MP3s are stored or your computer games.
Specific peripheral drives: You can share PC-connected or networkenabled peripheral drives, like an extra Universal Serial Bus (USB)- attached hard drive, a Zip or Jaz backup drive, or an external CD/DVD read/write drive.