


172 Part III: Installing a Wireless Network
6.Click OK to return to the Local Area Connections dialog box and then click OK again to return to the Network and Dial-up Connections window.
7.Close the Network and Dial-up Connections window.
Windows 2000 applies the change to the network settings and obtains an IP address for the network adapter from your network’s DHCP server.
Windows XP
If your computer is running the Windows XP operating system, follow these steps to set the network adapter to obtain its IP address automatically from a DHCP server:
1.Choose Start Network Connections.
If Network Connections doesn’t appear in the Start menu, choose Control Panel and then double-click the Network Connections icon in the Control Panel.
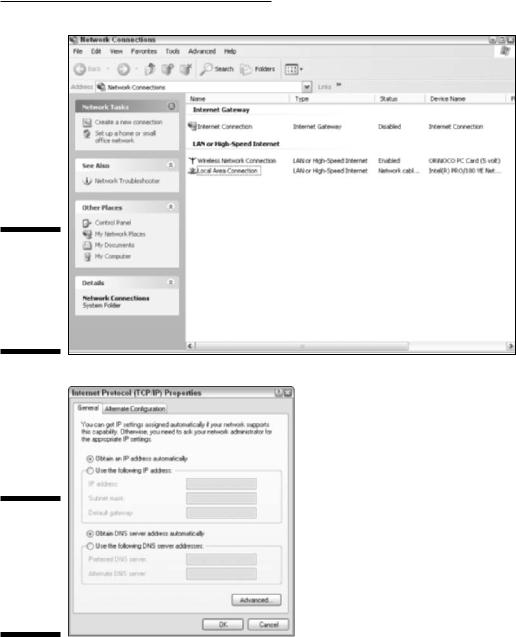
The Network Connections window appears, as shown in Figure 9-6.
2.In the LAN or High-Speed Internet section of the Network Connections window, highlight the Wireless Network Connection item for the network adapter that you want to configure.
For example, in Figure 9-6, the wireless network interface adapter device is listed as ORiNOCO PC Card (5 Volt) in the Network Connections window.
3.Choose File Properties.
The Wireless Network Connection Properties dialog box appears.
4.On the General tab, highlight the Internet Protocol (TCP/IP) option, and then click the Properties button.
The Internet Protocol (TCP/IP) Properties dialog box appears, as shown in Figure 9-7.
5.On the General tab, select both the Obtain an IP Address Automatically and the Obtain DNS Server Address Automatically radio buttons and then click OK.
You’re returned to the Wireless Network Connection Properties dialog box.
6.Click OK again to return to the Network Connections window and then close that window.
Windows XP applies the change to the network settings and obtains an IP address for the network adapter from your network’s DHCP server.
Chapter 9: Setting Up Internet Sharing 173
Figure 9-6:
The
Network
Connections
window in
Windows
XP.
Figure 9-7:
The Internet Protocol (TCP/IP)
Properties dialog box in Windows XP.
Mac OS
If the computer is running the Mac OS 9.x operating system, follow these steps to set the network adapter to obtain its IP address automatically from a DHCP server:
174 Part III: Installing a Wireless Network
1.From the Apple menu, display the Control Panels list, select TCP/IP, and then click OK to display the TCP/IP window.
2.From the Connect Via drop-down menu, choose the network device that you want to configure.
3.From the Configure drop-down menu, choose Using DHCP Server.
4.Close the TCP/IP window, saving changes when prompted.
Mac OS sends a request to the DHCP server for an IP address and assigns that address to the network device.
If the computer is running the Mac OS X operating system:
1.From the Apple menu, choose System Preferences and then click the Network icon to display the Network pane.
2.From the Show menu, choose the network interface adapter that you want to configure.
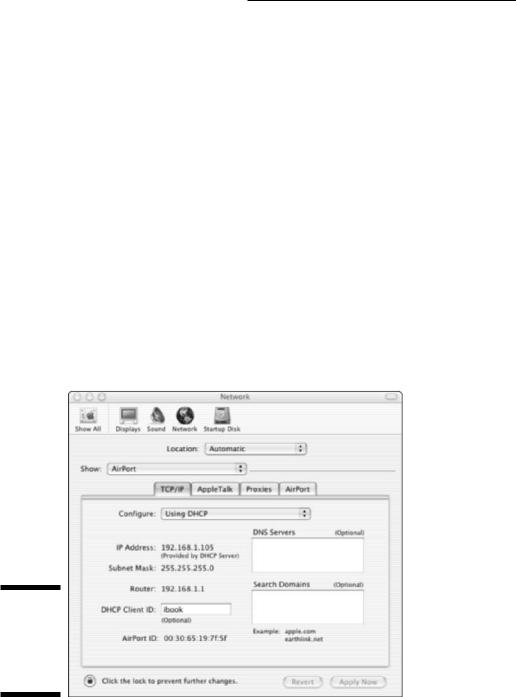
3.On the TCP/IP tab (see Figure 9-8), choose Using DHCP from the Configure menu.
Mac OS sends a request to the DHCP server for an IP address and assigns that address to the network adapter.
Figure 9-8:
The TCP/IP
tab of the
Mac OS X
Network
pane.