


Chapter 9: Setting Up Internet Sharing 175
Setting Up Internet Connection Sharing
Internet gateways and cable/DSL routers are certainly the easiest way to accomplish Internet connection sharing, but we know of a more economical method — software-based sharing using an attached PC. We should say, right up front, that we think that the hardware approach — that is, using a wireless Internet gateway or a cable/DSL router — is the best way to go. But if you really need to save a few bucks (and we mean only a few because you can get a router for $50 these days), try this approach. It works, but it’s not as good as the hardware approach because it can affect the performance of both your network overall as well as the particular computer that you use for Internet connection sharing. Windows 98 Second Edition (SE) and later versions of Windows provide a software-based solution for sharing an Internet connection over a local area network (LAN). This option is available whether you’re using a wired network, a wireless network, or a combination of the two.
Software-based Internet connection sharing is not efficient if you have more than four computers trying to share an Internet connection simultaneously. The cost of a broadband router is far less than the cost of a dedicated computer in most cases. And broadband routers usually contain other features that this software connection sharing doesn’t offer, such as port forwarding (Port Address Translation; PAT) to forward incoming requests to specific machines based on port, as well as offering a demilitarized zone (DMZ). (A DMZ, in the network world, is a network zone that has no firewall protection — we discuss this more in Chapter 10.) On the other hand, if you have an extra computer lying around and have time on your hands to maintain it, software-based Internet connection sharing could be your best option. (We’re still not convinced.)
When you set up a Windows software-based shared Internet connection, you select one computer to be the Internet connection host — the computer (running Windows 98 or later) that is always turned on and always connected to the Internet so that any other networked computer is able to access the Internet through it. This Internet connection host computer also must have two network adapters: one that connects to the Internet and another that communicates with the local area network. The connection to the Internet could be through a dialup modem, a broadband modem, or a connection to another larger network that connects to the Internet. After you complete the setup wizard, Windows turns the Internet connection server computer into both a DHCP server and your gateway to your broadband connection and the Internet.
You need to understand what Windows Internet Connection Sharing does not do: It does not convert the Internet connection host into a wireless access point. By contrast, software included with Mac OS 9 and Mac OS X v. 10.2 or later is capable of turning your AirPort-enabled Mac into an AP.
176 Part III: Installing a Wireless Network
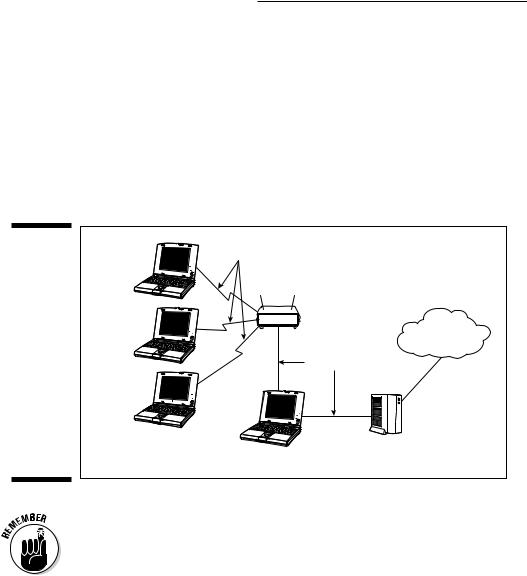
Using Windows Internet Connection Sharing software is equivalent to adding a cable/DSL router to your network. You could, for example, purchase a standalone AP — one that’s not also a router and DHCP server — and attach it to your PC via an Ethernet port. All wireless PCs in your house can then connect to the AP, which in turn connects to your host PC. You then connect a dialup modem to your computer (or perhaps installed inside your computer) or connect the modem to a second Ethernet port. You can then share your Internet connection (through the dialup modem or through a broadband modem) with the computers that connect wirelessly to the AP. Figure 9-9 depicts a wireless home network that uses Windows Internet Connection Sharing to provide an Internet connection to all wireless PCs on the network.
Figure 9-9: |
Wireless |
|
|
A wireless |
|
||
|
|
||
home |
|
|
|
network |
AP |
|
|
using |
|
||
|
|
||
Windows |
Wireless |
|
|
Internet |
|
||
PCs |
Internet |
||
Connection |
|||
|
|
||
Sharing to |
|
Ethernet cable |
|
provide an |
|
|
|
Internet |
|
|
|
connection |
|
|
|
to all |
|
|
|
wireless |
|
Cable/DSL |
|
PCs on the |
|
||
Host PC |
modem |
||
network. |
|||
|
|
When using Windows Internet Connection Sharing, the host computer must always be on, with Windows running, so that the other computers in the home network can access the Internet. In addition, each of the other computers on the network must be set up to obtain an IP address automatically, which we describe in the earlier section “Obtaining an IP Address Automatically.”
Windows 98 SE and Windows Me
To set up Windows Internet connection sharing in Windows 98 SE or
Windows Me:
1.Choose Start Settings Control Panel.
2.Double-click the Add/Remove Programs icon in the Control Panel.
Chapter 9: Setting Up Internet Sharing 177
3.When the Add/Remove Programs Properties dialog box appears, click the Windows Setup tab.
Windows Setup will take a few moments to search your hard drive to determine what Windows components are currently installed on your computer.
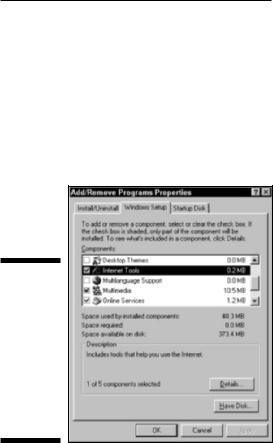
4.When Windows Setup displays the list of Windows components, highlight the Internet Tools option but make sure that its check box remains marked (see Figure 9-10).
Figure 9-10:
The Windows Setup tab of the
Add/Remove Programs Properties dialog box in Windows 98 SE or Me.
5.Click the Details button and then select the Internet Connection Sharing check box (if it’s not already marked).
6.Click OK twice.
7.Insert the Windows CD when prompted and then click OK again.
8.When the Copying Files dialog box appears, make sure that the drive letter in the Copying Files From text box is the drive letter assigned to your CD-ROM drive and then click OK once more.
Windows Setup copies a few files to your computer’s hard drive and then displays the Internet Connection Sharing Wizard.
9.On the wizard’s opening screen, click Next to display a list of network adapters (all the adapters ever installed on this computer).
10.Select the network adapter that you plan to use to connect to the Internet and then click Next.

178 Part III: Installing a Wireless Network
If you’re using a cable or DSL modem, be sure to select the adapter that’s connected to the cable/DSL modem. If you’re using a dialup modem, select this modem from the list.
The next screen that appears looks almost the same as the previous screen but no longer lists the adapter that you selected in this step.
11.Select the adapter that communicates with your network and then click Next.
If you plan to use your PC as a router for your wireless network, you should select the Ethernet adapter to which your AP is connected.
12.When the wizard prompts you to create a disk for the client computers, click Next, insert a floppy disk, and then click OK.
The wizard copies two files to the floppy disk: icsclset.exe and
ReadMe.txt.
If one of the client computers has been connecting to the Internet through a dialup connection, you might need to run the icsclset.exe program that the wizard copied onto the floppy disk. This program reconfigures your Web browser to connect to the Internet through the network adapter rather than through the dialup adapter. Run this program after finishing the wizard if you can’t connect to the Internet from one of the computers on your network.
13.Click Finish to complete the wizard.
When the wizard completes its magic, the PC on which you ran the wizard is now both a DHCP server and a NAT server (refer to the discussion in Chapter 2) — equivalent to a broadband router. You might need to restart any PC or AP that is connected to the PC for the changes to take effect.
The host PC has to be turned on for the other computers sharing its connection to be able to access the Internet.
To remove Internet connection sharing, repeat Steps 1 through 6 — except that in Step 5, clear the Internet Connection Sharing check box.
Windows 2000
To set up Internet connection sharing in Windows 2000:
1.Choose Start Settings and then click the Network and Dial-up
Connections menu item to display Network and Dial-up Connections window.
2.Highlight the Local Area Connection item for the network connection device that will be connected to the Internet.
Chapter 9: Setting Up Internet Sharing 179
3.Choose File Properties to display the Local Area Connection
Properties dialog box.
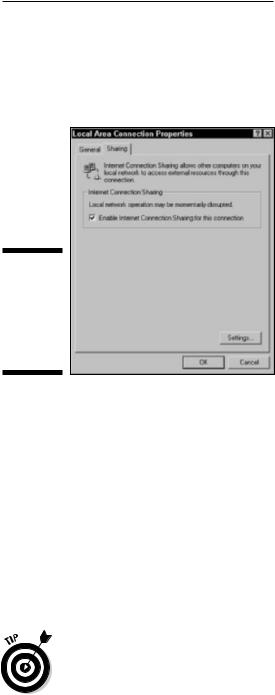
4.On the Sharing tab, select the Enable Internet Connection Sharing for This Connection check box, as shown in Figure 9-11, and then click OK.
Figure 9-11:
Enable
Internet connection sharing in Windows 2000.
A pop-up message informs you of the local IP address that will be assigned to the host computer (192.168.0.1) when it restarts. The message also instructs you to set each of the client computer’s TCP/IP settings to obtain an IP address automatically (which we discuss earlier in this chapter).
5.If you’re that sure you want to enable Internet Sharing, click the Yes button.
You’re returned to the Network and Dial-up Connections window.
6.Close the Network and Dial-up Connections window.
After completing these steps, this Windows 2000 PC is now both a DHCP server and a NAT server, equivalent to a broadband router. You might need to restart any PC or AP that is connected to the PC for the IP addresses to be reassigned.
To remove Internet connection sharing, display the Sharing tab of the Local
Area Connection Properties dialog box and then clear the Enable Internet
Connection Sharing for This Connection check box.