- •About the Authors
- •Dedication
- •Contents at a Glance
- •Table of Contents
- •Introduction
- •About This Book
- •System Requirements
- •How This Book Is Organized
- •Part I: Wireless Networking Fundamentals
- •Part II: Making Plans
- •Part III: Installing a Wireless Network
- •Part IV: Using a Wireless Network
- •Part V: The Part of Tens
- •Icons Used in This Book
- •Where to Go from Here
- •Nothing but Net(work): Why You Need (Or Want) One
- •File sharing
- •Printer and peripheral sharing
- •Internet connection sharing
- •Home arcades and wireless to go
- •Wired versus Wireless
- •Installing wired home networks
- •Installing wireless home networks
- •Picking a Wireless Standard
- •Planning Your Wireless Home Network
- •Workstations and servers
- •Network infrastructure
- •Network interface adapters
- •Get the (Access) Point?
- •Industry Standards
- •Who or What Is Bluetooth?
- •Wi-Fi versus Bluetooth
- •Piconets, Masters, and Slaves
- •Wirelessly synching your PDAs
- •Wireless printing and data transfer
- •Integrating HPNA and HomePlug with Your Wireless Home Network
- •Home Phoning (ET Got It Backward!)
- •Network Power(line)!
- •Deciding What Is Connected to the Network
- •Counting network devices
- •Choosing wired or wireless
- •Choosing a wireless technology
- •Choosing an access point
- •Deciding where to install the AP
- •Adding printers
- •Adding entertainment and more
- •Connecting to the Internet
- •Budgeting for Your Wireless Network
- •Pricing access points
- •Pricing wireless network adapters
- •A sample budget
- •Planning Security
- •Selecting Access Points
- •Certification and Standards Support
- •Compatibility and Form Factor
- •DHCP servers
- •Gateways, NAT, and cable/DSL routers
- •Switches
- •Print servers
- •Operational Features
- •Security
- •Range and Coverage Issues
- •Manageability
- •Web-based configuration
- •Software programming
- •Telnetting to your device
- •Upgradeable firmware
- •Price
- •Warranties
- •Customer and Technical Support
- •Before Getting Started, Get Prepared
- •Setting Up the Access Point
- •Preparing to install a wireless AP
- •Installing the AP
- •Configuring AP parameters
- •Changing the AP Configuration
- •Installing device drivers and client software
- •PC Cards and mini-PCI cards
- •Compact Flash cards
- •PCI and ISA cards
- •USB adapters
- •Modifying Wireless Network Adapters
- •Synchronizing and Internet Access
- •Wireless Zero Configuration with XP
- •Easy installation
- •Automatic network connections
- •Tracking Your Network’s Performance
- •Apple AirPort Hardware
- •Pick an AirPort Card, any card
- •Apple AirPort Software Updates
- •AirPort 2.0 software
- •AirPort 2.0.4 software
- •AirPort 2.0.5 software
- •AirPort 2.1.1 software
- •OS 9 Wireless Networks
- •Installing AirPort software on Mac OS 9
- •Upgrading AirPort Base Station firmware on OS 9
- •OS X Wireless Networks
- •Installing the AirPort software on OS X
- •Upgrading AirPort Base Station firmware on OS X
- •Adding another computer to your AirPort network on OS X
- •Connection sharing
- •Routers and gateways
- •Sharing dialup Internet connections
- •Obtaining an IP Address Automatically
- •Windows 9x
- •Windows 2000
- •Windows XP
- •Setting Up Internet Connection Sharing
- •Windows 98 SE and Windows Me
- •Windows 2000
- •Windows XP
- •Mac OS X v. 10.2 (Jaguar)
- •Assessing the Risks
- •General Internet security
- •Airlink security
- •How about a bit more about WEP?
- •What’s wrong with WEP?
- •Clamping Down on Your Wireless Home Network’s Security
- •Getting rid of the defaults
- •Enabling WEP
- •Closing your network
- •Looking into the Crystal Ball
- •Waiting for WPA
- •The future: 802.11i
- •A Networking Review
- •Basic networking terminology
- •Setting up a workgroup
- •Will You Be My Neighbor?
- •Sharing a document or folder on Windows 95/98/Me
- •Enabling sharing on Windows 2000/XP
- •Setting permissions
- •Accessing shared files
- •Be Economical: Share Those Peripherals
- •Setting up a print server
- •Sharing other peripherals
- •PC Gaming Hardware Requirements
- •Networking Requirements for PC Gaming
- •Console online gaming services and equipment
- •Console wireless networking equipment
- •Dealing with Router Configurations
- •Getting an IP address
- •Dealing with port forwarding
- •Setting Up a Demilitarized Zone (DMZ)
- •Wireless Home Entertainment Gear
- •Expanding Your Home Entertainment Center with Wireless Adapters
- •The Home Media Player
- •The Home Theater PC
- •Internet Content for Your Media Players and HTPCs
- •Making a Connection to Your Car
- •Your car’s path to wireless enlightenment
- •Synching your car stereo with home
- •Getting online with your own car PC
- •Picking wireless gear for your car
- •Using your PDA as a remote control
- •Whole home 802.11-based IR coverage
- •See me, feel me, hear me, touch me
- •Discovering Bluetooth Basics
- •Bluetooth Mobile Phones
- •Bluetooth PDAs
- •Other Bluetooth Devices
- •Printers
- •Digital cameras
- •Keyboards and meeses (that’s plural for mouse!)
- •Bluetooth adapters
- •Discovering Public Hot Spots
- •Freenets and open access points
- •For-pay services
- •Using T-Mobile Hot Spots
- •Using Wayport Hot Spots
- •Using Boingo Hot Spots
- •Tools for Finding Hot Spots
- •Netstumbler.com
- •Boingo
- •Check the Obvious
- •Move the Access Point
- •Move the Antenna(s)
- •Change Channels
- •Check for Dual-Band Interference
- •Check for New Obstacles
- •Install Another Antenna
- •Add a Signal Booster
- •Add a Repeater or Bridge
- •Check Your Cordless Phone Frequencies
- •Your Bath
- •Your Car
- •Your Exercise Gear
- •Your Home Appliances
- •Your Musical Instruments
- •Your Pets
- •Your Phones
- •Your Robots
- •Your Wearing Apparel
- •CNET.com
- •802.11 Planet
- •Broadband Wireless Exchange Magazine
- •80211b.weblogger.com
- •PC Magazine
- •Electronic House Magazine
- •Home Automation Magazine
- •Practically Networked
- •ExtremeTech.com
- •Network World
- •Other Cool Sites
- •Index
Chapter 7: Setting Up Your Windows PCs for Wireless Networking 129
Wireless Zero Configuration with XP
Windows XP promises to make connecting to new wireless networks easier through a service that Microsoft has dubbed Wireless Zero Configuration. Although Microsoft’s claim of zero configuration is a bit of an exaggeration, configuration is pretty easy. When installing or configuring a wireless adapter that’s supported by Windows XP, you don’t need to use software provided by the manufacturer. Instead, Windows XP itself recognizes the adapter and provides the necessary driver and configuration software.
Easy installation
As an alternative to the manufacturer’s installation and configuration software, follow these steps to install and configure a supported wireless network adapter. (Note: We recommend that you check the documentation that accompanies your wireless adapter to determine whether it is supported by Windows XP Zero Configuration before continuing with these steps.)
1.If you plan to use a wireless network interface adapter that you have to install inside the case of the computer, turn off the computer and install the PCI or ISA adapter.
2.Log on to Windows XP as a user with administrator rights.
If you installed Windows XP, you probably have administrator rights. To check, choose Start Settings Control Panel User Accounts to display the User Accounts screen that shows the accounts on your computer. If you’re not listed as Computer Administrator, you need to find out who is the administrator and get that person to change your account.
3.Insert the PC Card or attach the USB adapter.
Windows XP displays a message that your new hardware is installed and ready to use.
Because your computer is within range of your network’s wireless AP (they have to be close enough to talk to each other), Windows XP announces that one (or more) wireless network is available and suggests that you click the Network icon to see a list of available networks.
4.Click the Network icon in the notification area of the task bar at the bottom-right of the screen.
Windows XP displays the Wireless Network Connection dialog box, as shown in Figure 7-6.
130 Part III: Installing a Wireless Network
Figure 7-6:
The
Wireless
Network
Connection
dialog box.
5.In the Network Key text box, type the WEP key that you used in the AP configuration, enter the key again in the Confirm Network Key text box, and then click the Connect button.
The dialog box disappears, and Windows XP displays a balloon message that announces a wireless network connection and indicates the connection’s speed and signal strength (poor, good, or excellent). The Network icon in the status bar flashes green occasionally to indicate network traffic on the wireless connection.
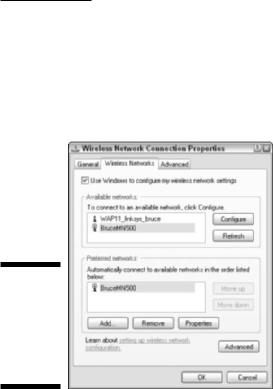
In a matter of minutes, you have installed and configured a wireless network connection. If you have trouble connecting, you can access more configuration information by clicking the Advanced button in the Wireless Network Connection dialog box (refer to Figure 7-6) to display the Wireless Network Connection Properties dialog box (shown in Figure 7-7).
Automatic network connections
Easy installation and configuration is only half of the Windows XP wireless networking story. If you know that you will use your computer to connect to several different wireless networks — perhaps one at home and another at work — Windows XP enables you to configure the wireless adapter to automatically detect and connect to each network on the fly, without further configuration.
To configure one or more wireless networks for automatic connection, follow these steps:
1.In the notification area of the status bar at the bottom of the screen, click the Network icon to display the Wireless Network Connection dialog box and then click the Properties button.
Chapter 7: Setting Up Your Windows PCs for Wireless Networking 131
2.In the Wireless Network Connection Properties dialog box (see Figure 7-7) that appears, click the Wireless Networks tab.
Notice that your home wireless network is already listed. If your computer is in range of the second wireless network, its SSID will also be listed.
Figure 7-7:
The Wireless Network Connection Properties dialog box.
3.To add another network to the list, click the Add button on the Wireless Networks tab.
4.In the Wireless Network Properties dialog box that appears, type the network name (SSID) of the other wireless network to which you will be connecting your computer in the Network Name text box.
You’d want to enter the network name (SSID) for the wireless network at your office, for example.
5.If you’re connecting to a wireless network at your office, make sure that you have appropriate authorization and check with the network administrator for encryption keys and authorization procedures that he or she has implemented.
If the network administrator has implemented a system for automatically providing users with WEP keys, click OK.
If the wireless network to which you plan to connect doesn’t have an automatic key distribution system in place, do this:
a.Deselect the The Key Is Provided for Me Automatically check box.
b.Enter the WEP key.
c.Click OK to save this network SSID.