

The ABC’s of AutoLISP by George Omura
Chapter 2: Storing and Running Programs
Introduction |
How to Create a Program |
Creating an AutoLISP Program |
Local and Global Variables |
What You need |
Automatic Loading of Programs |
Creating an AutoLISP File |
Managing large Acad.LSP Files |
Loading an AutoLISP File |
Using AutoLISP in a Menu |
Running a loaded Program |
Using Script files |
Understanding How a program Works |
Conclusion |
Using AutoCAD Commands in a Program |
|
Introduction
In the last chapter, you learned how to use the interpreter and in the process, you were introduced to some of the basic concepts of AutoLISP. You can now enter simple expressions into the interpreter to perform specific tasks. But once you exit the drawing editor, all of your work in AutoLISP is lost. AutoLISP would be difficult to use if there weren't some way of storing your functions for later retrieval. It would be especially difficult to create complex programs if you could only load them into the interpreter from the keyboard one line at a time. In this chapter, you will explore the development of programs through the use of AutoLISP files and in the process, review the AutoLISP concepts you learned in chapter 1.
Creating an AutoLISP Program
Instead of entering all of your functions directly into the interpreter, you have the option of writing them in a text file outside of AutoCAD. Later, when you want to use your function, you can quickly load and run them using the AutoLISP Load function. Functions you store and load in this way will act just as if you entered them into the interpreter manually. Since you can easily edit and review your functions in a word processor, you can begin to develop larger, more complex functions and programs.
What you Need
Before you can create an AutoLISP file, you need a word processor that will read and write ASCII files. ASCII stands for American Standard Code for Information Interchange. As the name implies, ASCII format was created to allow different computing systems to exchange data with each other. Most word processors allow you to generate files in this format. In this and the preceding chapters, whenever we say to open or create an AutoLISP file, we are asking you to open an ASCII file using your word processor. You can use the Windows Notepad to do most of your
29
Copyright © 2001 George Omura,,World rights reserved

The ABC’s of AutoLISP by George Omura
AutoLISP work. Most other word processors will also save and read ASCII files, usually called TXT files in Windows.
Creating an AutoLISP File
The most common way to store AutoLISP programs is to save it as a text file with the extension .lsp. This file should contain the same information you would enter through the keyboard while using the interpreter interactively. We suggest that you create a directory called /LSP in which you can store all of your AutoLISP programs. By keeping your programs together in one directory, you are able to manage them as their numbers grow.
The program listed in figure 2.1 combines many of the concepts you have learned in chapter one into a single AutoLISP program. You will create a file containing this program then load and run the program into AutoCAD to see how it works. We use the term program to describe a function that performs a task when entered at the AutoCAD command prompt, even though programs such as the one in Figure 2.1 can still be considered functions
(defun c:BOX ( / pt1 pt2 pt3 pt4 )
(setq pt1 (getpoint "Pick first corner: "))
(setq pt3 (getcorner pt1 "Pick opposite corner: ")) (setq pt2 (list (car pt3) (cadr pt1)))
(setq pt4 (list (car pt1) (cadr pt3)))
(command "line" pt1 pt2 pt3 pt4 "c" )
)
Figure 2.1: A program to draw boxes
1.Use the Windows notepad to create a new text file called Box1.lsp
2.Carefully enter the first line from figure 2.1. Or you can simply cut and paste the data from this document into the Box1.lsp file.
(defun C:BOX (/ pt1 pt2 pt3 pt4)
Be sure you have entered everything exactly as shown before you go to the next line. Pay special attention to the spaces between elements of the line. Also note the capitalization of letters. Capitalization is not particularly important at this point however.
3.Press return to move to the next line.
4.Carefully, enter the second line again checking your typing and the spacing between elements before go to the next line. Also be sure to use the Shift-Apostrophe key for the double quotes, do not use two
30
Copyright © 2001 George Omura,,World rights reserved
The ABC’s of AutoLISP by George Omura
apostrophes.
5. Continue entering each line as described in the previous steps. When you are done, double check your file for spelling errors and make sure the parentheses are balanced. Save and exit the Box1.lsp file. You now have a program that you can load and run during any AutoCAD editing session.
Loading an AutoLISP file
To load an AutoLISP file you use an AutoLISP
1.Start AutoCAD and create a new file called Box1.
2. When you are in the drawing editor, enter the following at the command prompt:
(load "box")
If the Box.lsp file is in a directory other than the current directory, the \lsp directory for example, enter
(load "/lsp/box")
The box program is now available for you to run.
As you can see, the Load function is used like any other AutoLISP function. It is the first element of an expression followed by an argument. The single argument to the load function is always a string value. Notice that within the string in the above example, the forward slash sign is used to designate a directory instead of the usual backslash. This is important to keep in mind as it is a source of confusion to both novice and experienced AutoLISP users. AutoLISP uses the backslash to denote special codes within strings. Whenever AutoLISP encounters a backslash within a string, it expects a code value to follow. These codes allow you to control the display of strings in different ways such as adding a carriage return or tab. If you use the backslash to designate directories, you must enter it twice as in the following example:
(load "\\lsp\\box")
Once the file is loaded, you will get the message:
C:BOX
You may have noticed that Load uses a string data type for its argument. Just as with numbers, strings evaluate to themselves, so when AutoLISP tries to evaluate "/lsp/box" the result is "/lsp/box".
Running a Loaded Program
Once you have loaded the box program, you can run it at any time during the current editing session. However, once you exit AutoCAD the program is not saved with the file. You must re-load the program file in subsequent editing sessions before it can be used again. Now try running the program.
1. First, set the snap mode and the dynamic coordinate readout on.
31
Copyright © 2001 George Omura,,World rights reserved
The ABC’s of AutoLISP by George Omura
2. Enter the word Box at the command prompt. You should get the following prompt:
Pick first corner:
3. If your screen is in text mode, use the F2 key to shift to the graphic screen. Move the cursor so that the coordinate readout reads 2.0000,3.0000 and pick that point. The next prompt appears:
Pick opposite corner:
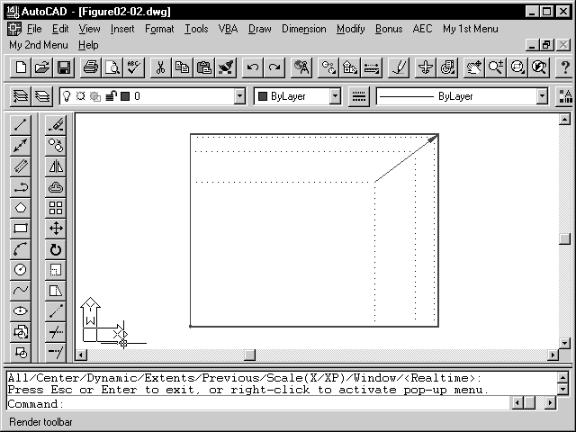
4. Now move your cursor. A window follows the motion of your cursor (see figure 2.2). Move the corner of the window to the so that the coordinate 8.0000,6.000 is displayed on the coordinate readout then pick that point. The box is drawn and the Command prompt returns. Figure 2.3 gives you a general description of how this box program works.
Figure 2.2: The Getcorner window
32
Copyright © 2001 George Omura,,World rights reserved