


The ABC’s of AutoLISP by George Omura
How to read ASCII text files
There are many reasons why you may want to have a program read from and write to an ASCII file. You may store commonly used general notes in ASCII files on your hard disk which you would import into your drawing. Or you may want to store drawing information on disk for later retrieval such as layering setup or block lists.
Using a File Import Program
The program shown in figure 7.11 is a rudimentary text import program. In this section, you will use it to examine the way AutoLISP reads external ASCII files.
(Defun C:IMPRT (/ sp dt stl qst)
(setq nme (getstring "\nName of text file to import: ")) (setq sp (getpoint "\nText starting point: "))
(setq txt (open nme "r")) (setq dt (read-line txt))
(setq lns (getdist "\nEnter line spacing in drawing units: ")) (setq ls (rtos lns 2 2))
(setq ls (strcat "@" ls "<-90")) (command "text" sp "" "" dt)
(while (/= dt nil)
(setq dt (read-line txt)) (command "text" ls "" "" dt)
)
(close txt) (command "redraw")
)
Figure 7.11: A text import program
Create an ASCII file containing the program in figure 7.13. Give it the name Imprt.lsp. Go back to the Chapt7 AutoCAD file and load the Imprt.lsp file. Now run the program:
1.Enter imprt at the Command prompt.
2.At the prompt:
Name of text file to import:
Enter imprt.lsp.
152
Copyright © 2001 George Omura,,World rights reserved
The ABC’s of AutoLISP by George Omura
3. At the next prompt:
Text starting point:
pick a point at coordinate 2,8. 4. At the next prompt:
Enter line spacing in drawing units:
enter .4.
The contents of the file Imprt.lsp will be written into the drawing area using AutoCAD text.
The C:IMPRT program starts out by prompting the user to identify the file to be imported. The user is prompted to enter the name of the file to be imported:
(Defun C:IMPRT (/ sp dt stl qst)
(setq nme (getstring "\nName of text file to import: "))
The entered name is saved as the variable nme. Next, the starting point is gotten:
(setq sp (getpoint "\nText starting point: "))
This point is saved as sp. The last prompt sets up the line spacing:
(setq lns (getdist sp "\nEnter line spacing in drawing units: "))
The spacing distance is assigned to the variable lns. Note that getdist is used so the user can input a distance either through the keyboard or cursor.
In the next line, the AutoLISP function open is used to open the file to be imported:
(setq txt (open nme "r"))
In this expression, you are telling AutoLISP to open a file to be read, then assign that file to the variable txt. From this point on, you can treat the variable txt as if it were a read only version of the file itself. This variable that assumes the idobject of the file is called the file descriptor. At first, it may seem confusing that you assign the file name to a variable that is used to locate and open the file then assign the open file to a variable of a different name. But you cannot perform file reads and writes directly through a variable of the same name as the file. You can, however, assign an open file to a symbol then treat that symbol as if it were the file itself.
The syntax for open is:
(open [name of file] [read or write code])
The first argument is the name of the file to be opened. The second argument is a code that tells AutoLISP whether to allow read only, write only or appending operations on the file. The following table shows the codes and their meaning.
153
Copyright © 2001 George Omura,,World rights reserved
The ABC’s of AutoLISP by George Omura
Code Uses
"r"
"w"
"a"
Open a file for reading only. If the file does not exist, any attempts to read from it will result in an error message.
Open a file to write to. If the file already exists, its contents will be written over. If the file does not exist, it will be created
Open a file and append to the end if it. If the file does not exist, it will be created.
The next line uses the AutoLISP function read-line to read the first line of text from the open file:
(setq dt (read-line txt))
A line of text is read from the file represented by the symbol txt and is assigned to the variable dt. Read-line has only one argument, the file descriptor. When the file is first opened, AutoLISP goes to the beginning of the file in preparation to read it. Read-line reads the first line then AutoLISP moves to the second line waiting for further instructions to read the file. The next time the expression:
(read-line txt)
is evaluated, AutoLISP will read the next line after the previously red line then move to the following line and wait for another read-line function call.
The next two lines set up the location of the beginning of the text in the drawing editor:
(setq ls (rtos lns 2 2))
(setq ls (strcat "@" ls "<-90"))
The numeric value entered at the line spacing prompt is converted to a string then appended to the "@" and "<-90" strings to create a string that can be used in the text command that follows. The next line writes the text from the first line of the file into the AutoCAD drawing:
(command "text" sp "" "" dt)
The following while expression continually reads lines from the open file and writes them to the AutoCAD drawing editor:
(while (/= dt nil)
(setq dt (read-line txt))
(command "text" ls "" "" dt)
)
The read-line function will return nil when it reaches the end of the file. At that point, the while expression stops its recursion).
154
Copyright © 2001 George Omura,,World rights reserved
The ABC’s of AutoLISP by George Omura
Finally, to take care of housekeeping, the open file is closed.
(close txt)
This is a very important step in the file reading process. If a file is not closed, the contents of that file can be lost.
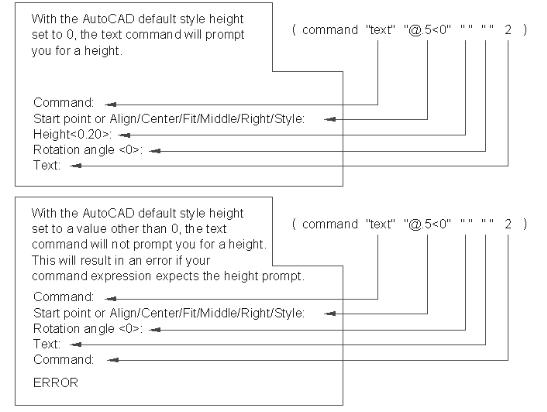
We should mention that C:IMPRT requires the current text style to have a height value of 0. If this is not the case, then the program will not work properly. This is because in the line that actually writes the text into the drawing editor:
(command "text" ls "" "" dt)
assumes that AutoCAD will prompt for a height value for the text. The height prompt occurs only when the current text style has a height value of 0. If the current text style has a height value other than 0, the height prompt is skipped. This would cause the above expression to add one too many returns in the text command sequence (see figure 7.12).
Figure 7.12: The text command expects specific input
155
Copyright © 2001 George Omura,,World rights reserved