

The ABC’s of AutoLISP by George Omura
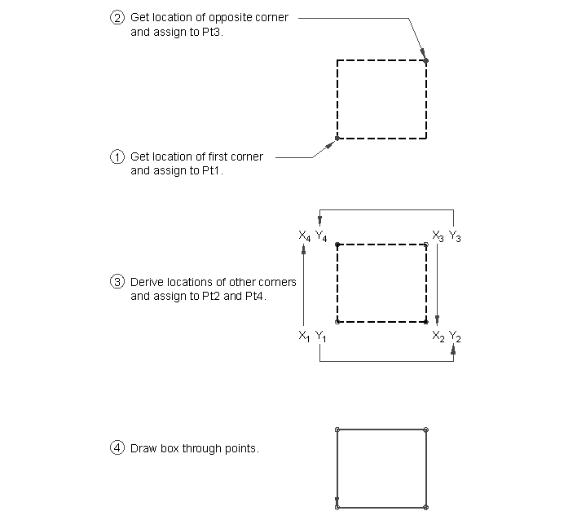
Figure 3.1: Sample sketch used to develop box.lsp
Using Functions
We have broken the box program down conceptually into three processes. We can also break it down physically by turning each process into a function as in the following:
50
Copyright © 2001 George Omura,,World rights reserved
The ABC’s of AutoLISP by George Omura
(defun getinfo ()
(setq pt1 (getpoint "Pick first corner: "))
(setq pt3 (getcorner pt1 "Pick opposite corner: "))
)
(defun procinfo ()
(setq pt2 (list (car pt3) (cadr pt1))) (setq pt4 (list (car pt1) (cadr pt3)))
)
(defun output ()
(command "line'' pt1 pt2 pt3 pt4 "c'' )
)
You now have three functions that can be called independently. We now need a way to tie these functions together. We can write a main program that does just that:
(defun C:BOX1 (/ pt1 pt2 pt3 pt4)
(getinfo)
(procinfo)
(output)
)
Let's see how this new version of the Box drawing program works.
1.Open a new AutoLISP file called box1.lsp.
2.Enter the above three functions, Getinfo, Procinfo, and output, along with the new box program. Your file should look like Figure 3.2.
3.Open a new AutoCAD file called chapt3= and load the Box1.lsp file.
4.Run the C:BOX1 program. You will see that it acts no differently from the first box program in chapter 1.
51
Copyright © 2001 George Omura,,World rights reserved

The ABC’s of AutoLISP by George Omura
(defun getinfo ()
(setq pt1 (getpoint "Pick first corner: "))
(setq pt3 (getcorner pt1 "Pick opposite corner: "))
)
(defun procinfo ()
(setq pt2 (list (car pt3) (cadr pt1))) (setq pt4 (list (car pt1) (cadr pt3)))
)
(defun output ()
(command "pline" pt1 pt2 pt3 pt4 "c" )
)
(defun C:BOX1 (/ pt1 pt2 pt3 pt4) (getinfo)
(procinfo)
(output)
)
Figure 3.2: The contents of box1.lsp
The C:Box1 program listed above acts as a sort of master organizer that evaluates each of the three functions, getinfo, procinfo, and output, as they are needed. This modular approach to programming has several advantages.
First, since each function exists independently, they can be used by other programs thereby reducing the amount of overall code needed to run your system. Though in the above example, we actually increased the size of the Box program, as you increase the number of program you use, you will find that you can use functions from this program in other programs. Functions you write in this way can serve as tools in building other programs.
Second, while writing programs, you can more easily locate bugs since they can be localized within one function or another. Whenever AutoCAD encounters an error, it displays an error message along with the offending expression.
Third, smaller groups of code are more manageable making your problem solving task seem less intimidating. The actual Box program represents the problem in general terms while the functions take care of the details. You can get a clearer idea of how your programs work because clarity is built into the program by virtue of this modular structure.
Finally, features can be added and modified more easily by "plugging" other functions either into the main program or into the individual functions that make up the program.
52
Copyright © 2001 George Omura,,World rights reserved

The ABC’s of AutoLISP by George Omura
Adding a Function
As great a program AutoCAD is, it does have some glaring shortcomings. One is the fact that it does not dynamically display relative X and Y coordinates. It does display relative polar coordinates dynamically, but often, it is helpful to see distances in relative X and Y coordinates. One example where this would be useful is in the creation of floor plans where a dynamic reading of relative X and Y coordinates could help you size rooms in a building. It would be also helpful if this dynamic readout would display the rooms area as the cursor moved. Figure 3.3 Shows a function that displays relative X and Y coordinates in the status line.
(defun RXY (/ pt lt x last pick lpt1)
(if (not pt1)(setq lpt1 (getvar "lastpoint"))(setq lpt1 pt1)) (while (/= pick t)
(setq pt (cadr (setq lt (grread t)))) (if (= (car lt) 5)(progn
(setq x (strcat
(rtos (- (car pt) (car lpt1))) " x " (rtos (- (cadr pt) (cadr lpt1))) " SI= " (rtos (*(- (car pt) (car lpt1))
(- (cadr pt) (cadr lpt1))
)
2 2)
)
)
(grtext -2 x)
)
)
(setq pick (= 3 (car lt)))
)
(cadr lt)
)
Figure 3.3: The RXY function
1.Exit AutoCAD temporarily either by using the AutoCAD Shell command or by using the End command to exit AutoCAD entirely.
2.Open an AutoLISP file called Rxy.lsp and copy the program listed in figure 3.4. Check your file carefully against the listing to be sure it is correct.
3.Return to the Chapt3 AutoCAD file.
4.Turn on the snap and dynamic coordinate readout.
5.Load Rxy.LSP then start the line command.
53
Copyright © 2001 George Omura,,World rights reserved
The ABC’s of AutoLISP by George Omura
6. At the First point prompt, pick the coordinate 2,2 then, at the next point prompt, enter the following:
(rxy)
Notice how the coordinate readout now dynamically displays the relative XY coordinates from the first point you picked.
7. Move the cursor until the coordinate readout lists 6.0000,7.0000 then pick that point. A line is draw with a displacement from the first point of 6,7.
We won't go into a detailed explanation of this function quite yet. Imagine, however, that you have just finished writing and debugging this function independent of the box program and you want to add it permanently to the box program.
1.Exit AutoCAD temporarily either by using the AutoCAD Shell command or by using the End command to exit AutoCAD entirely.
2.Open the box1.lsp file and change the Getinfo function to the following:
(defun getinfo ()
(setq pt1 (getpoint "Pick first corner: ")) (princ "Pick opposite corner: ")
(setq pt3 (rxy))
)
Your new Box1.lsp file should look like figure 3.4. We have replaced the expression that obtains PT3 with two lines, one that displays a prompt:
(princ "Pick opposite corner: ")
and another that uses the RXY function to obtain the location of PT3:
(setq pt3 (rxy))
Now when you use the box program, the width and height of the box along with its area are displayed on the status prompt.
3.Return to the Chapt3 file.
4.Load the Rxy.lsp and Box1.lsp files.
5.Run the C:BOX1 program by entering box1 at the command prompt.
6.Make sure the Snap mode and Dynamic coordinate readout are both on.
7.At the Pick first corner prompt, pick the coordinate 2,3.
54
Copyright © 2001 George Omura,,World rights reserved