

The ABC’s of AutoLISP by George Omura
Functions for Assigning Values to Variables
So far, you have been entering everything from the keyboard. However, you will most often want to bet information from the drawing area of the AutoCAD screen. AutoLISP offers a set of functions just for this purpose. These functions are characterized by their GET prefix. Table 1.2 shows a list of these Get functions along with a brief description.
Table 1.2: Functions that pause to allow input
FUNCTION |
DESCRIPTION |
Getpoint |
Allows key or mouse entry of point values. This always |
|
returns values as lists of coordinate values. |
Getcorner |
Allows selection of a point by using a window. this |
|
function requires a base point value defining the first |
|
corner of the window. The window appears, allowing |
|
you to select the opposite corner. |
Getorient |
Allows key or mouse entry of angles based on Units |
|
command setting for angles. Returns values in radians. |
Getangle |
Allows key or mouse entry of angles based on the |
|
standard AutoCAD compass orientation of angles. |
|
Returns values in radians. |
Getdist |
Allows key or mouse entry of distances. This always |
|
returns values as real numbers regardless of the unit |
|
format in use. |
To see how one of these functions works, try the following exercise.
1.Turn your snap mode on by pressing the F9 function key.
2.Turn on the dynamic coordinate readout by pressing the F6 function key.
3.Enter the following at the command prompt:
(setq pt1 (getpoint))
This expression blanks the command line and waits until you enter a point. Just as with any standard AutoCAD command that expects point input, you can enter a relative or absolute point value through the keyboard or pick a point on the drawing area using the cursor. The coordinate of the point you pick will become the value assigned to the variable Pt1 in the form of a list.
4. Move your cursor until the coordinate readout lists the coordinate 4,5 then pick that point.
25
Copyright © 2001 George Omura,,World rights reserved
The ABC’s of AutoLISP by George Omura
5. Check the value of pt1 by entering the following:
!pt1
The value (4.0 5.0 0.0) is returned and the command prompt appears once again
Note that a Z coordinate value of 0.0 was added and that all the elements of the coordinate list are reals.
Adding Prompts
All these Get functions allow you to create a prompt by following the function with the prompt enclosed by quotation marks. The following demonstrates the use of prompts in conjunction with these functions.
1. Enter the following expression:
(setq pt1 (getpoint ``Pick the first point:''))
The following prompt appears:
Pick the first point:
2. Move your cursor until the coordinate readout reads 3,4 then pick that point.
The Get functions allow you to specify a point from which the angle, distance, or point is to be measured. 3. Enter the following:
(setq pt2 (getcorner pt1 ``Pick the opposite corner:''))
the following prompt appears:
Pick the opposite corner:
Pt1 is the point variable that holds the coordinate for the last point you picked. A window appears from the coordinate defined by Pt1.
4. Move the cursor until the coordinate readout reads 6,7 then pick that point.
You can also enter a relative coordinate through the keyboard in the unit system currently used in your drawing.
26
Copyright © 2001 George Omura,,World rights reserved
The ABC’s of AutoLISP by George Omura
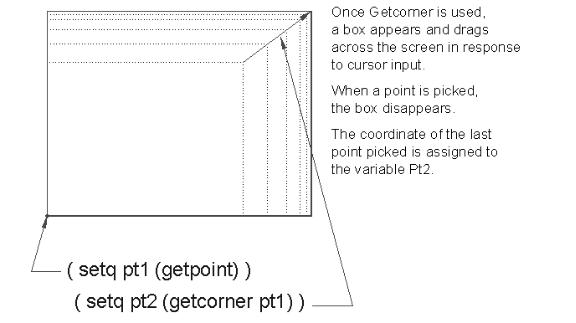
Getangle and Getdist prompt you for two points if a point variable is not provided. Getcorner always requires a point variable (see Figure 1.13).
Figure 1.13: The Getcorner function as it appears on the drawing area
By using the Getpoint and getcorner functions, you can easily store point and angle values as variables. You can then refer to a stored point by entering its variable in response to a command prompt that accepts point input.
5. Issue the line command and at the From point prompt, enter:
!pt1
A rubber-banding line appears from the point previously defined as pt1 just as if you had selected that point manually.
6. Now enter the following:
!pt2
A line is drawn from the point stored by pt1 to the point stored by pt2.
27
Copyright © 2001 George Omura,,World rights reserved
The ABC’s of AutoLISP by George Omura
Conclusion
So far, you have been introduced to the AutoLISP interpreter and to some of the terms used and a few of the function available in AutoLISP. You have also been introduced to six basic rules key to the use of AutoLISP. In summary, these rules are:
•The AutoLISP Expression is the fundamental structure of all AutoLISP programs.
•All AutoLISP expressions begin and end with parentheses with the first element of the expression being an operator or function followed by the arguments to the operator.
•All parentheses and double quotation marks enclosing strings must be balanced within an expression.
•AutoLISP evaluates everything. When it evaluates expressions, it does so by evaluating the arguments before applying the arguments to the function.
•Numbers and strings evaluate to themselves.
•Variables evaluate to the last value assigned to them.
You have seen how you can store values as variables and how you can use AutoLISP to perform math calculations. You may want to apply this knowledge to your everyday use of AutoCAD. Doing so will help you become more comfortable with AutoLISP and will give you further confidence to proceed with more complex programs.
You have also looked at how lists can be broken down and put together through the CAR, CDR, Quote and List functions. List manipulation can be a bit harry so take some time to thoroughly understand these functions. You may want to practice building lists just to get a better feel for this unusual data type.
In Chapter 2, you will learn how to create an AutoLISP program. You will also learn how to permanently store AutoLISP functions so that they can be later retrieved during subsequent editing sessions.
28
Copyright © 2001 George Omura,,World rights reserved