- •Introduction
- •Who should read this book
- •How This Book Is Organized
- •How to Use This Book
- •Where to Find the LISP Programs
- •CHAPTER 1: Introducing AutoLISP
- •Understanding the Interpreter and Evaluation
- •The Components of an Expression
- •Using Arguments and Expressions
- •Using Variables
- •Understanding Data Types
- •Integers and Real Numbers
- •Strings
- •Lists
- •File Descriptors
- •Object Names
- •Selection Sets
- •Symbols
- •Subrs
- •Atoms
- •Assigning Values to Variables with Setq
- •Preventing Evaluation of Arguments
- •Applying Variables
- •Functions for Assigning Values to Variables
- •Adding Prompts
- •CHAPTER 2: Storing and Running Programs
- •Creating an AutoLISP Program
- •What you Need
- •Creating an AutoLISP File
- •Loading an AutoLISP file
- •Running a Loaded Program
- •Understanding How a Program Works
- •Using AutoCAD Commands in AutoLISP
- •How to Create a Program
- •Local and Global Variables
- •Automatic Loading of Programs
- •Managing Large Acad.lsp files
- •Using AutoLISP in a Menu
- •Using Script Files
- •CHAPTER 3: Organizing a Program
- •Looking at a Programs Design
- •Outlining Your Programming Project
- •Using Functions
- •Adding a Function
- •Reusing Functions
- •Creating an 3D Box program
- •Creating a 3D Wedge Program
- •Making Your Code More Readable
- •Using Prettyprint
- •Using Comments
- •Using Capitals and Lower Case Letters
- •Dynamic Scoping
- •CHAPTER 4: Interacting with the Drawing Editor
- •A Sample Program Using Getdist
- •How to Get Angle Values
- •Using Getangle and Getorient
- •How to Get Text Input
- •Using Getstring
- •Using Getkword
- •How to Get Numeric Values
- •Using Getreal and Getint
- •How to Control User Input
- •Using Initget
- •Prompting for Dissimilar Variable Types
- •Using Multiple Keywords
- •How to Select Groups of Objects
- •Using Ssget
- •A Sample Program Using Ssget
- •CHAPTER 5: Making Decisions with AutoLISP
- •Making Decisions
- •How to Test for Conditions
- •Using the If function
- •How to Make Several Expressions Act like One
- •How to Test Multiple Conditions
- •Using the Cond function
- •How to Repeat parts of a Program
- •Using the While Function
- •Using the Repeat Function
- •Using Test Expressions
- •CHAPTER 6: Working With Geometry
- •How to find Angles and Distances
- •Understanding the Angle, Distance, and Polar Functions
- •Using Trigonometry to Solve a Problem
- •Gathering Information
- •Finding Points Using Trigonometry
- •Functions Useful in Geometric Transformations
- •Trans
- •Atan
- •Inters
- •CHAPTER 7: Working with Text
- •Working With String Data Types
- •Searching for Strings
- •Converting a Number to a String
- •How to read ASCII text files
- •Using a File Import Program
- •Writing ASCII Files to Disk
- •Using a Text Export Program
- •CHAPTER 8: Interacting with AutoLISP
- •Reading and Writing to the Screen
- •Reading the Cursor Dynamically
- •Writing Text to the Status and Menu Areas
- •Calling Menus from AutoLISP
- •Drawing Temporary Images on the Drawing Area
- •Using Defaults in a Program
- •Adding Default Responses to your Program
- •Dealing with Aborted Functions
- •Using the *error* Function
- •Organizing Code to Reduce Errors
- •Debugging Programs
- •Common Programming Errors
- •Using Variables as Debugging Tools
- •CHAPTER 9: Using Lists to store data
- •Getting Data from a List
- •Using Simple Lists for Data Storage
- •Evaluating Data from an Entire List at Once
- •Using Complex Lists to Store Data
- •Using Lists for Comparisons
- •Locating Elements in a List
- •Searching Through Lists
- •Finding the Properties of AutoCAD Objects
- •Using Selection Sets and Object Names
- •Understanding the structure of Property Lists
- •Changing the properties of AutoCAD objects
- •Getting an Object Name and Coordinate Together
- •CHAPTER 10: Editing AutoCAD objects
- •Editing Multiple objects
- •Improving Processing Speed
- •Using Cmdecho to Speed up Your Program
- •Improving Speed Through Direct Database Access
- •Filtering Objects for Specific Properties
- •Filtering a Selection Set
- •Selecting Objects Based on Properties
- •Accessing AutoCAD's System Tables
- •CHAPTER 11: Accessing Complex Objects
- •Accessing Polyline Vertices
- •Defining a New Polyline
- •Drawing the new Polyline
- •Testing for Polyline Types
- •How Arcs are Described in Polylines
- •Accessing Object Handles and Block Attributes
- •Using Object Handles
- •Extracting Attribute Data
- •Appendix A: Menu Primer
- •Appendix B: Error Messages
- •Appendix C: Group Codes
The ABC’s of AutoLISP by George Omura
Creating a 3D Wedge Program
Let's create a new program that draws a wedge shape based on similar information given for the 3d box. Figure 3.9 shows how you might draw a wedge based on the rectangle drawn from the box program.
Figure 3.9: A program to draw a 3D wedge
The procedure outlined in Figure 3.9 was converted into the following AutoLISP program.
61
Copyright © 2001 George Omura,,World rights reserved
The ABC’s of AutoLISP by George Omura
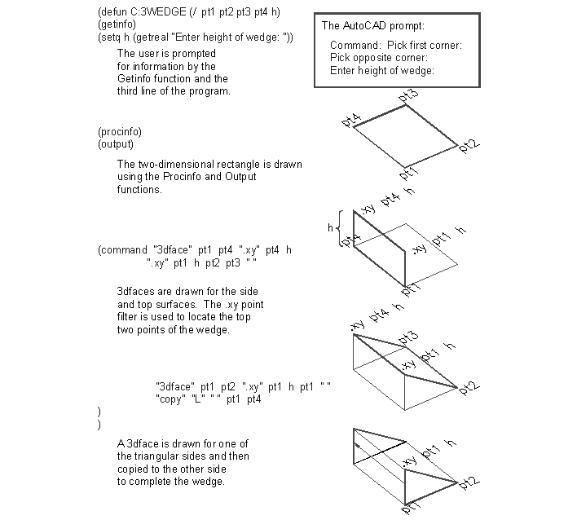
(defun C:3DWEDGE (/ pt1 pt2 pt3 pt4 h) (getinfo)
(setq h (getreal "Enter height of wedge: ")) (procinfo)
(output)
(command "3dface" pt1 pt4 ".xy" pt4 h ".xy" pt1 h pt2 pt3 "" "3dface" pt1 pt2 ".xy" pt1 h pt1 ""
"copy" "L" "" pt1 pt4
)
)
Try the following exercise to see how it works.
1.Exit AutoCAD temporarily either by using the AutoCAD Shell command or by using the End command to exit AutoCAD entirely.
2.Open the box1.lsp file again and add the program listed above to the file.
3.Return to the Chapt3 AutoCAD file.
4.Load Box1.lsp again. If you had to Exit AutoCAD to edit Box1.lsp, Load Rxy.lsp also.
5.Erase the box currently on the screen.
6.Start the C:3DWEDGE program by entering 3dwedge at the command prompt.
7.At the Pick first corner prompt, pick a point at the coordinate 2,3.
8.At the Pick opposite corner prompt, pick a point so the wedge's base is 7 units wide by 5 units wide.
9.At the Enter height prompt, enter 6. A wedge appears.
10.Issue the hide command. The wedge appears as a solid object.
This Wedge program is nearly identical to the C:3DBOX program with some changes to the last expression.
(command "3dface" pt1 pt4 ".xy" pt4 h ".xy" pt1 h pt2 pt3 "" "3dface" pt1 pt2 ".xy" pt1 h pt1 ""
"copy" "L" "" pt1 pt3
)
62
Copyright © 2001 George Omura,,World rights reserved
The ABC’s of AutoLISP by George Omura
The first line of this expression draws a 3d face on the top and vertical face of the wedge. It does this by using AutoCAD's .xy point filter to locate points in the Z coordinate. The second line draws a 3dface on the triangular side of the wedge again using the .xy point filter. The last line copies the triangular face to the opposite side of the wedge. Figure 3.10 shows the entire process.
Figure 3.10: Box1.lsp with the C:3DWEDGE program added
Now you have three programs which use as their basic building blocks the three functions derived from your original Box program. You also have a function, rxy, which can be used independently to dynamically display relative x y coordinates.
63
Copyright © 2001 George Omura,,World rights reserved
The ABC’s of AutoLISP by George Omura
Making Your Code More Readable
The box program is quite short and simple. As your programs grow in size and complexity, however, you will find that it becomes more and more difficult to read. Breaking the program down into modules help to clarify your code. There are other steps you can take to help keep your code readable.
Using Prettyprint
The term Prettyprint is used to describe a way to format your code to make it readable. Indents are used to offset portions of code to help the code's readability. Figure 3.12 shows three examples of the C:3DBOX program. The first example is arranged randomly. The second lists each expression as a line while the third makes use of prettyprint to organize the code visually.
(defun C:3DBOX (/ pt1 pt2 pt3 pt4 h) (getinfo)
(setq h (getreal "Enter height of box: "))(procinfo)(output) (command "change" "Last" "" "Properties" "thickness" h
"" "3dface" pt1 pt2 pt3 pt4 "" "3dface" ".xy" pt1 h ".xy" pt2 h ".xy" pt3 h ".xy" pt4 h ""))
(defun C:3DBOX (/ pt1 pt2 pt3 pt4 h) (getinfo)
(setq h (getreal "Enter height of box: ")) (procinfo)
(output)
(command "change" "Last" "" "Properties" "thickness" h "" "3dface" pt1 pt2 pt3 pt4 ""
"3dface" ".xy" pt1 h ".xy" pt2 h ".xy" pt3 h ".xy" pt4 h ""))
Figure 3.12 (continued on next page): Three ways to format the 3dbox program code
64
Copyright © 2001 George Omura,,World rights reserved