


The ABC’s of AutoLISP by George Omura
(defun C:3DBOX (/ pt1 pt2 pt3 pt4 h) (getinfo)
(setq h (getreal "Enter height of box: ")) (procinfo)
(output)
(command "change" "Last" "" "Properties" "thickness" h "" "3dface" pt1 pt2 pt3 pt4 ""
"3dface" ".xy" pt1 h ".xy" pt2 h ".xy" pt3 h ".xy" pt4 h ""
)
)
Figure 3.12 (continuet)
In the third example, notice how the listing is written under the command function. Each new command to be issued using the command functions is aligned with the next in a column. This lets you see at a glance the sequence of commands being used. Look at the RXY.lsp function in figure 3.3. As you progress through the book, make note of how the listings are written.
Using Comments
It often helps to insert comments into a program as a means of giving a verbal description of the code. Figure 3.13 shows the box program from chapter 1 including comments. The comments start with a semicolon and continue to the end of the line. When AutoLISP encounters a semicolon, it will ignore everything that follows it up to the end of the line. Using the semicolon, you can include portions of your Pseudocode as comments to the program code.
65
Copyright © 2001 George Omura,,World rights reserved

The ABC’s of AutoLISP by George Omura
;Function to draw a simple 2 dimensional box ;----------------------------------------------------------------------
(defun c:BOX (/ pt1 |
pt2 pt3 pt4) |
;define box |
function |
(setq pt1 (getpoint |
"Pick first corner: ")) |
;pick start |
corner |
(setq pt3 |
(getpoint pt1 "Pick opposite corner: "));pick other corner |
|||
(setq |
pt2 |
(list (car pt3) (cadr pt1))) |
;derive |
secondcorner |
(setq |
pt4 |
(list (car pt1) (cadr pt3))) |
;derive |
fourth corner |
(command "line" pt1 pt2 pt3 pt4 "c") |
;draw box |
) |
;close defun |
;Function to display relative XY coordinates in status line ;----------------------------------------------------------------------
(defun RXY (/ pt lt x last pick lpt1)
(if (not pt1)(setq lpt1 (getvar "lastpoint"))(setq lpt1 pt1)) ;get last point
(while (/= pick t) |
|
|
(setq pt (cadr (setq lt (grread t)))) |
;read cursor |
|
(if (= (car lt) 5) |
|
|
(progn |
|
;location |
(setq x (strcat |
|
|
(rtos (- (car pt) (car lpt1))) " x " |
;get X coord |
|
(rtos (- (cadr pt) (cadr lpt1))) " SI= " |
;get Y coord |
|
(rtos (*(- (car pt) (car lpt1)) |
;get area |
|
(- (cadr pt) (cadr lpt1)) |
|
|
) |
;close mult |
|
2 2) |
;close rtos |
|
) |
;close strcat |
|
) |
;close setq x |
|
(grtext -2 x) |
|
;display status |
) |
;close progn |
|
) |
;close if |
|
(setq pick (= 3 (car lt))) |
|
;test for pick |
) |
|
;close while |
(cadr lt) |
|
;return last |
) |
|
;coordinate |
Figure 3.13: Sample of code using comments.
66
Copyright © 2001 George Omura,,World rights reserved
The ABC’s of AutoLISP by George Omura
Using Capitals and Lower Case Letters
In programming, case sensitivity is a term that means a programming language treats upper an lower case letters differently. Except where string variables occur, AutoLISP does not have any strict requirements when it comes to using upper and lower case letters in the code. However, you can help keep you code more readable by using upper case letters sparingly. For example, you may want to use all uppercase letters for defuned function names only. That way you can easily identify user created functions within the code. You can also mix upper and lower case letters for variable names to help convey their meaning. This can help give the variable name more significance while still keeping the name short to conserve space. For example, You might give the name NewWrd for a variable that represents a new string value. NewWrd is more readable than say newwrd.
The only time AutoLISP is case sensitive is where strings variables are concerned. The string "Yes" is different from "yes" so you must take care when using upper and lower case letters in string variable types. We will cover this topic in more detail in the next chapter.
Dynamic Scoping
You may have noticed that in the functions getinfo, procinfo, and output, the argument list is empty (see figure 3-2). There are no variables local to those functions. The variables used in the programs C:BOX1, C:3DBOX, and C:3DWEDGE appear in their argument lists rather than in the functions being called by these programs. A binding is created between variables and their values within these programs so when the program ends, the variables loose the value assigned to them.
On the other hand, there are no variable bindings created within the individual functions called by the main programs so when the functions assign a value to a variables, the variables are free to all the functions used by the main program. This ability of a function to access variables freely from the calling function is known as Dynamic Scoping.
Whenever a function looks for a variables value, it will look at its own local variables first. If the variables value is not found, it then looks to the calling function or program for the value. Finally, if no value is found there, the function will look at the global environment for a value.
We saw this occur in chapter 2 with the Adsquare function. Adsquare looked in the AutoLISP global environment for the value of Golden since golden was not a formal argument to Adsquare (see figure 2.10).
In the case of the C:BOX1 program, all the variables used by the program and the functions it calls are included in its argument list. For this reason, variables have a binding within C:BOX1 but are free tp any of the functions called by C:BOX1.
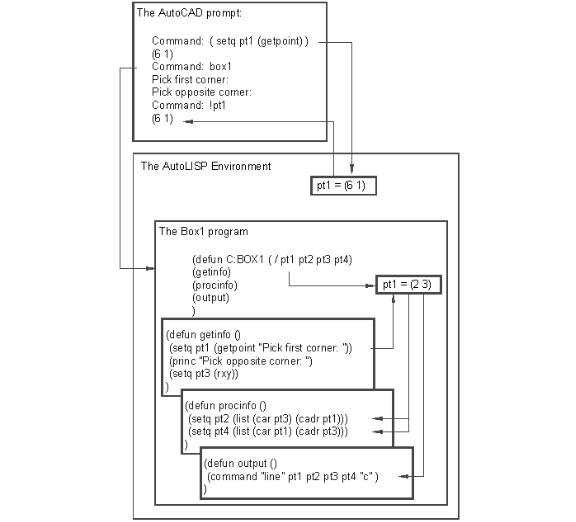
An interesting affect of Dynamic Scoping is the ability to maintain two variables of the same name, each holding different values. To see how this works, do the following.
1. Erase the wedge currently on the screen.
2.Enter the following expression:
(setq pt1 (getpoint))
3.pick a point near the coordinate 6,1. This assigns the coordinate you pick to the variable pt1.
67
Copyright © 2001 George Omura,,World rights reserved
The ABC’s of AutoLISP by George Omura
4.Start the C:BOX1 program.
5.At the Pick first corner prompt, pick a point near the coordinate 2,3.
6.At the Pick opposite corner prompt, pick a point near so the box is about 7 units wide by 5 units wide. The 2D box appears.
7.Issue the line command and at the first point prompt, enter:
!pt1
9. The line will start at the point you selected in step 3 of this exercise.
Figure 3.13: Dynamic Scoping
68
Copyright © 2001 George Omura,,World rights reserved
The ABC’s of AutoLISP by George Omura
In the pervious example, you assigned a point location to the variable pt1. Then you ran the C:BOX1 program which also assigns a value to a variable called pt1. Pt1 in the C:BOX1 program is assigned the coordinate of the first corner point you pick. After the box is drawn, you start the line command and enter the variable pt1 as the starting point.
You might expect the line to start from the corner of the box since it is the point last assigned to pt1. Instead, the line begins at the location you had assigned to pt1 before you ran the wedge program. When you ran the C:BOX1 program, two versions of pt1 existed, The global version of pt1 you created before you ran C:BOX1, and the version of pt1 created by the C:BOX1 program. The C:BOX1 version of pt1 lives and dies within that program and has no affect on the global version of pt1 (see figure 3.13).
Dynamic Scoping of variables can simplify your program coding efforts since you don't have to create an argument list for every functions you write. It can also simplify your management of variables. Dynamic Scoping can also create some interesting side affects as seen in the last exercise. For this reason, you should try and keep track of your variables and use global variables sparingly.
Conclusion
In this chapter you examined methods for designing your programs in an organized fashion. The box example, though simple enough to leave as a single program, allowed you to explore the concept of modular programming. It also showed how a program might be structured to give a clear presentation to both the creator of the program and those who might have to modify it later.
69
Copyright © 2001 George Omura,,World rights reserved