

The ABC’s of AutoLISP by George Omura
The C:SEQ program still requires the two conditional expressions that were added earlier:
(if (not *seqpt)(setq *seqpt 2.0))
.
.
.
(if (not spc)(setq spc *seqpt)(setq *seqpt spc)) ;set global
But without increasing the amount of code, we are able to make a simpler and more flexible system to add prompts to our programs. An added benefit is a more readable program.
Dealing with Aborted Functions
If you are writing programs for yourself, you may not be too concerned with how the program looks or behaves. But if you start to write programs for others to use, you have to start thinking about ways of making your programs more error proof. You should provide ways of easily exiting your program without creating problems for the unfamiliar user. Error handling, as it is often called, is writing your program to include code that anticipates any possible input errors the user might come up with. Fortunately, most of AutoLISPs get functions have some error handling capabilities built in. If you enter a string when a get function expects a point, you will get a message telling you that a point is expected.
But the most common error handling problem you will encounter is the aborted program. We can get an idea of how an aborted program can affect a users work by using the C:BREAK2 program from chapter 6.
Open an AutoCAD file and load the C:BREAK2 program. Start C:BREAK2 by entering break2 at the command prompt. At the prompt:
Select object:
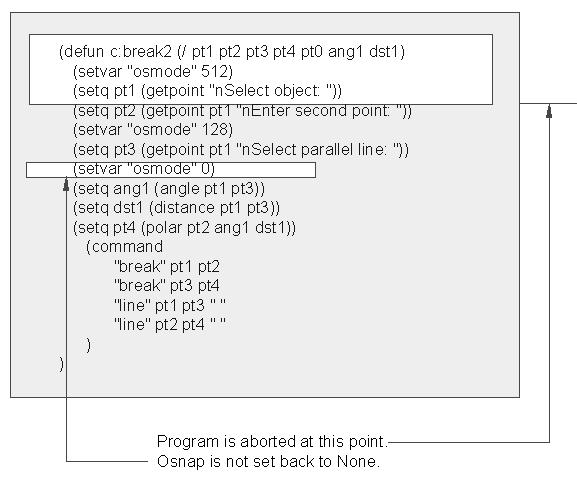
press the Ctrl-C key combination to abort the program. Now any time you use your cursor to select a point or object, you will get the "nearest" osnap override. This because you aborted the program before it was able to set the osnap mode back to none (see figure 8.14).
179
Copyright © 2001 George Omura,,World rights reserved
The ABC’s of AutoLISP by George Omura
Figure 8.14: What happens when C:BREAK2 is aborted
Using the *error* Function
To deal with problems like this, you can use a special AutoLISP function called *error*. If a function is created using *error* as its name, it is evaluated whenever an error occurs. Figure 8.15 shows the Break2.lsp file with the addition if an *error* function. Open the Break2.lsp file and add the *error* function shown in figure 8.16.
180
Copyright © 2001 George Omura,,World rights reserved
The ABC’s of AutoLISP by George Omura
(defun *error* (msg) (setvar "osmode" 0) (princ msg)
(princ)
)
(defun c:break2 (/ pt1 pt2 pt3 pt4 pt0 ang1 dst1) |
|
(setvar "osmode" 512) |
;near osnap mode |
(setq pt1 (getpoint "\nSelect object: ")) |
;get first break point |
(setq pt2 (getpoint pt1 "\nEnter second point: ")) |
;get second break point |
(setvar "osmode" 128) |
;perpend osnap mode |
(Setq pt3 (getpoint pt1 "\nSelect parallel line: "));get 2nd line |
|
(Setvar "osmode" 0) |
;no osnap mode |
(setq ang1 (angle pt1 pt3)) |
;find angle btwn lines |
(setq dst1 (distance pt1 pt3)) |
;find dist. btwn lines |
(setq pt4 (polar pt2 ang1 dst1)) |
;derive pt4 on 2nd line |
(command |
|
"break" pt1 pt2 |
;break 1st line |
"break" pt3 pt4 |
;break 2nd line |
"line" pt1 pt3 "" |
;close ends of lines |
"line" pt2 pt4 "" |
|
) |
|
) |
|
|
|
Figure 8.15: The Break2.lsp file with an error checking function added.
Save the file go back to the AutoCAD file. Be sure that osnap is set to "none". Load and start the C:Break2 program. Again, at the Select object prompt, enter a Ctrl-C.
Now, instead of leaving the osnap mode in the "nearest" setting, the *error* function returns the osnap setting back to "none". It also prints the message:
Function cancelled
Lets look at this function to see exactly how it works. The first line looks like a typical defun expression:
(defun *error* (msg)
The argument list contains the symbol msg. *error* accepts as an argument, an error message. This error message is the one that appears normally without the *error* function. In the next line:
(setvar "osmode" 0)
181
Copyright © 2001 George Omura,,World rights reserved

The ABC’s of AutoLISP by George Omura
the osnap mode is set back to 0. Next, the error message supplied by AutoLISP is printed to the AutoCAD prompt:
(princ msg)
The last princ prevents the error message from appearing twice in the prompt.
This works very nicely assuming that you always have osnap set to "none". But suppose your osnap setting varies during your editing session and you want your function to return to whatever the current setting is at the time a program is issued. Figure 6.16 shows the Break2 program again with some additional code that helps restore the osnap setting to its previous setting regardless of what it may have been.
(defun *error* (msg) (setvar "osmode" *osnap) (princ msg)
(princ)
)
(defun c:break2 (/ pt1 pt2 pt3 pt4 pt0 ang1 dst1) |
|
(setq *osnap (getvar "osmode")) |
|
(setvar "osmode" 512) |
;near osnap mode |
(setq pt1 (getpoint "\nSelect object: ")) |
;get first break point |
(setq pt2 (getpoint pt1 "\nEnter second point: ")) |
;get second break point |
(setvar "osmode" 128) |
;perpend osnap mode |
(Setq pt3 (getpoint pt1 "\nSelect parallel line: "));get 2nd line |
|
(Setvar "osmode" *osnap) |
;no osnap mode |
(setq ang1 (angle pt1 pt3)) |
;find angle btwn lines |
(setq dst1 (distance pt1 pt3)) |
;find dist. btwn lines |
(setq pt4 (polar pt2 ang1 dst1)) |
;derive pt4 on 2nd line |
(command |
|
"break" pt1 pt2 |
;break 1st line |
"break" pt3 pt4 |
;break 2nd line |
"line" pt1 pt3 "" |
;close ends of lines |
"line" pt2 pt4 "" |
|
) |
|
) |
|
Figure 8.16: The C:BREAK2 program modified to handle any osnap setting
The line:
(setq *osnap (getvar "osmode"))
is added to the beginning of the program. This creates a global variable *osnap which holds the osnap code that determines the current osnap setting. The expression that returns the osnap mode to "none":
182
Copyright © 2001 George Omura,,World rights reserved