

The ABC’s of AutoLISP by George Omura
Chapter 10: Editing AutoCAD objects
Introduction
Editing Multiple Objects
Finding the Number of Objects in a Selection Set
Improving Processing Speed
Using Cmdecho to speed up your programs
Improving speed through direct database access
Filtering Objects for Specific Properties
Filtering a selection set
Selecting Objects Based on Properties
Accessing AutoCAD's System Tables
Conclusion
Introduction
In the last chapter you were introduced to the ssname and entget functions that, together with ssget, allowed you to extract information about an object from the drawing database. In this chapter, you will learn how to perform operations on several objects at once. Also, you will look at how to obtain information regarding a drawing's table information which consists of layers and their settings, viewport, UCSs and other system options.
There are actually several functions that allow you to access the AutoCAD drawing database directly. Table Lists the functions and gives a brief description of each.
211
Copyright © 2001 George Omura,,World rights reserved
The ABC’s of AutoLISP by George Omura
Function |
Description |
(entnext [object name]) |
If used with no argument, entnext will return the object name of the first |
|
object in the database. If an object name is given as an argument, entnext |
|
returns the first sub-object of object name. A sub-object is an object |
|
contained in a complex object such as a polyline vertex or a block attribute. |
(entlast) |
Returns the object name of the last object added to the drawing database. |
(entsel [prompt]) |
Prompts the user to select an object then returns a list whose first element is |
|
the object's name and whose second element is the pick point used to select |
|
the object. A prompt can be optionally added. If no prompt is used, the |
|
prompt "Select object:" is given automatically. |
(handent handle) |
Returns an object name given an object's handle. |
(entdel object name) |
Deletes object name. If object has previously been deleted in the current |
|
editing session, then the object named will be restored. |
(entget object name) |
Returns the property list of object name |
(entmod property list) |
Updates the drawing database record of the object whose object name appears |
|
in the property list. The object name is the -1 group code sublist of the |
|
property list. |
(entupd object name) |
Updates the display of polyline vertices and block attributes that have been |
|
modified using entmod. |
You have already seen first hand how a few of these functions work. In this and the following chapter, you will explore the use of several more of these very powerful editing tools.
Editing Multiple objects
The Edtxt program you looked at in the last chapter used ssget to obtain a single object. However, ssget is really better suited to obtaining multiple sets of objects. You can use groups of objects collected together as selection sets to perform some operation on them all at once.
To examine methods for editing multiple objects, we will look at a program that offers an alternate to the Extend command. Though Extend allows you to extend several objects, you have to pick each object individually. Picking objects individually allows for greater flexibility in the type of object you can extend and the location of the extension. However, there are times when you will want to perform a multiple extend operations like extending several lines to a another line.
212
Copyright © 2001 George Omura,,World rights reserved
The ABC’s of AutoLISP by George Omura
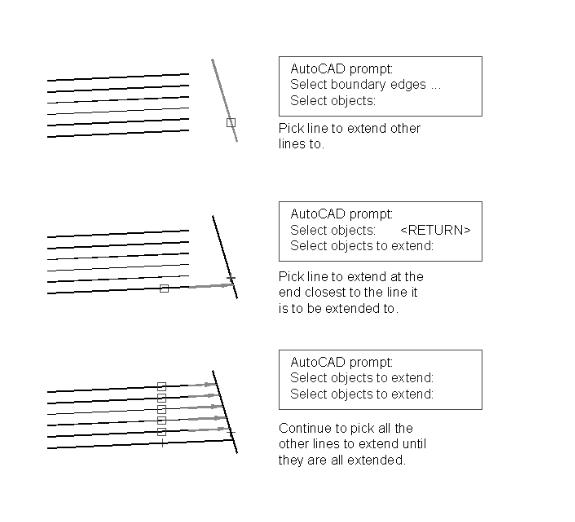
You can use AutoLISPs' ssget function to help you simplify the processing of multiple objects. Figure 10.1 shows a sketch of how a multiple extend program might work manually and Figure 10.2 shows the actual program derived from that sketch.
Figure 10.1: Sketch of process using extend.
213
Copyright © 2001 George Omura,,World rights reserved

The ABC’s of AutoLISP by George Omura
;Program to extend multiple lines - Mlext.lsp ------------------------------- |
|
||
(defun c:MLEXT (/ x y sset1 count pt1 pt2 int obj elst) |
|
||
(graphscr) |
|
|
;shift to graphics |
(princ "\nSelect Boundary edge...") |
;print prompt |
||
(setq obj (car (entsel))) |
|
|
;Get entity name |
(setq x (getpoint "\nPick axis crossing lines to extend: ")) |
|||
(setq y (getpoint x "\nPick endpoint: ")) |
;get axis crossing lines |
||
(setq sset1 (ssget "c" x y)) |
;get entities to extend |
||
(setq count 0) |
|
|
;set counter |
(if (/= sset1 |
nil) |
|
;test for selection set |
(while (< |
count (sslength sset1)) |
;while still select. set |
|
(setq |
elst |
(entget (ssname sset1 count)) ;get entity name |
|
|
pt1 |
(cdr (assoc 10 elst)) |
;get one endpoint |
|
pt2 |
(cdr (assoc 11 elst)) |
;get other endpoint |
|
int |
(inters x y pt1 pt2) |
;find intersection |
);end |
setq |
|
of axis and line |
(command "extend" obj "" int "") |
;command to extend line |
||
(setq |
count (1+ count)) |
;go to next line count |
|
);end while |
|
|
|
);end if |
|
|
|
);end defun |
|
|
|
Figure 10.2: The Mlext.lsp file
1.Open a file called Mlext.lsp and copy the program from figure 10.2 into your file. Start AutoCAD and open a new file called chapt10. Remember to add the equal sign at the end of the file name.
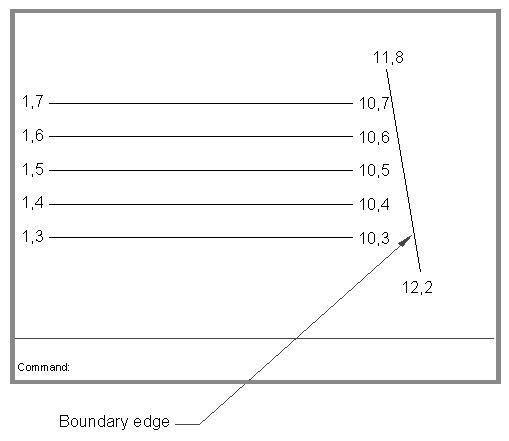
2.Draw the drawing shown in figure 10.3. The figure indicates the coordinate location of the endpoints so you can duplicate the drawing exactly. Do not include the text indicating the coordinates.
3.Load the Mlext.lsp file and enter mlext at the command prompt. When you see the prompt
Select boundary edges...
Select object:
pick the line labeled boundary edge in figure 10.3. At the next prompt
Pick axis crossing lines to extend:
214
Copyright © 2001 George Omura,,World rights reserved
The ABC’s of AutoLISP by George Omura
4.A rubber banding line representing the crossing axis appears. Pick a point at coordinate 8,2. You can use on the snap mode and dynamic coordinate readout to help you locate this point.
5.At the next prompt
Pick endpoint:
pick a point at coordinate 8,9. The lines that are crossed by the axis are extended to the boundary edge line. Lets look at how this program works.
Figure 10.3: Lines drawn in the chapt10 file
Let's look at how this program works. The first expression in the program is:
(graphscr)
This simply flips the display to the graphics screen in case the user is currently in Text mode. Another function
215
Copyright © 2001 George Omura,,World rights reserved
The ABC’s of AutoLISP by George Omura
called Textscr does just the opposite. It flips the display into text mode if the current screen is in a graphics mode.
Next, the Mlext finds the line used to extend to:
(princ "\nSelect boundary edge...")
(setq obj (car (entsel)))
Here we use entsel to obtain the object name. Since entsel returns a two element list containing the name and pick coordinate, we use car to extract the object name from the list. Also note that we use a prompt similar to the one used by the extend command.
The next several lines creates a selection set of lines to extend:
(setq x (getpoint "\nPick axis crossing lines to extend: ")) (setq y (getpoint x "\nPick endpoint: "))
(setq sset1 (ssget "c" x y))
Here two points are obtained indicating an axis along which the lines to be extended lie. These points will be used later to help find other pick points. Then ssget is used with the crossing option to create a selection set. The two points defining the axis are used as the two corner points of the crossing window.
The next two lines do some setup work:
(setq count 0)
(if (/= sset1 nil)
The first of these two lines set a counting variable to zero. The next line checks to make sure a set of objects has indeed been selected and a selection set created.
Once these things have been established, the actual work is done:
(while (< count (sslength sset1))
(setq elst (entget (ssname sset1 count)) (setq pt1 (cdr (assoc 10 elst)))
(setq pt2 (cdr (assoc 11 elst))) (setq int (inters x y pt1 pt2)) (command "extend" obj "" int "") (setq count (1+ count))
);end while
216
Copyright © 2001 George Omura,,World rights reserved
The ABC’s of AutoLISP by George Omura
This while expression is evaluated until the counter variable count reaches the total number of objects in the selection set sset1. Each time the expression is evaluated, count is increased by one until count equals the length of the selection set. Lets look at what each iteration of the while expression does.
Finding the Number of Objects in a Selection Set
First, the while expression checks to see if the counting variable count is less than the total number of elements in the selection set sset1. This is done through the sslength function:
(while )< count (sslength ssget1))
Sslength simply returns the number of objects in its selection set argument. The argument can be the actual selections set or a symbol representing it. In our example, the symbol ssget1 is used. If count is less than the number of objects, we know that we haven't processed all the objects in the selection set, in which case, the expressions that follow are evaluated.
Next, the variable elst is given the object name of an object in the selection set:
(setq elst (entget (ssname sset1 count)))
The count variable is used by ssname to determine which object in the selection set sset1 is to be examined. Entget then extracts the property list for that object and this list is assigned to the variable elst.
Next, the two endpoints of the objects are extracted:
(setq pt1 (cdr (assoc 10 elst)))
(setq pt2 (cdr (assoc 11 elst)))
Here the Assoc function is used to extract the two endpoint coordinates from the property list. The group codes 10 and 11 are used by Assoc to locate the sublist in elst containing the coordinates in question (see appendix C for a full list of group codes and their meaning). These coordinates are assigned to variables pt1 and pt2.
Once the endpoint's coordinates are found, a function called inters is used to find the intersection point of the current object being examined and the object crossing axis derived in the beginning of the function:
(setq int (inters x y pt1 pt2))
Inters is a function finds the intersecting point of two pairs of coordinates. Inters syntax is:
(inters x1 y1 x2 x2 )
where x1 and y1 are the x and y coordinates of one axis and x2 and y2 are the coordinates of the second axis. Inters returns a list containing the coordinates of the intersection of the two axes. In the Mlext program, this list is assigned to the variable int.
Finally, the command function is used to invoke the extend command and extends the current object:
(command "extend" obj "" int "")
217
Copyright © 2001 George Omura,,World rights reserved

The ABC’s of AutoLISP by George Omura
The first thing that the extend command asks for is the line to extend to. Here, obj is used to indicate that line. A return is issued to end the selection process then a point value is entered to indicate both the line to be extended and the location of the extend side. In this case, the intersection point of the line and the extend axis is used for this purpose. Finally, a return is issued to end the extend command.
The last line in the while expression increases the value of count by one in preparation to get the next object in the selection set.
(setq count (1+ count))
If count is still less than the number of objects in the selection set, the process repeats itself.
Since the Extend and Trim commands work in a nearly identical way, you can create a program that performs both multiple extends or trims on lines by changing just a few elements in the Mlext program. Figure 10.4 shows such a program called Etline. The elements that are changed from Mlext are indicated in the comment.
;program to extend or trim |
multiple lines --Etline.lsp------------------------ |
|||
(defun c:ETLINE (/ x y u sset1 count pt1 pt2 int obj) |
|
|||
(graphscr) |
|
|
|
;shift to graphics |
(initget "Extend Trim") |
|
|
;ADDED set keywords |
|
(setq EorT (getkword "\Extend or <Trim>: ")) |
;ADDED select operation |
|||
(if (equal EorT "")(setq EorT "Trim")) |
;ADDED test operation choice |
|||
(princ "\nSelect boundary edge...") |
|
;print prompt |
||
(setq obj (car (entsel))) |
|
|
|
;Get entity name |
(setq x (getpoint "\nPick axis crossing lines to edit: |
")) |
|||
(setq y (getpoint x "\nPick endpoint: ")) |
|
;get axis crossing lines |
||
(setq sset1 (ssget "c" x y)) |
|
;get entities to extend |
||
(setq count 0) |
|
|
|
;set counter |
(if (/= sset1 |
nil) |
|
|
;test for selection set |
(while (< |
count (sslength sset1)) |
;while still select. set |
||
(setq |
elst |
(entget (ssname sset1 count)) ;get entity name |
||
|
pt1 |
(cdr (assoc 10 elst)) |
;get one endpoint |
|
|
pt2 |
(cdr (assoc 11 elst)) |
;get other endpoint |
|
|
int |
(inters x y pt1 pt2) |
;find intersection |
|
);end |
setq |
|
|
of axis and line |
(if (equal EorT "Extend") |
;ADDED Test for extend choice |
|||
(command "extend" obj "" int "") ;extend line or...
(command "trim" obj "" int "");ADDED trim line
);end if |
|
(setq count (1+ count)) |
;go to next line count |
);end while |
|
);end if |
|
);end progn |
|
Figure 10.4: Program to perform both extend an trim functions
218
Copyright © 2001 George Omura,,World rights reserved