


Adobe Photoshop Help |
|
Painting |
|
|
|
Using Help | Contents | Index |
Back |
253 |
•Replace Patterns to replace the current list with a different library. Select the library file you want to use, and click Load.
•A library file (displayed at the bottom of the palette menu). Click OK to replace the current list, or click Append to append the current list.
To rename a preset pattern:
1Select the pattern you want to rename, and choose Rename Pattern from the palette menu.
2Enter a new name for the pattern, and click OK.
To delete a preset pattern:
Do one of the following:
•Select the pattern you want to delete, and choose Delete Pattern from the palette menu.
•Hold down Alt (Windows) or Option (Mac OS), position the pointer over a pattern (the pointer turns into scissors), and click.
To save a set of preset patterns as a library:
1Choose Save Patterns from a Pattern pop-up palette menu.
2Choose a location for the pattern library, enter a filename, and click Save.
You can save the library anywhere. However, if you place the library file in the Presets/ Patterns folder inside the Photoshop program folder, the library name will appear at the bottom of the Pattern pop-up palette menus after you restart Photoshop.
To return to the default library of patterns:
Choose Reset Patterns from a Pattern pop-up palette menu. You can either replace the current list or append the default library to the current list.
If you receive a pattern stamp tool preset that uses an undefined pattern, or if you erase the preset you’re using by resetting or replacing the pattern library, choose New
Pattern from the Pattern pop-up palette menu to redefine the pattern.
Using the Pattern Maker
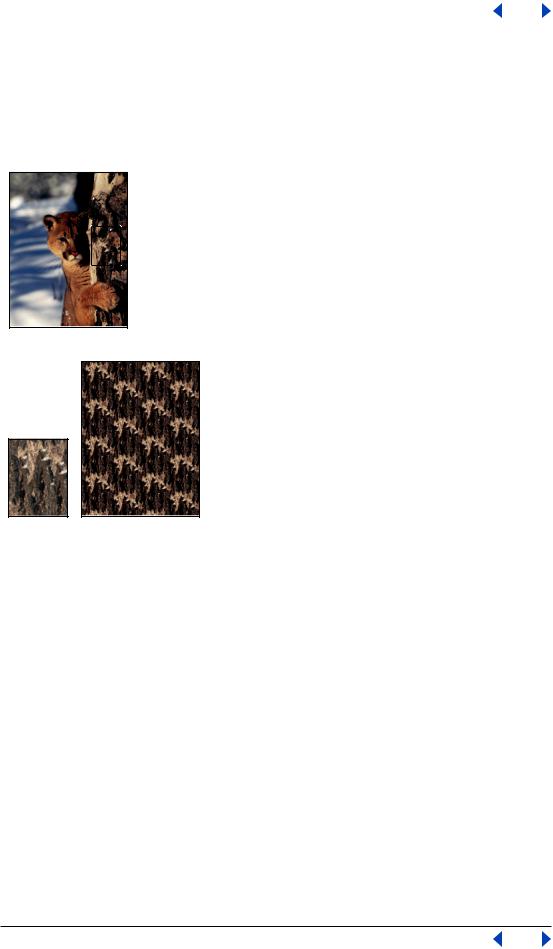
The Pattern Maker lets you create an infinite variety of patterns based on a selection or the contents of the Clipboard. Because the pattern is based on the pixels in a sample, it shares visual characteristics with the sample. For example, if you sample an image of grass, the Pattern Maker generates a tileable pattern that is different from the sample but still appears to be grass.You can generate multiple patterns from the same sample, and save pattern tiles as preset patterns for future use in Photoshop and ImageReady.
Note: The Pattern Maker command is available only for 8-bit images in RGB Color, CMYK Color, Lab Color, and Grayscale image modes.
Using Help | Contents | Index |
Back |
253 |
Adobe Photoshop Help |
|
Painting |
|
|
|
Using Help | Contents | Index |
Back |
254 |
Generating patterns
The Pattern Maker generates patterns by rearranging the pixels in a sampled area to create a tile. The size of a tile can vary, from 1 pixel by 1 pixel to the dimensions of the active layer. If the tile is smaller than the active layer, the pattern is made up of multiple tiles that are laid out in a grid to fill the layer. If the tile is the same size as the active layer, it comprises the entire pattern.
Original image. Pixels in selected area are sampled to create a tile.
A B
Generated pattern:
A. Single tile B. Tiled pattern
Note: If the transparency of the active layer is locked, the Pattern Maker does not change the transparency of the layer when it tiles with a generated pattern.
To generate a pattern:
1 Do one of the following:
•Select the layer that contains the area from which you want to generate the pattern. The layer you select will be replaced by the generated pattern, so it’s a good idea to make a copy of the layer first.
•To generate a pattern in a new layer or file, select the pixels from which you want to generate the pattern, and choose Edit > Copy.Then add a layer to the image, or create a new file with the dimensions you want the final image to have.
Note: You cannot generate a pattern from a non-rectangular sample. If you make a nonrectangular selection, Photoshop uses the bounding box of the selected area to create a rectangular sample.
2 Choose Filter > Pattern Maker.
Using Help | Contents | Index |
Back |
254 |

Adobe Photoshop Help |
|
Painting |
|
|
|
Using Help | Contents | Index |
Back |
255 |
3 Do one of the following:
•If you are generating a pattern in the same layer that contains the sample, select the
rectangular marquee tool  in the Pattern Maker dialog box, and select the area from which you want to generate the pattern. To move the selection marquee, drag it to a different location.
•If you are generating a pattern in a new layer or file, select Use Clipboard as Sample in the Pattern Maker dialog box.
4 Specify the dimensions of tiles in the generated pattern by doing one of the following:
•Enter pixel values in the Width and Height text boxes, or drag the pop-up sliders.
•Click Use Image Size to use the image size as the tile size. Selecting this option produces a pattern with a single tile.
5To offset the tiles in the generated pattern, choose a direction from the Offset pop-up menu and specify an offset amount by entering a value in the Amount text box or dragging the Amount pop-up slider. The offset amount is a percentage of the tile dimension in the specified direction.
6Click Generate. The preview area is tiled with the generated pattern. (See “Previewing patterns” on page 255.)
You can view the status of the current generation in the Photoshop status bar. Press Esc to cancel the generation.
7 Click Generate Again to generate additional patterns using the same options, or adjust the options and then click Generate Again.
You can navigate through the generated tiles using the Tile History panel. (See “Reviewing tiles and pattern previews” on page 256.)
8 When you are satisfied with a pattern preview and you have saved the tiles that you might want to use in the future, click OK. (See “Reviewing tiles and pattern previews” on page 256.)
Previewing patterns
The Pattern Maker dialog box provides tools and options for previewing generated patterns. You can magnify and navigate in the preview image just as you do in the Photoshop document window. You can also show or hide tile boundaries and switch between previewing the original image and the generated pattern.
To magnify and reduce the preview image:
1Select the zoom tool  in the Pattern Maker dialog box.
2Click in the preview image to zoom in, or hold down Alt (Windows) or Option (Mac OS), and click in the preview image to zoom out.
The magnification level appears at the bottom of the dialog box.
To navigate in the preview image:
Select the hand tool  in the Pattern Maker dialog box, and drag in the preview image. Alternately, hold down the spacebar, and drag in the preview image.
Using Help | Contents | Index |
Back |
255 |
Adobe Photoshop Help |
|
Painting |
|
|
|
Using Help | Contents | Index |
Back |
256 |
To display tile boundaries in the preview image:
Select Tile Boundaries in the Preview section of the Pattern Maker dialog box. To choose a different color for tile boundaries, click the color swatch.
To switch between the generated pattern and the original image:
Choose an option from the Show pop-up menu in the Preview section of the Pattern Maker dialog box.
When previewing the original image, you change the sample area using the rectangular marquee tool. The new sample will be used for the next generation.
Reviewing tiles and pattern previews
The Tile History section of the Pattern Maker dialog box lets you review all the pattern previews you have generated. You can navigate through pattern previews, delete pattern previews, and save tiles as preset patterns.
Important: When you save a tile as a preset pattern, only a single tile is saved, not the full, generated pattern.
To navigate through tiles and pattern previews:
Do one of the following:
•Click the First Tile button  , Previous Tile button
  , Next Tile button
  , or Last Tile button
  .
.
•Type the number of the pattern preview you want to view, and press Enter (Windows) or Return (Mac OS).
If the Update Pattern Preview option is selected, the full pattern is regenerated in the preview area. If the Update Pattern Preview option is deselected, only the tile thumbnail changes.
Deselect Update Pattern Preview to quickly review tiles. When you find the desired tile, select Update Pattern Preview to regenerate the preview.
To delete a tile and pattern preview:
Navigate to the tile you want to delete, and click the Trash button  .
.
To save a tile as a preset pattern:
1Navigate to the tile you want to save, and click the Preset button  .
.
2Enter a preset name, and click OK.
You can create and manage libraries of presets using the Preset Manager. (See “Managing libraries with the Preset Manager (Photoshop)” on page 54.)
Using Help | Contents | Index |
Back |
256 |