


Adobe Photoshop Help |
|
Selecting |
|
|
|
Using Help | Contents | Index |
Back |
167 |
To use anti-aliasing:
1Select the lasso, polygonal lasso, magnetic lasso, rounded rectangle marquee (ImageReady), elliptical marquee, or magic wand tool.
2Select Anti-aliased in the options bar.
To define a feathered edge for a selection tool:
1Select any of the lasso or marquee tools.
2Enter a Feather value in the options bar. This value defines the width of the feathered edge and can range from 1 to 250 pixels.
To define a feathered edge for an existing selection:
1Choose Select > Feather.
2Enter a value for the Feather Radius, and click OK.
Note: A small selection made with a large feather radius may be so faint that its edges are invisible and thus not selectable. If a message appears stating “No pixels are more than 50% selected,” either decrease the feather radius or increase the selection’s size. Or click OK to accept the mask at its current setting and create a selection where you cannot see the edges.
A B
C D
Selection without feathering and with feathering:
A. Original selection B. Feather: 0 C. Feather: 10 D. Feather: 30
Moving, copying, and pasting selections and layers
You can move or copy selections and layers within or between images—and also between images in other applications.
Moving selections and layers within an image
The move tool lets you drag a selection or layer to a new location in the image. With the Info palette open, you can track the exact distance of the move.You can also use the move tool to align selections and layers and distribute layers within an image.
Using Help | Contents | Index |
Back |
167 |

Adobe Photoshop Help |
|
Selecting |
|
|
|
Using Help | Contents | Index |
Back |
168 |
To specify move tool options:
1Select the move tool  .
.
2Select any of the following in the options bar:
•Auto Select Layer to select the topmost layer that has pixels under the move tool, rather than the selected layer.
•Show Bounding Box to display the bounding box around the selected item.
To move a selection or layer: 1 Select the move tool  .
.
To activate the move tool when another tool is selected, hold down Ctrl (Windows) or Command (Mac OS). (This technique does not work with the pen tool  , freeform pen
  , path selection tool
  , direct selection tool
  , hand tool
  , slice select tool
  , or anchor point tools

 .) Hold down Command (Mac OS) to activate the move tool when using the shape tools


 .
.
2 Do one of the following:
•Move the pointer inside the selection border, and drag the selection to a new position. If you have selected multiple areas, all move as you drag.
•Select the layer you want to move. Then drag the layer to a new position.
To align selections and layers within an image:
1 Do one of the following:
•To align the content of a layer to a selection, make a selection in the image. Then select a layer in the Layers palette.
•To align the contents of multiple layers to a selection border, make a selection in the image. Then link together the layers you want to align in the Layers palette.
(See “Linking layers” on page 289.
•To align the contents of layers with the content of the active layer, link the layers you want to align to the active layer. (See “Linking layers” on page 289.)
2Select the move tool  .
.
3Click one or more alignment buttons in the options bar: Align Top Edges  , Align Vertical Centers
  , Align Bottom Edges
  , Align Left Edges
  , Align Horizontal Centers
  , or Align Right Edges
  .
.
To distribute layers within an image:
1In the Layers palette, link three or more layers. (See “Linking layers” on page 289.)
2Select the move tool  .
.
3Click one or more distribute buttons in the options bar: Distribute Top Edges  , Distribute Vertical Centers
  , Distribute Bottom Edges
  , Distribute Left Edges
  , Distribute Horizontal Centers
  , or Distribute Right Edges
  .
.
Using Help | Contents | Index |
Back |
168 |

Adobe Photoshop Help |
|
Selecting |
|
|
|
Using Help | Contents | Index |
Back |
169 |
Copying selections or layers
You can use the move tool to copy selections as you drag them within or between images, or you can copy and move selections using the Copy, Copy Merged, Cut, and Paste commands. Dragging with the move tool saves memory because the Clipboard is not used as it is with the Copy, Copy Merged, Cut, and Paste commands.
•The Copy command copies the selected area on the active layer.
•The Copy Merged command makes a merged copy of all the visible layers in the selected area.
•The Paste command pastes a cut or copied selection into another part of the image or into another image as a new layer.
(Photoshop) The Paste Into command pastes a cut or copied selection inside another selection in the same image or different image. The source selection is pasted onto a new layer, and the destination selection border is converted into a layer mask. (See “Masking layers” on page 314.)
Keep in mind that when a selection or layer is pasted between images with different resolutions, the pasted data retains its pixel dimensions. This can make the pasted portion appear out of proportion to the new image. Use the Image Size command to make the source and destination images the same resolution before copying and pasting. (See “Determining a recommended resolution for an image (Photoshop)” on page 68.)
Depending on your color management settings and the color profile associated with the file (or imported data), you may be prompted to specify how to handle color information in the file (or imported data). For more information, see “About color management policies” on page 106.
To copy a selection:
1Select the area you want to copy.
2Choose Edit > Copy or Edit > Copy Merged.
To copy a selection while dragging:
1Select the move tool  , or hold down Ctrl (Windows) or Command (Mac OS) to activate the move tool.
2Hold down Alt (Windows) or Option (Mac OS), and drag the selection you want to copy and move.
When copying between images, drag the selection from the active image window into the destination image window. If nothing is selected, the entire active layer is copied. As you drag the selection over another image window, a border highlights the window if you can drop the selection into it.
To create multiple copies of a selection within an image:
1Select the move tool  , or hold down Ctrl (Windows) or Command (Mac OS) to activate the move tool.
2Copy the selection:
•Hold down Alt (Windows) or Option (Mac OS), and drag the selection.
•To copy the selection and offset the duplicate by 1 pixel, hold down Alt or Option, and press an arrow key.
Using Help | Contents | Index |
Back |
169 |
Adobe Photoshop Help |
|
Selecting |
|
|
|
Using Help | Contents | Index |
Back |
170 |
•To copy the selection and offset the duplicate by 10 pixels, press Alt+Shift (Windows) or Option+Shift (Mac OS), and press an arrow key.
As long as you hold down Alt or Option, each press of an arrow key creates a copy of the selection and offsets it by the specified distance from the last duplicate.
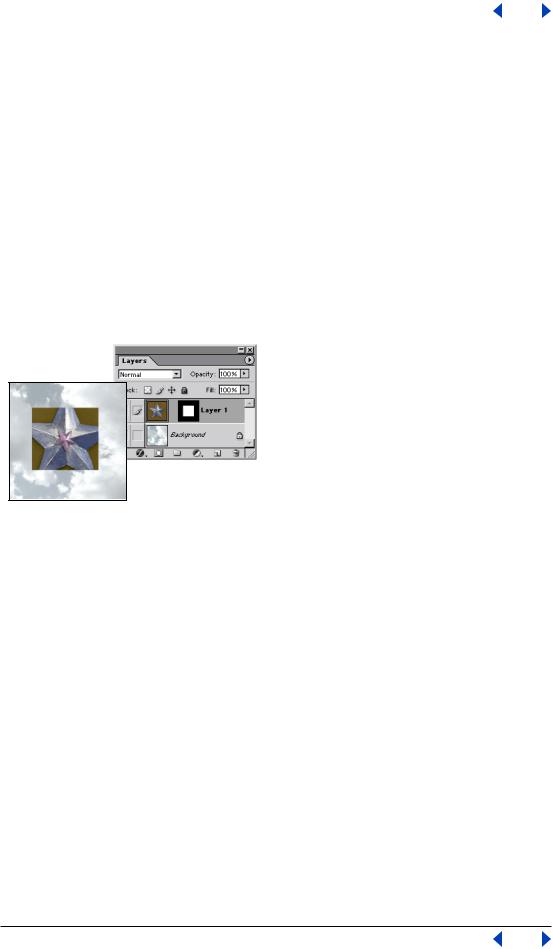
To paste one selection into another (Photoshop):
1Cut or copy the part of the image you want to paste.
2Select the part of the image into which you want to paste the selection. The source selection and the destination selection can be in the same image or in two different Photoshop images.
3Choose Edit > Paste Into. The contents of the source selection appear masked by the destination selection.
In the Layers palette, the layer thumbnail for the source selection appears next to the layer mask thumbnail for the destination selection. The layer and layer mask are unlinked— that is, you can move each one independently.
Source selection pasted into destination selection
For more information on editing layer masks, see “Applying and discarding layer masks” on page 318.
4Select the move tool  , or hold down the Ctrl (Windows) or Command (Mac OS) key to activate the move tool. Then drag the source contents until the part you want appears through the mask.
5To reveal more or less of the image underlying the layer, click the layer mask thumbnail in the Layers palette, select a painting tool, and edit the mask:
•To hide more of the image underlying the layer, paint the mask with black.
•To reveal more of the image underlying the layer, paint the mask with white.
•To partially reveal the image underlying the layer, paint the mask with gray.
6 If you are satisfied with your results, you can choose Layer > Merge Down to merge the new layer and layer mask with the underlying layer and make the changes permanent.
Using drag and drop to copy between applications
The drag-and-drop feature lets you copy and move images between Photoshop or ImageReady and other applications.
Using Help | Contents | Index |
Back |
170 |